
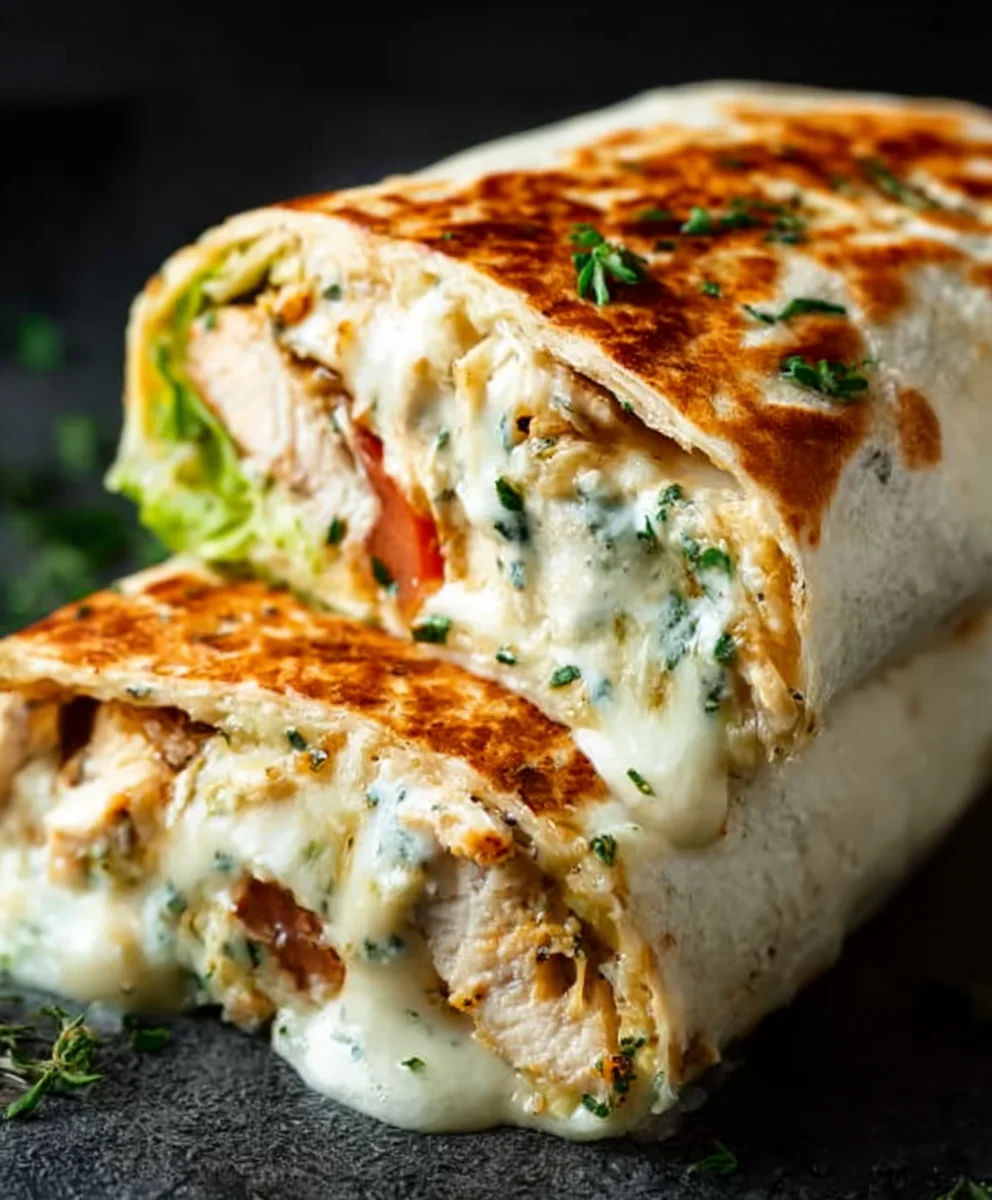
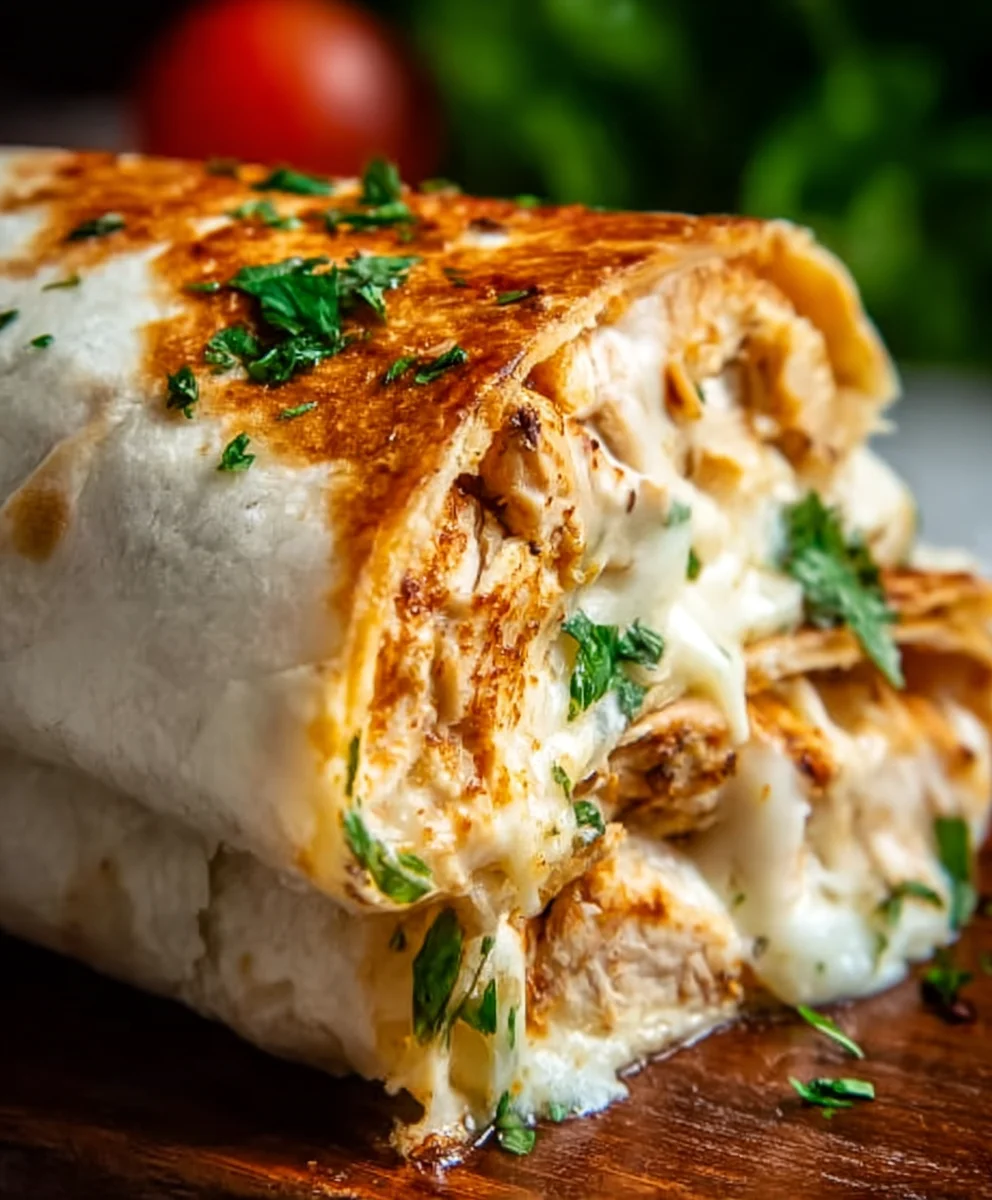
Cheesy Chicken Garlic Wraps are more than just a meal; they’re a warm hug on a plate, a symphony of savory flavors that dance across your taste buds. There’s something incredibly comforting and satisfying about biting into a perfectly grilled tortilla, bursting with tender chicken, melty cheese, and an irresistible punch of garlic. It’s no wonder these wraps have become a go-to for busy weeknights, quick lunches, or even casual entertaining. The magic lies in the simplicity and the bold, crowd-pleasing combination. We all love that moment when the cheese pulls away, gooey and delicious, and the aromatic garlic hints at the flavor explosion to come. This recipe elevates the humble wrap to new heights, offering a delightful balance of textures and tastes that will have you coming back for more. Get ready to discover your new favorite way to enjoy Cheesy Chicken Garlic Wraps!

Ingredients:
- 2 large chicken breasts, diced into bite-sized pieces
- 4 large flour tortillas
- 1 tablespoon olive oil
- 2 teaspoons garlic powder
- 1 teaspoon onion powder
- 1 teaspoon paprika
- Salt and freshly ground black pepper, to taste
- 1 cup shredded cheddar cheese
- 1/2 cup shredded mozzarella cheese
- 1/2 cup creamy garlic sauce
- Fresh parsley, chopped, for garnish
Preparing the Chicken
Sautéing the Chicken
Begin extract by preparing your chicken. In a medium bowl, toss the diced chicken breasts with the olive oil. This will ensure the chicken doesn’t stick to the pan and helps it cook evenly. Next, season the chicken generously with salt and pepper. Don’t be shy with the seasoning; it’s crucial for building flavor in the wraps. Add the garlic powder, onion powder, and paprika to the bowl. Toss everything together until each piece of chicken is thoroughly coated with the spices. The paprika will give the chicken a lovely color and a subtle smoky undertone.
Now, heat a large skillet or frying pan over medium-high heat. Once the pan is hot, carefully add the seasoned chicken in a single layer. Avoid overcrowding the pan; if necessary, cook the chicken in two batches to ensure it browns properly rather than steaming. Cook the chicken for about 5-7 minutes per side, or until it is golden brown and cooked through. You want to see a nice sear on each piece. Remove the cooked chicken from the skillet and set it aside on a plate. Let it cool slightly before proceeding.
Assembling the Wraps
Warming the Tortillas
While the chicken is cooling, it’s time to prepare your tortillas. Warm tortillas are much more pliable and less likely to tear when you’re rolling them. You have a few options here. You can warm them one by one in a dry skillet over medium heat for about 20-30 seconds per side until they are soft and flexible. Alternatively, you can wrap a stack of tortillas in a damp paper towel and microwave them for about 30-45 seconds, or until they are warmed through. Another method is to carefully warm them directly over a low gas flame on your stovetop for a few seconds per side, being very cautious not to burn them. Choose the method that you find easiest and most effective.
Building the Flavor Base
Once your tortillas are warm and pliable, it’s time to assemble the wraps. Lay one warm tortilla flat on a clean work surface. Spread a generous amount of the creamy garlic sauce evenly over the surface of the tortilla, leaving a small border around the edges. This sauce is the flavor powerhouse, so don’t skimp on it. The creamy texture will bind all the ingredients together beautifully.
Adding the Chicken and Cheese
Next, evenly distribute the cooked chicken pieces over the garlic sauce. Aim to spread it out so that each bite of the wrap will have a good portion of chicken. Now, sprinkle the shredded cheddar cheese and shredded mozzarella cheese over the chicken. The combination of cheddar and mozzarella provides a wonderful balance of sharp, nutty flavor from the cheddar and a delightful, melty stretch from the mozzarella. You want a good amount of cheese so that it melts into a gooey, irresistible filling.
Finishing the Wraps
Rolling and Securing
To roll the wraps, first fold in the sides of the tortilla towards the center, over the filling. Then, starting from the edge closest to you, tightly roll up the tortilla to enclose the filling completely. If your tortilla is proving difficult to keep closed, you can secure it with a toothpick or a small piece of parchment paper wrapped around the seam. Repeat this process for the remaining three tortillas.
Toasting for Extra Deliciousness
For an extra layer of flavor and a delightful crunch, you can lightly toast the assembled wraps. Heat a clean skillet over medium heat. Place the rolled wraps seam-side down in the skillet. Cook for about 2-3 minutes per side, or until the tortillas are golden brown and lightly crispy. This step is optional but highly recommended, as it adds a wonderful texture and further melds the flavors.
Serving the Cheesy Chicken Garlic Wraps
Once the wraps have been toasted (or simply assembled if you skipped the toasting step), arrange them on a serving platter. Garnish generously with freshly chopped parsley. The vibrant green of the parsley adds a lovely visual appeal and a burst of fresh flavor that cuts through the richness of the cheese and chicken. Serve immediately while the cheese is still wonderfully melted and gooey. These Cheesy Chicken Garlic Wraps are perfect for a quick lunch, a casual dinner, or even as a satisfying snack. Enjoy every cheesy, garlicky bite!
Conclusion:
And there you have it – your very own batch of delicious Cheesy Chicken Garlic Wraps! We hope you enjoyed the process of creating these flavorful and satisfying wraps. They’re perfect for a quick weeknight dinner, a hearty lunch, or even a fun appetizer when entertaining guests. The combination of tender chicken, pungent garlic, and gooey cheese wrapped in a soft tortilla is simply irresistible.
For serving suggestions, these Cheesy Chicken Garlic Wraps pair wonderfully with a crisp green salad, a side of sweet potato fries, or even a simple bowl of tomato soup. Don’t be afraid to get creative with your toppings! A dollop of sour cream, a sprinkle of fresh chives, or a dash of your favorite hot sauce can elevate these wraps to the next level.
If you’re feeling adventurous, try adding some sautéed bell peppers and onions to the filling, or swap out the cheddar cheese for mozzarella or pepper jack for a different cheesy experience. You can even experiment with different herbs like parsley or oregano for an extra layer of flavor. We truly encourage you to make these Cheesy Chicken Garlic Wraps your own. Happy cooking!
Frequently Asked Questions:
Can I make these Cheesy Chicken Garlic Wraps ahead of time?
Yes, you can! You can prepare the chicken and garlic mixture a day in advance and store it in the refrigerator. However, it’s best to assemble and warm the wraps just before serving to ensure the tortilla is soft and the cheese is perfectly melted.
What kind of chicken is best for these Cheesy Chicken Garlic Wraps?
Boneless, skinless chicken breasts or thighs work exceptionally well for this recipe. Both are lean and tender, making them easy to shred or dice after cooking. Ensure the chicken is cooked through before shredding or dicing it for the filling.
Cheesy Chicken Garlic Wraps
Easy and delicious wraps filled with seasoned chicken, melted cheddar and mozzarella cheese, and a creamy garlic sauce.
Ingredients
-
2 large chicken breasts, diced
-
4 large flour tortillas
-
1 tablespoon olive oil
-
2 teaspoons garlic powder
-
1 teaspoon onion powder
-
1 teaspoon paprika
-
Salt and freshly ground black pepper, to taste
-
1 cup shredded cheddar cheese
-
1/2 cup shredded mozzarella cheese
-
1/2 cup creamy garlic sauce
-
Fresh parsley, chopped, for garnish
Instructions
-
Step 1
Season diced chicken with olive oil, salt, pepper, garlic powder, onion powder, and paprika. Cook in a skillet until golden brown and cooked through. Set aside. -
Step 2
Warm the flour tortillas until pliable. This can be done in a dry skillet, microwave, or carefully over a low gas flame. -
Step 3
Spread creamy garlic sauce evenly over each warm tortilla, leaving a small border. -
Step 4
Distribute the cooked chicken evenly over the garlic sauce on each tortilla. Sprinkle generously with shredded cheddar and mozzarella cheese. -
Step 5
Fold in the sides of each tortilla towards the center, then tightly roll up from the bottom to enclose the filling. Secure with a toothpick if needed. -
Step 6
Optional: Lightly toast the rolled wraps in a skillet over medium heat for 2-3 minutes per side until golden brown and lightly crispy. -
Step 7
Garnish the wraps with freshly chopped parsley and serve immediately while the cheese is melted and gooey.
Important Information
Nutrition Facts (Per Serving)
It is important to consider this information as approximate and not to use it as definitive health advice.
Allergy Information
Please check ingredients for potential allergens and consult a health professional if in doubt.
Leave a Comment