
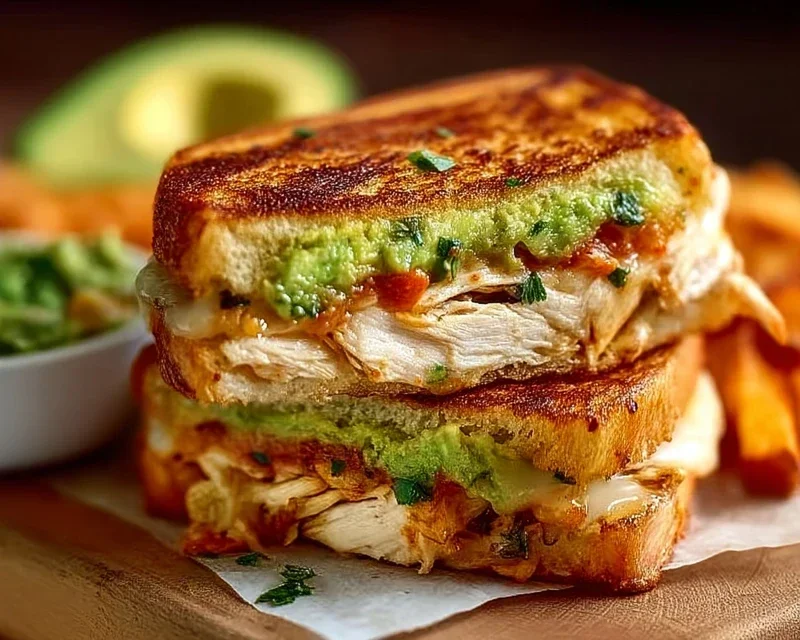
Chicken Avocado Melt Sandwich dreams are made of this! If you’re searching for that perfect bite – the one that’s creamy, savory, and utterly satisfying – then look no further. This isn’t just any sandwich; it’s a symphony of textures and flavors that has captured the hearts (and stomachs) of countless food lovers. What makes this particular iteration of the Chicken Avocado Melt Sandwich so beloved? It’s the magical interplay between tender, juicy chicken, the luxurious richness of perfectly ripe avocado, and the irresistible pull of melted cheese. It’s comfort food elevated, a simple yet sophisticated creation that’s perfect for a quick lunch, a cozy dinner, or even a decadent breakfast. Get ready to experience a sandwich that’s as delightful to make as it is to devour.

Chicken Avocado Melt Sandwich
There’s something incredibly satisfying about a well-made melt sandwich. It’s warm, gooey, and packed with flavor. When you combine tender chicken, creamy avocado, melty cheese, and a hint of tang from Dijon mustard, you get a sandwich that’s not just lunch, it’s an experience. This Chicken Avocado Melt Sandwich is my go-to when I’m craving something hearty yet fresh. The best part? It’s surprisingly easy to put together, making it perfect for a quick weeknight dinner or a leisurely weekend lunch. Let’s get started!
Ingredients:
Preparing the Chicken
The foundation of this delicious melt is perfectly cooked chicken. We want it to be juicy and flavorful, ready to be nestled into our sandwich.
1. Start by prepping your chicken breasts. If they are particularly thick, you can pound them gently with a meat mallet or the bottom of a heavy pan to ensure even cooking. This step is crucial for preventing one part of the chicken from being overcooked while another is still underdone. Season both sides generously with salt and pepper. Don’t be shy with the seasoning; it makes a big difference in the final taste.
2. Heat the tablespoon of olive oil in a skillet over medium-high heat. Once the oil is shimmering, carefully add the seasoned chicken breasts. Cook for about 5-7 minutes per side, or until the chicken is cooked through and reaches an internal temperature of 165°F (74°C). The exact cooking time will depend on the thickness of your chicken breasts. Once cooked, remove the chicken from the skillet and let it rest on a cutting board for about 5 minutes. Resting the chicken allows the juices to redistribute, resulting in a much moister and more tender bite. After resting, you can either slice the chicken or shred it, depending on your preference. I usually like to slice it into bite-sized pieces for easier layering in the sandwich.
Assembling the Sandwich
Now for the fun part – bringin extractg all those wonderful ingredients together!
3. While the chicken is resting, prepare your sandwich spread. In a small bowl, mix together the mayonnaise and Dijon mustard. This simple combination adds a creamy tang that perfectly complements the richness of the avocado and cheese. Spread this mixture evenly on the inside of all four slices of bread. This not only adds flavor but also acts as a barrier, preventing the bread from becoming soggy.
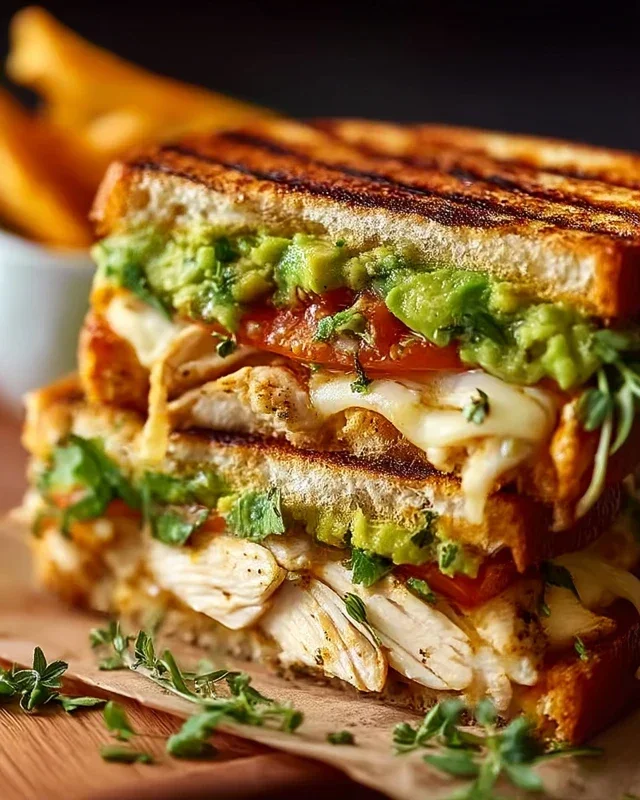
4. Now, let’s build our masterpiece. On two of the bread slices (the bottom halves of your sandwiches), layer your ingredients. Start with a generous layer of your prepared chicken. Next, arrange the thinly sliced red onion and tomato slices over the chicken. The slight bite of the red onion and the freshness of the tomato add wonderful contrasting textures and flavors.
5. The star of the show, the avocado, comes next. Carefully arrange the avocado slices over the tomato and onion. Try to distribute them evenly so you get a bit of creamy avocado in every bite. Finally, top the avocado with your chosen cheese slices. Make sure the cheese covers the avocado well, as it will melt and bind everything together. Now, place the remaining two bread slices (spread-side down) on top to complete your sandwiches.
Grilling the Melts
The final step is to achieve that perfect golden-brown, crispy exterior and a molten, gooey interior.
6. Heat a clean skillet or griddle over medium heat. Add a bit of butter or olive oil to the pan. Once the butter is melted and shimmering, or the oil is hot, carefully place the assembled sandwiches into the skillet. Grill for about 3-5 minutes per side. You’re looking for the bread to turn a beautiful golden-brown and for the cheese to be completely melted and gooey. Press down gently on the sandwiches with a spatula occasionally to ensure even cooking and to help the cheese melt. You want that irresistible melt factor! If your bread is browning too quickly before the cheese has melted, you can reduce the heat slightly or even cover the pan loosely for a minute or two to trap heat and encourage melting.
7. Once both sides of your sandwiches are golden brown and the cheese is wonderfully melted, carefully remove them from the skillet. Let them sit for just a minute before slicing them in half. This brief resting period helps the sandwich hold its shape and prevents the molten cheese from oozing out too much. Serve immediately and enjoy the incredible blend of textures and flavors! This sandwich is best enjoyed hot, so don’t wait too long after they come off the grill.
Conclusion:
There you have it – a delightful and incredibly satisfying Chicken Avocado Melt Sandwich! This recipe truly shines because it’s a perfect harmony of creamy avocado, tender chicken, gooey melted cheese, and a delightful crunch from toasted bread. It’s quick enough for a busy weeknight but special enough for a weekend brunch. I’ve found it’s wonderfully versatile, making it a go-to for lunches and light dinners alike. Don’t be afraid to experiment with the ingredients – that’s part of the fun! I really encourage you to give this Chicken Avocado Melt Sandwich a try; I’m confident you’ll love its fresh flavors and comforting meltiness.
For serving, this sandwich pairs beautifully with a crisp side salad, a bowl of tomato soup, or even some sweet potato fries. It’s a complete meal that feels both healthy and indulgent.
Frequently Asked Questions:
Can I use pre-cooked chicken for this recipe?
Absolutely! Rotisserie chicken or leftover cooked chicken breast works wonderfully and will save you even more time. Just make sure it’s seasoned to your liking.
What other cheeses work well in this melt?
While cheddar is fantastic, feel free to explore! Monterey Jack, pepper jack for a little heat, Gruyere for a nutty flavor, or even a creamy mozzarella would be delicious. The key is a cheese that melts well!
Are there any dairy-free alternatives?
Yes! You can use dairy-free cheese slices and ensure your mayonnaise (if using) is vegan. For the avocado, it’s naturally dairy-free and provides that essential creaminess.
Chicken Avocado Melt Sandwich
A delicious and satisfying grilled sandwich featuring tender chicken, creamy avocado, melted cheese, and fresh vegetables.
Ingredients
-
2 boneless skinless chicken breasts
-
Salt and pepper to taste
-
1 tablespoon olive oil
-
1 avocado, sliced
-
4 slices of Swiss cheese
-
4 slices of sourdough bread
-
2 tablespoons mayonnaise
-
1 tablespoon Dijon mustard
-
1 small red onion, thinly sliced
-
1 tomato, sliced
-
Butter for grilling the sandwiches
Instructions
-
Step 1
Season the chicken breasts with salt and pepper. Heat olive oil in a skillet over medium-high heat and cook the chicken for 6-8 minutes per side, or until cooked through. Let it rest and then slice. -
Step 2
In a small bowl, mix together the mayonnaise and Dijon mustard. Spread this mixture evenly on one side of each slice of bread. -
Step 3
Assemble the sandwiches: Layer the sliced chicken, avocado, red onion, tomato, and cheese on the bread slices (mayonnaise-side up). -
Step 4
Butter the outside of each sandwich. Heat a skillet or griddle over medium heat. -
Step 5
Grill the sandwiches for 4-5 minutes per side, or until the bread is golden brown and the cheese is melted and gooey. -
Step 6
Slice the sandwiches in half and serve immediately.
Important Information
Nutrition Facts (Per Serving)
It is important to consider this information as approximate and not to use it as definitive health advice.
Allergy Information
Please check ingredients for potential allergens and consult a health professional if in doubt.

Leave a Comment