
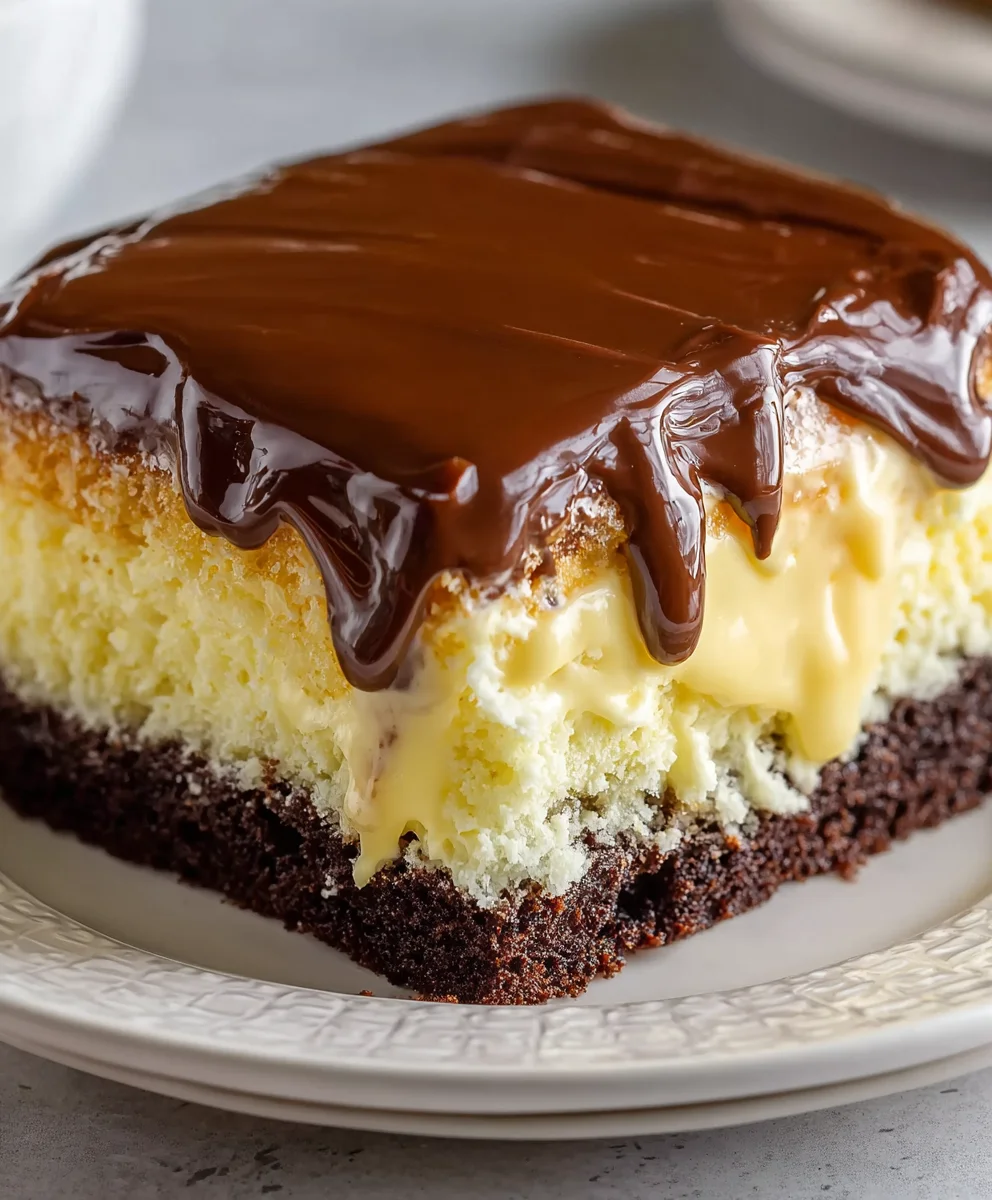
Boston Cream Poke Cake, oh, that glorious confection that whispers of childhood birthdays, cozy potlucks, and moments of pure, unadulterated joy! If you’ve ever had the pleasure of sinking your fork into its tender, pudding-filled depths, you already know its magic. It’s a dessert that’s as visually stunning as it is deliciously decadent, a true crowd-pleaser that never fails to elicit “oohs” and “aahs” from anyone lucky enough to be served a slice. What is it about this particular cake that captures our hearts and taste buds? Perhaps it’s the ingenious way the fluffy cake is pierced, allowing a creamy, vanilla-kissed pudding to seep into every nook and cranny, transforming a simple sponge into an irresistible treat. Or maybe it’s the luscious chocolate ganache topping, a silken river of cocoa that brings it all together in a symphony of flavors and textures. Whatever the secret ingredient, this Boston Cream Poke Cake is destined to become your new go-to dessert for any occasion that calls for something truly special.

Ingredients:
- 15.25 ounce box yellow cake mix
- Ingredients needed to make cake (eggs, oil, and water) – refer to your yellow cake mix box for specific quantities
- 2 (3.4 ounce) boxes instant vanilla or French vanilla pudding
- 4 cups milk
- 16 ounce tub chocolate frosting
Baking the Cake
First things first, let’s get our cake baked. Preheat your oven according to the yellow cake mix box directions, usually around 350°F (175°C). Grease and flour a 9×13 inch baking pan, or line it with parchment paper for easier removal later. In a large mixing bowl, combine the yellow cake mix with the eggs, oil, and water as specified on the cake mix packaging. Whisk or beat the ingredients together until smooth and well combined, being careful not to overmix, as this can result in a tough cake. Pour the batter evenly into your prepared baking pan. Place the pan in the preheated oven and bake for the time recommended on the cake mix box, typically between 28 to 35 minutes. To check for doneness, insert a toothpick into the center of the cake; it should come out clean. Once baked, let the cake cool in the pan on a wire rack for about 10-15 minutes before inverting it onto the wire rack to cool completely. Allowing the cake to cool is crucial for the next steps, so be patient! A completely cooled cake will hold its shape better and absorb the pudding more evenly.
Preparing the Pudding Filling
While the cake is cooling, we’ll prepare our luscious vanilla pudding filling. In a medium to large mixing bowl, combine the contents of both 3.4 ounce boxes of instant vanilla or French vanilla pudding. Pour in the 4 cups of cold milk. It’s important to use cold milk for instant pudding; warm milk won’t allow it to set up properly. Now, whisk vigorously for about 2 minutes, or until the pudding begins to thicken. You’ll notice it transform from a liquid to a smooth, creamy consistency. For the best results and to ensure no lumps form, continue whisking until you see the pudding start to firm up. Once it has reached a thick, spoonable texture, cover the bowl with plastic wrap, pressing the wrap directly onto the surface of the pudding to prevent a skin from forming. Place the pudding in the refrigerator to chill and set further while the cake finishes cooling.
Creating the Pudding Soaked Base
Once the yellow cake is completely cool, it’s time to get ready for that signature poke cake magic. Place the cooled cake back into the original 9×13 inch baking pan (or a clean one of the same size if you transferred it to a rack). Now, grab a wooden spoon handle, a straw, or even a skewer, and start poking holes all over the surface of the cake. You want to make a lot of holes, spaced about 1 to 2 inches apart, going all the way down to the bottom of the cake. The more holes you make, the more pudding the cake will absorb, leading to a wonderfully moist and flavorful Boston Cream Poke Cake. Don’t be shy with the poking! This step is essential for distributing the creamy pudding throughout the cake.
Infusing the Cake with Pudding
Now comes the truly delicious part! Take your chilled, thickened vanilla pudding out of the refrigerator. Give it a quick stir to loosen it up slightly. Carefully spoon the pudding evenly over the top of the poked cake, ensuring that the pudding fills all the holes you created. Use a spatula to spread any excess pudding gently over the entire surface of the cake. You want a nice, even layer of creamy pudding blanketing the cake. This is what will give your Boston Cream Poke Cake its signature moist texture and creamy center. Gently smooth the surface so it’s as level as possible.
Chilling and Frosting
Once the pudding has been spread over the poked cake, cover the entire pan tightly with plastic wrap or aluminum foil. Place the cake in the refrigerator and let it chill for at least 4 hours, or preferably overnight. This extended chilling time is crucial for allowing the pudding to fully set and seep into all those little holes, transforming the cake into a wonderfully moist and integrated dessert. After the chilling period, remove the cake from the refrigerator. Take your 16 ounce tub of chocolate frosting and, using a spatula or butter knife, spread the frosting evenly over the top of the chilled pudding layer. You can warm the frosting slightly in the microwave for about 10-15 seconds if it’s very firm, making it easier to spread. Ensure you cover the entire surface of the pudding for that classic Boston Cream look. Chill the cake again for at least 30 minutes before serving to allow the frosting to firm up.

Conclusion:
There you have it! You’ve mastered the art of creating a truly delightful Boston Cream Poke Cake. This recipe brings together the rich, creamy flavor of classic Boston Cream Pie with the irresistible texture of a moist, tender cake. The simple act of poking holes and infusing it with luscious pudding and topping it with a smooth chocolate ganache transforms an ordinary cake into something truly extraordinary. I hope you enjoyed making this and that it brings as much joy to your table as it does to mine.
For serving, I love this cake chilled, allowing the pudding to set beautifully. It’s perfect for any occasion, from a casual family gathering to a more formal dessert offering. Consider serving it with a dollop of fresh whipped cream or a few fresh berries for a burst of contrasting flavor and color. When it comes to variations, feel free to experiment! You could try a different flavor of pudding, like vanilla bean or even a chocolate pudding for an extra chocolatey experience. Alternatively, a white chocolate ganache or a simple dusting of powdered sugar would also be lovely. Don’t be afraid to make this Boston Cream Poke Cake your own!
Frequently Asked Questions:
Q: Can I make this Boston Cream Poke Cake ahead of time?
A: Absolutely! In fact, I highly recommend making it at least a few hours, or even a day, in advance. This allows the pudding to fully soak into the cake and for the flavors to meld together, resulting in an even more delicious and moist dessert. Just be sure to cover it tightly with plastic wrap before refrigerating.
Q: What kind of cake mix is best for this recipe?
A: While a yellow or vanilla cake mix is traditionally used for a Boston Cream flavor profile, you can certainly use a white cake mix as well. The goal is to have a relatively neutral cake base that allows the pudding and chocolate to shine. Whichever you choose, ensure it’s prepared according to the package directions for the best results.
Easy Boston Cream Poke Cake Dessert Recipe
A simple and delicious Boston Cream Poke Cake recipe featuring a moist yellow cake soaked in creamy vanilla pudding and topped with rich chocolate frosting.
Ingredients
-
15.25 ounce box yellow cake mix
-
Ingredients needed to make cake (eggs, oil, and water)
-
2 (3.4 ounce) boxes instant vanilla or French vanilla pudding
-
4 cups milk
-
16 ounce tub chocolate frosting
Instructions
-
Step 1
Preheat oven to 350°F (175°C). Grease and flour a 9×13 inch baking pan. Combine yellow cake mix with eggs, oil, and water as per box directions. Pour batter into pan and bake for 28-35 minutes, or until a toothpick comes out clean. Cool cake in pan for 10-15 minutes, then invert onto a wire rack to cool completely. -
Step 2
While cake cools, prepare pudding. Combine both boxes of instant pudding with 4 cups of cold milk in a bowl. Whisk vigorously for about 2 minutes until thickened. Cover with plastic wrap, pressing wrap onto the surface, and chill. -
Step 3
Once cake is completely cool, place it back into the 9×13 inch pan. Poke holes all over the cake surface with a wooden spoon handle, straw, or skewer, about 1-2 inches apart, going all the way to the bottom. -
Step 4
Spoon the chilled vanilla pudding evenly over the poked cake, ensuring it fills all the holes. Spread gently with a spatula to cover the entire surface. -
Step 5
Cover the pan tightly and chill for at least 4 hours, or preferably overnight. -
Step 6
Remove cake from refrigerator. Spread the chocolate frosting evenly over the chilled pudding layer. Chill again for at least 30 minutes before serving.
Important Information
Nutrition Facts (Per Serving)
It is important to consider this information as approximate and not to use it as definitive health advice.
Allergy Information
Please check ingredients for potential allergens and consult a health professional if in doubt.

Leave a Comment