
Easy Chocolate Swiss Roll recipes are a magical gateway to impressive-looking desserts that are surprisingly simple to create. There’s something incredibly rewarding about rolling up a delicate chocolate sponge, filling it with luscious cream, and presenting it as a stunning centerpiece. People adore this classic for its comforting chocolatey goodness and the beautiful spiral pattern that instantly elevates any occasion. What truly makes the easy Chocolate Swiss Roll so special is its deceptive simplicity. It looks sophisticated enough for a special celebration, yet it’s accessible for even novice bakers. Imagin extracte the delight on your loved ones’ faces when you reveal this homemade masterpiece, proving that delicious and beautiful desserts don’t have to be complicated. This recipe is designed to remove any intimidation, making your journey to a perfect easy Chocolate Swiss Roll a delightful breeze.

Easy Chocolate Swiss Roll
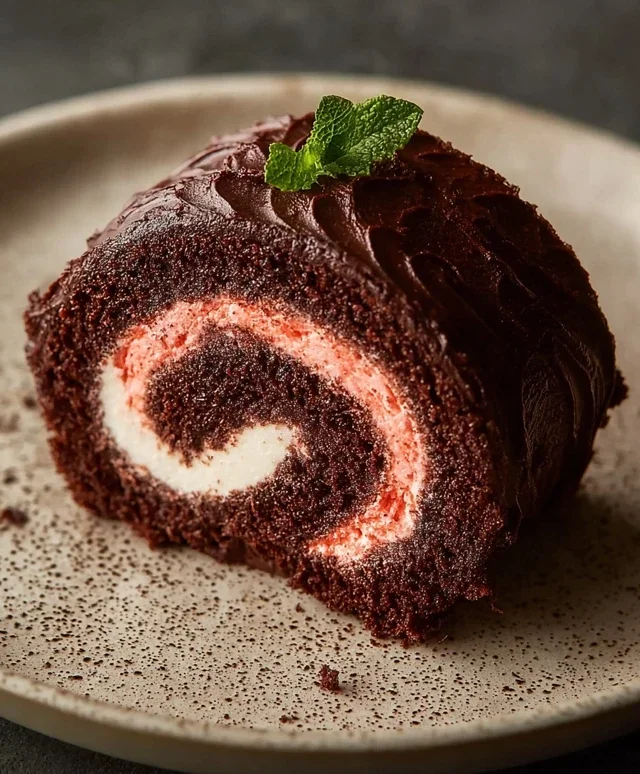
There’s something incredibly delightful about a classic Swiss roll. The light, airy sponge cake rolled around a creamy filling is a timeless dessert that always feels a little bit special. Today, I’m sharing my recipe for an Easy Chocolate Swiss Roll that’s not only delicious but also surprisingly straightforward to make, even if you’re new to the world of rolled cakes. We’re using a few clever ingredients to ensure a wonderfully tender and moist crum extractb, perfect for soaking up that luscious chocolate filling. Get ready to impress yourself (and anyone lucky enough to share it with you!) with this showstopper.
Ingredients:
Instructions:
Making the Chocolate Sponge Cake
1. Prepare your baking essentials: Preheat your oven to 175°C (350°F). Line a 25×38 cm (10×15 inch) baking sheet with parchment paper, ensuring it covers the bottom and sides. Lightly grease the parchment paper. This step is crucial for preventing the cake from sticking and making it easy to remove later. Get a clean, lint-free kitchen towel ready and generously dust it with the 2 tablespoons of cocoa powder. Spread it out evenly. This cocoa-dusted towel will be used to help us roll the cake while it’s still warm, preventing it from cracking.
2. Whisk the dry ingredients: In a medium bowl, whisk together the oat flour, cassava flour, cocoa powder, arrowroot starch, baking powder, and baking soda. Make sure everything is thoroughly combined. Whisking helps to aerate the dry ingredients and distribute the leavening agents evenly, which contributes to a lighter cake.
3. Whip the aquafaba: In a large, clean bowl (make sure it’s free of any grease), whip the aquafaba on high speed using an electric mixer until it forms stiff peaks. This is similar to whipping egg whites. It might take several minutes, but you’re looking for a glossy, meringue-like consistency that holds its shape. Gradually add 100g of the granulated sugar (or coconut sugar) while continuing to whip. Keep whipping until the sugar is fully incorporated and the mixture is glossy and stiff. This aquafaba meringue will provide the structure and lightness to our cake.
4. Combine wet ingredients and fold: In a separate bowl, whisk together the unsweetened applesauce, unsweetened dairy-free yogurt, and the remaining 100g of granulated sugar (or coconut sugar). Once the aquafaba meringue is ready, gently fold about a third of it into the applesauce mixture to lighten it. Then, carefully fold the remaining aquafaba meringue into the dry ingredients in two additions. Be careful not to overmix; you want to maintain as much air as possible. Fold until just combined, with no streaks of dry ingredients visible.
5. Bake the sponge: Pour the batter onto the prepared baking sheet and spread it evenly using a spatula. Tap the baking sheet gently on the counter a couple of times to release any large air bubbles. Bake for 12-15 minutes, or until a toothpick inserted into the center comes out clean and the cake springs back when lightly touched. The cake should be golden brown around the edges and slightly firm to the touch. Do not overbake, as this will make it brittle and prone to cracking when rolled.
6. Roll the cake: As soon as the cake comes out of the oven, carefully invert it onto the cocoa-dusted kitchen towel. Gently peel off the parchment paper. Starting from one of the shorter ends, carefully roll up the cake and the towel together. Let it cool completely in this rolled state on a wire rack. This cooling process while rolled helps the cake retain its shape and prevents cracks.
Creating the Chocolate Strawberry Filling
1. Whip the vegan butter: In a medium bowl, cream the room temperature vegan butter using an electric mixer until light and fluffy. This will form the base of our rich filling.
2. Add pulsed strawberries and sugar: Gradually add the pulsed freeze-dried strawberries (which will act like a natural powdered sugar and flavor enhancer) and the remaining 50g of granulated sugar (if you used coconut sugar in the cake, you can adjust this amount to your preference or use more of it here). Continue to beat until well combined and the filling is smooth and spreadable. The freeze-dried strawberries add an intense burst of strawberry flavor and a beautiful pink hue without adding extra moisture that could make the filling too soft.
Assembling the Swiss Roll
1. Unroll and fill: Once the cake is completely cool, gently unroll it from the towel. You should have a beautiful, flexible chocolate sponge. Spread the prepared chocolate strawberry filling evenly over the entire surface of the cake, leaving a small border around the edges. Be generous but don’t overfill, as you want to be able to roll it tightly.
2. Roll and chill: Carefully re-roll the cake, this time without the towel, into a tight log. Use the towel underneath to help guide the roll if needed. Place the rolled Swiss roll seam-side down on a serving platter or a piece of parchment paper. Cover and refrigerate for at least 30 minutes to allow the filling to set and the cake to firm up, making it easier to slice.
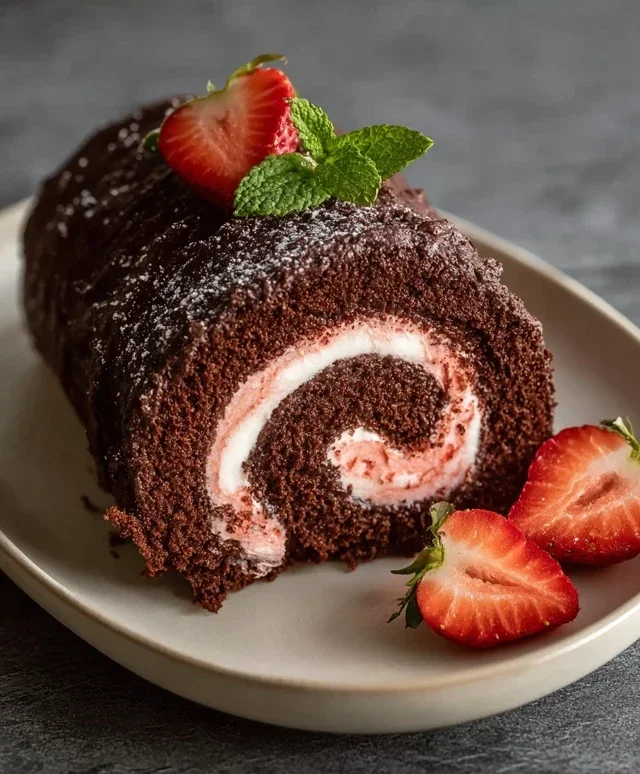
3. Garnish and serve: Before serving, you can dust the top with a little extra cocoa powder or powdered sugar if desired. Slice the Swiss roll into thick portions using a sharp knife, wiping the knife clean between each slice for neat cuts. Garnish with fresh sliced strawberries. Enjoy this delightful and surprisingly easy Chocolate Swiss Roll!
Conclusion:
I hope you’re as excited to try this Easy Chocolate Swiss Roll recipe as I am! It truly is a delightful treat that looks impressive but is surprisingly straightforward to make. The beauty of this recipe lies in its simplicity, allowing you to achieve a wonderfully light and airy sponge cake rolled with a rich chocolate filling. It’s the perfect balance of decadent chocolate and delicate cake, making it a crowd-pleaser for any occasion, from a casual afternoon tea to a more formal dessert. Don’t be intimidated by the rolling process; a little patience goes a long way, and even if your first attempt isn’t perfectly neat, I promise it will still taste absolutely divine!
Serving this Swiss roll is wonderfully versatile. It’s fantastic on its own, dusted with a little powdered sugar or cocoa. For an extra touch of indulgence, consider serving it with a dollop of fresh whipped cream, a scoop of vanilla ice cream, or a drizzle of raspberry coulis. If you’re feeling adventurous, why not try a few variations? You could incorporate a hint of espresso powder into the cake batter for a mocha twist, or experiment with different fillings like a cream cheese frosting or a white chocolate ganache. The possibilities are endless! So, gather your ingredients, embrace the fun, and bake this delicious Easy Chocolate Swiss Roll for yourself and your loved ones. I’m confident you’ll be delighted with the results!
Frequently Asked Questions:
Why is my Swiss roll cracking when I roll it?
Cracking often happens if the cake is overbaked or if it’s rolled while still too hot and not flexible enough. Ensure you don’t bake the sponge past the point where it’s just set and lightly springy. Letting it cool for a few minutes on a wire rack, then inverting it onto a fresh sheet of parchment paper, and then rolling it up while still warm but not scalding hot is key to preventing cracks. Sometimes a light score mark on the edge of the cake can help guide a cleaner roll.
Can I make the chocolate filling ahead of time?
Absolutely! The chocolate filling, whether it’s a simple buttercream or a ganache, can usually be made a day or two in advance and stored in an airtight container in the refrigerator. Just allow it to soften slightly at room temperature before spreading it onto the cake to ensure it’s pliable and won’t tear the sponge.
Easy Chocolate Swiss Roll
A simple and delicious dairy-free and gluten-free chocolate swiss roll recipe perfect for any occasion.
Ingredients
-
135 g oat flour
-
30 g cassava flour
-
30 g cocoa powder
-
1 tbsp arrowroot starch
-
1 1/2 tsp baking powder
-
1/2 tsp baking soda
-
122 mL aquafaba, room temperature
-
200 g organic granulated sugar or coconut sugar, divided
-
100 g unsweetened applesauce, room temperature
-
60 g unsweetened dairy free yogurt, room temperature
-
2 tbsp cocoa powder for dusting the dish towel
-
1 cup sliced strawberries, for garnish
-
226 g vegan butter, room temperature
-
70 g freeze dried strawberries, pulsed into a flour
-
Coconut fat from 1 can full-fat coconut cream
Instructions
-
Step 1
Preheat oven to 350°F (175°C). Line a 10×15 inch jelly roll pan with parchment paper and grease lightly. Dust a clean kitchen towel with 2 tbsp cocoa powder. -
Step 2
In a large bowl, whisk together oat flour, cassava flour, 30g cocoa powder, arrowroot starch, baking powder, and baking soda. -
Step 3
In a separate bowl, whisk aquafaba until foamy. Gradually add half of the sugar (100g) and continue whisking until stiff peaks form. -
Step 4
In another bowl, whisk together applesauce, dairy-free yogurt, and remaining sugar (100g). Stir in the aquafaba mixture until just combined. -
Step 5
Gently fold the dry ingredients into the wet ingredients until just combined. Do not overmix. -
Step 6
Pour batter into the prepared pan and spread evenly. Bake for 12-15 minutes, or until a toothpick inserted into the center comes out clean. -
Step 7
Immediately invert the cake onto the cocoa-dusted towel. Peel off the parchment paper and let the cake cool completely. -
Step 8
For the filling, cream together vegan butter and coconut cream fat until smooth. Add pulsed freeze-dried strawberries and mix until combined. -
Step 9
Once the cake is cool, spread the filling evenly over the surface. Starting from one end, carefully roll up the cake with the towel. Wrap tightly and refrigerate for at least 30 minutes before slicing. -
Step 10
Garnish with sliced strawberries before serving.
Important Information
Nutrition Facts (Per Serving)
It is important to consider this information as approximate and not to use it as definitive health advice.
Allergy Information
Please check ingredients for potential allergens and consult a health professional if in doubt.


Leave a Comment