
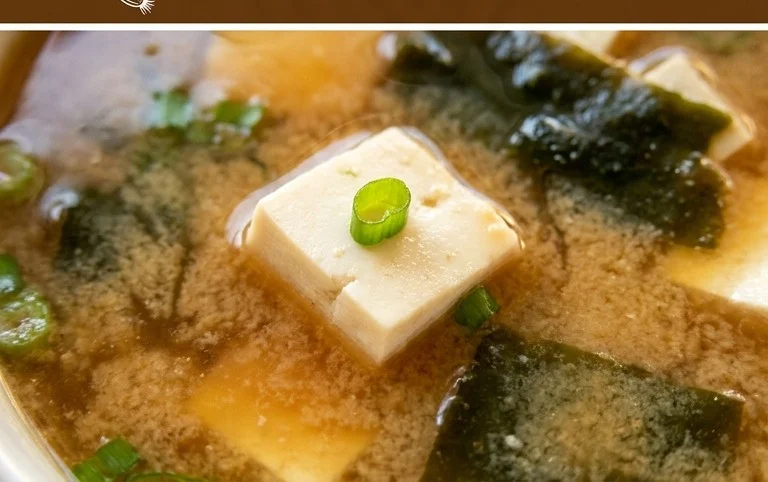
Miso soup recipe is more than just a starter; it’s a warm embrace in a bowl, a comforting ritual that transports me straight to my favorite Japanese restaurant. There’s a reason why this deceptively simple dish holds such a special place in my heart, and I suspect you feel the same way. It’s that perfect balance of savory umami from the fermented soybean paste, the subtle sweetness of dashi broth, and the tender bite of tofu and seaweed. What truly makes miso soup so special, though, is its incredible versatility and its ability to be both deeply satisfying and incredibly light. It’s the ultimate palate cleanser, a gentle nudge before the main event, or a nourishing solo act on a chilly evening. Today, I’m thrilled to share my go-to miso soup recipe, a version that’s quick enough for a weeknight but flavorful enough to impress.

Miso Soup Recipe
There’s something incredibly comforting and deeply satisfying about a warm bowl of miso soup. It’s a staple in Japanese cuisine for good reason – it’s quick to make, incredibly healthy, and bursting with umami flavor. Whether you’re enjoying it as a light starter, a side dish, or even a satisfying light meal, this simple miso soup recipe is my go-to. It’s minimalist in ingredients but maximum in flavor, and it’s so easy to customize to your liking.
This recipe focuses on the foundational elements of a classic miso soup, allowing the subtle, savory notes of the miso to shine. We’ll be using a few key components to achieve that authentic taste and texture. The beauty of miso soup lies in its simplicity, making it perfect for both begin extractners in the kitchen and seasoned cooks looking for a quick, wholesome option. Let’s gather our ingredients and get started!
Ingredients:
Preparing Your Dashi
Dashi is the soul of miso soup, providing that foundational savory (umami) flavor. While you can purchase instant dashi granules, making your own from scratch, or even using pre-made liquid dashi, offers a more nuanced and pure flavor. For this recipe, I’m assuming you’ll be using good quality dashi, whether it’s homemade, from a carton, or even instant granules dissolved according to package directions. The quantity of 2½ cups is a good starting point for a generous serving for one or two people. If you’re making a larger batch, simply scnon-alcoholic ale up the other ingredients proportionally. It’s important to use dashi that is hot but not boiling when you add the miso, as boiling can diminish the delicate flavor and beneficial probiotics present in the miso paste.
Rehydrating the Seaweed
The dried seaweed, often wakame, adds a delightful chewy texture and a touch of oceanic flavor to the soup. A heaping tablespoon might seem like a lot, but dried seaweed expands significantly when rehydrated. I usually toss it into a small bowl with a little bit of water while I’m preparing the other ingredients. This allows it to soften up nicely. Once rehydrated, I like to gently squeeze out any excess water before adding it to the soup. This prevents the soup from becoming too watery and ensures the seaweed pieces are distinct and not clumped together.
Silken Tofu: A Creamy Addition
Silken tofu is my preferred choice for miso soup because of its incredibly smooth and delicate texture. It breaks apart easily and absorbs the flavors of the broth beautifully, adding a subtle creaminess without being heavy. Cutting the tofu into small, bite-sized pieces ensures that each spoonful gets a little bit of everything – the broth, the seaweed, and the tofu. Be gentle when handling silken tofu, as it is quite fragile.
Miso Paste: The Star of the Show
The star of our miso soup is, of course, the miso paste. There are many types of miso paste available, each with its own unique flavor profile. Common varieties include white miso (shiro miso), which is milder and sweeter, and red miso (aka miso), which is richer and saltier. For this recipe, I suggest starting with 2 tablespoons and then adjusting to your taste. I often use a blend of white and red miso for a balanced flavor. Remember, miso is a fermented product, and its beneficial bacteria are sensitive to heat. It’s crucial to dissolve the miso paste in a small amount of the hot dashi before adding it to the main pot, and never let the soup boil after the miso has been added. This preserves its delicate flavor and nutritional benefits.
Fresh Scallions for a Zesty Finish
Finally, the chopped scallions provide a fresh, slightly pungent garnish that brightens up the entire bowl. They add a pop of color and a refreshing contrast to the savory broth. I like to chop them thinly so they are easy to eat and distribute evenly throughout the soup.
Cooking Instructions
1. Heat the Dashi and Rehydrate the Seaweed: Pour your 2½ cups of dashi into a small saucepan. While the dashi is starting to warm up over medium heat, place your heaping tablespoon of dried seaweed in a small bowl and cover it with a little bit of warm water. Let it sit for a few minutes to rehydrate. You’ll notice it expand and soften.
2. Prepare the Miso and Add Tofu: Once the dashi is hot but not yet boiling, gently add your small pieces of silken tofu to the pot. In a separate small bowl, scoop out your 2 to 2½ tablespoons of miso paste. Ladle about ¼ cup of the warm dashi from the saucepan into the bowl with the miso paste. Using a whisk or a fork, vigorously stir the miso paste into the dashi until it is completely smooth and lump-free. This step is crucial for ensuring your miso soup doesn’t have gritty bits of miso.
3. Combine and Warm Through: Add the rehydrated seaweed (gently squeeze out excess water first) to the saucepan with the dashi and tofu. Stir gently to distribute. Once the miso paste mixture is smooth, carefully pour it into the saucepan with the dashi, tofu, and seaweed.
4. Gently Simmer (Do Not Boil): Stir everything together gently. Reduce the heat to low and let the soup heat through for a minute or two. The key here is to never let the miso soup boil after the miso has been added. Boiling will destroy the delicate flavors and beneficial properties of the miso paste. You just want to ensure everything is heated through and the flavors have melded together. Taste the soup at this point and add a little more miso paste if you prefer a stronger flavor, dissolving it in a little warm dashi first as described in step 2.
5. Serve and Garnish: Once the soup is heated to your liking and the flavors are balanced, ladle the miso soup into serving bowls. Garnish generously with the chopped scallions. Serve immediately and enjoy the comforting warmth and umami-rich taste of your homemade miso soup! This simple recipe is a testament to how few ingredients can create such profound flavor.
Conclusion:
I hope you’ve enjoyed learning how to make this incredibly simple yet deeply satisfying Miso Soup recipe! Its beauty lies in its versatility and its ability to transform humble ingredients into a flavorful and nourishing dish. Whether you’re seeking a quick and healthy starter for a Japanese-inspired meal, a comforting bowl on a chilly evening, or a flavorful base for more elaborate creations, this miso soup is a true winner. Its quick preparation time makes it perfect for busy weeknights, and the customizable nature means you can adapt it to your favorite ingredients and dietary preferences.
Serve it piping hot as a delightful appetizer alongside sushi or tempura, or enjoy a larger bowl as a light lunch. For an extra heartiness, consider adding ingredients like silken tofu cubes, enoki mushrooms, sliced scallions, or even some cooked ramen noodles. Don’t be afraid to experiment with different types of miso paste – white miso (shiro miso) offers a milder, sweeter flavor, while red miso (aka miso) provides a richer, saltier, and more complex taste. You can even blend them for a balanced profile. I truly encourage you to give this delightful miso soup a try; you might just discover your new favorite comfort food!
Frequently Asked Questions:
What is the best type of miso paste to use?
The “best” type of miso paste really depends on your personal preference! White miso (shiro miso) is milder and slightly sweeter, making it a great choice for begin extractners or those who prefer a less intense flavor. Red miso (aka miso) is fermented longer and has a deeper, richer, and saltier taste. A blend of both can offer a wonderful balance of complexity and smoothness.
Can I make this miso soup vegan?
Absolutely! Our recipe is naturally vegan if you use vegetable dashi or water instead of bonito flakes for your dashi broth. Ensure your miso paste is also vegan, as some varieties can contain animal products.
How long does miso soup last in the refrigerator?
Miso soup is best enjoyed fresh, but leftovers can be stored in an airtight container in the refrigerator for 1-2 days. It’s important to note that the flavor and aroma might diminish slightly over time. Reheat gently on the stovetop, avoiding boiling, as high heat can degrade the beneficial probiotics in the miso.

Miso Soup Recipe
A simple and comforting miso soup recipe, a staple in Japanese cuisine.
Ingredients
-
2½ cups Dashi
-
1 heaping tablespoon dried seaweed
-
4 oz silken tofu (cut into small pieces)
-
2-2½ tablespoons white miso paste (or to taste)
-
1 tablespoon scallion (chopped)
Instructions
-
Step 1
Rehydrate the dried seaweed by soaking it in a small bowl of water for 5-10 minutes. Drain and set aside. -
Step 2
In a medium saucepan, heat the Dashi over medium heat until simmering. -
Step 3
Add the rehydrated seaweed and silken tofu to the simmering Dashi. Cook for 2-3 minutes until heated through. -
Step 4
In a small bowl, whisk the miso paste with a ladleful of the hot Dashi from the pot until smooth. This prevents the miso from clumping. -
Step 5
Gently stir the dissolved miso mixture back into the saucepan. Heat through but do not boil, as boiling can diminish the flavor and beneficial properties of miso. -
Step 6
Ladle the miso soup into bowls and garnish with chopped scallions just before serving.
Important Information
Nutrition Facts (Per Serving)
It is important to consider this information as approximate and not to use it as definitive health advice.
Allergy Information
Please check ingredients for potential allergens and consult a health professional if in doubt.


Leave a Comment