
Mini Cannoli Cups are a delightful twist on a classic Italian dessert, and let me tell you, they are an absolute showstopper! Forget wrestling with tricky cannoli tubes; these little beauties offer all the incredible flavor and satisfying crunch you crave, but in a wonderfully approachable, bite-sized package. We all know and adore the iconic cannoli – that crisp, golden shell filled with a sweet, creamy ricotta filling, often studded with chocolate chips or candied fruit. It’s a flavor profile that whispers of sunshine, family gatherings, and pure indulgence. But what truly makes these Mini Cannoli Cups special is their miniature magic. They’re perfectly portioned for guilt-free enjoyment (or maybe just one more!), making them ideal for parties, dessert buffets, or simply as a sweet treat to brighten your day. Get ready to fall in love with these irresistible Mini Cannoli Cups!

Mini Cannoli Cups
If you’re craving the irresistible crunch of a cannoli shell filled with sweet, creamy ricotta, but want a simpler, more manageable approach, then these Mini Cannoli Cups are your answer! Forget the hassle of rolling dough and frying tubes; we’re using readily available refrigerated pie crusts to create adorable, bite-sized vessels for that classic cannoli flavor. These are perfect for parties, desserts, or even a special treat just for yourself. The beauty of this recipe is its adaptability – feel free to get creative with your fillings and toppings!
Ingredients:
Preparing the Filling
The heart of any cannoli is its luscious ricotta filling, and ours is no different. The key to a perfectly smooth and flavorful filling is using good quality, well-drained ricotta. This ensures we avoid a watery consistency.
1. Start by draining your ricotta cheese. You can do this by placing it in a fine-mesh sieve set over a bowl for at least 30 minutes, or even overnight in the refrigerator. This step is crucial for a thick, creamy filling that holds its shape. Once drained, transfer the ricotta to a medium bowl. Add the powdered sugar, granulated sugar, finely grated orange or lemon zest, and vanilla extract. Gently whisk everything together until it’s smooth and well combined. Don’t overmix; we’re aiming for a tender, luscious texture. Taste and adjust sweetness if needed. Cover the bowl and refrigerate while you prepare the shells.
Creating the Cannoli Shells
This is where the magic of using refrigerated pie crust comes in. It’s a fantastic shortcut that still delivers a wonderfully crisp and golden shell.
2. Preheat your oven to 375°F (190°C). Lightly grease a standard 12-cup muffin tin. On a lightly floured surface, gently unroll your softened pie crusts. If they are circular, that’s perfect! If they are rectangular, try to gently shape them into a rough circle. Cut each pie crust into four equal wedges. This will give you a total of eight wedges from the two crusts.
3. Take one pie crust wedge and carefully press it into one of the muffin tin cups, gently stretching it to fit the contours of the cup. You want the crust to come up the sides of the muffin tin. Repeat this with the remaining pie crust wedges, pressing them into the prepared muffin tin cups. You might need to slightly overlap the edges of the crust pieces in some cups to ensure full coverage. Don’t worry if they aren’t perfectly neat; the rustic charm is part of their appeal!
Baking and Finishing the Shells
Now for the part where our pie crusts transform into delicious, edible cups!
4. In a small bowl, combine the turbinado sugar and ground cinnamon. This mixture will give our cannoli cups a delightful spiced sweetness and a beautiful golden-brown crust. Lightly brush the edges of each pie crust cup with a little water. This will help the turbinado sugar mixture adhere. Sprinkle the turbinado sugar and cinnamon mixture generously over the edges and the interior of each crust-lined muffin cup. Aim for an even coating.
5. Carefully place the muffin tin in the preheated oven. Bake for 12-15 minutes, or until the crusts are golden brown and crisp. Keep a close eye on them, as oven temperatures can vary. Once they are beautifully golden, remove the muffin tin from the oven. Let them cool in the muffin tin for about 5 minutes before carefully inverting them onto a wire rack to cool completely. This cooling step is important to ensure they stay nice and crisp. If any of your cups stick slightly, gently coax them out with a butter knife.
Assembling Your Mini Cannoli Cups
The final and most rewarding step: filling our beautiful shells with that delicious ricotta cream!
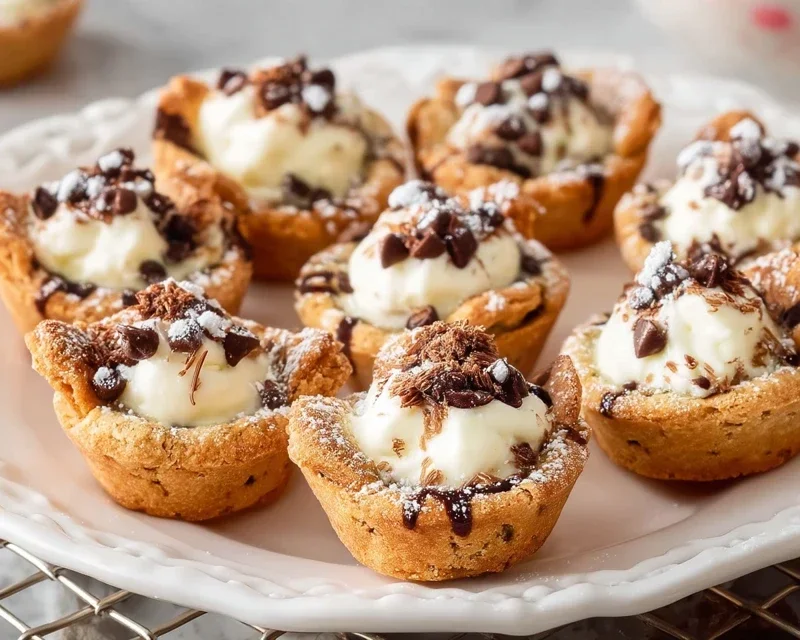
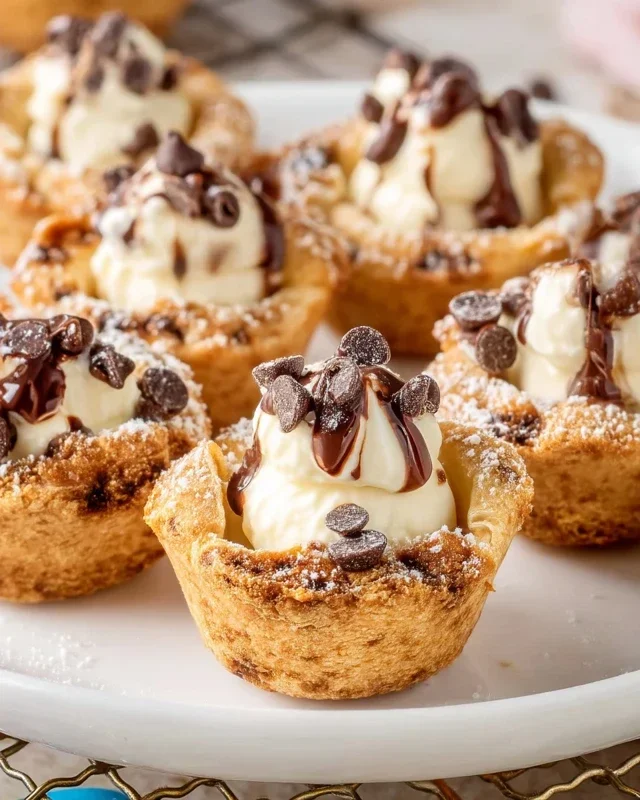
6. Once the cannoli cups are completely cool, it’s time to fill them. Spoon or pipe the chilled ricotta filling into each cooled cannoli cup. You can use a piping bag with a large round tip for a professional look, or simply use a spoon for a more rustic and casual presentation. Fill them generously!
7. Now for the fun part – the toppings! Sprinkle the tops of the filled cannoli cups with miniature semisweet chocolate chips or finely chopped pistachios. These add both flavor and visual appeal. Finally, dust with a little extra powdered sugar for that classic cannoli finish.
Enjoy your delightful Mini Cannoli Cups immediately for the best texture. They are a wonderful way to enjoy the taste of cannoli without the fuss, and they’re always a crowd-pleaser!
Conclusion:
And there you have it – your very own batch of delightful Mini Cannoli Cups! I truly hope you’ve enjoyed this recipe. This is a fantastic way to bring the classic cannoli experience into your home without the fuss of rolling and frying traditional shells. The crisp, buttery mini shells filled with creamy, sweet ricotta filling are an absolute triumph. They’re not only incredibly delicious but also wonderfully versatile, making them perfect for parties, holidays, or simply as a special treat to brighten your day. I encourage you to give these Mini Cannoli Cups a try; I’m confident you’ll be delighted with the results!
For serving, these little gems are best enjoyed shortly after filling to maintain that perfect shell crispness. They look absolutely stunning arranged on a dessert platter or presented individually. Don’t be afraid to get creative with your toppings – a dusting of powdered sugar, a drizzle of chocolate, or a few chopped pistachios can elevate them even further. Consider making them ahead of time and filling them just before serving for maximum impact.
Frequently Asked Questions:
Q1: Can I make the cannoli shells ahead of time?
Yes, absolutely! The mini shells can be baked a day or two in advance and stored in an airtight container at room temperature. Just ensure they are completely cooled before storing to prevent them from becoming soggy. Fill them closer to serving time.
Q2: What are some other filling ideas besides the classic ricotta?
While the ricotta filling is traditional and divine, you can certainly experiment! Consider a mascarpone-based filling for extra richness, or even a chocolate mousse for a decadent twist. For a fruitier option, you could fold in some finely chopped candied citrus peel or even a touch of lemon zest.
Q3: How do I store leftover Mini Cannoli Cups?
If you have any leftover (which I doubt!), it’s best to store the unfilled shells separately from the filling in airtight containers at room temperature. If they are already filled, they will be best enjoyed within a day, but you can refrigerate them for up to two days. Note that the shells may lose some of their crispness when refrigerated.
Mini Cannoli Cups
Delightful mini cannoli cups featuring a creamy ricotta filling and a crisp, sweet crust, perfect for any occasion.
Ingredients
-
1 container whole-milk ricotta cheese (15 oz., drained)
-
1/2 cup powdered sugar
-
2 tablespoons granulated sugar
-
1 teaspoon finely grated orange zest
-
1/2 teaspoon vanilla extract
-
1 box refrigerated pie crusts, softened as directed on box (2 count )
-
3 tablespoons turbinado sugar
-
1 teaspoon ground cinnamon
-
1/4 cup miniature semisweet chocolate chips
-
additional powdered sugar for dusting
Instructions
-
Step 1
Preheat oven to 375°F (190°C). Lightly grease a mini muffin tin. -
Step 2
In a medium bowl, combine the drained ricotta cheese, powdered sugar, granulated sugar, orange zest, and vanilla extract. Stir until smooth and well combined. Stir in chocolate chips. -
Step 3
Unroll the refrigerated pie crusts. Cut each crust into 6 equal squares. Press the dough squares into the prepared mini muffin tin cups, forming a shell. -
Step 4
Bake for 10-12 minutes, or until golden brown and puffed. Let cool in the tin for a few minutes before transferring to a wire rack to cool completely. -
Step 5
In a small shallow bowl, combine the turbinado sugar and ground cinnamon. Roll the edges of the cooled cannoli cups in the cinnamon-sugar mixture. -
Step 6
Spoon or pipe the ricotta filling into the cooled cannoli cups. Dust with additional powdered sugar before serving.
Important Information
Nutrition Facts (Per Serving)
It is important to consider this information as approximate and not to use it as definitive health advice.
Allergy Information
Please check ingredients for potential allergens and consult a health professional if in doubt.

Leave a Comment