
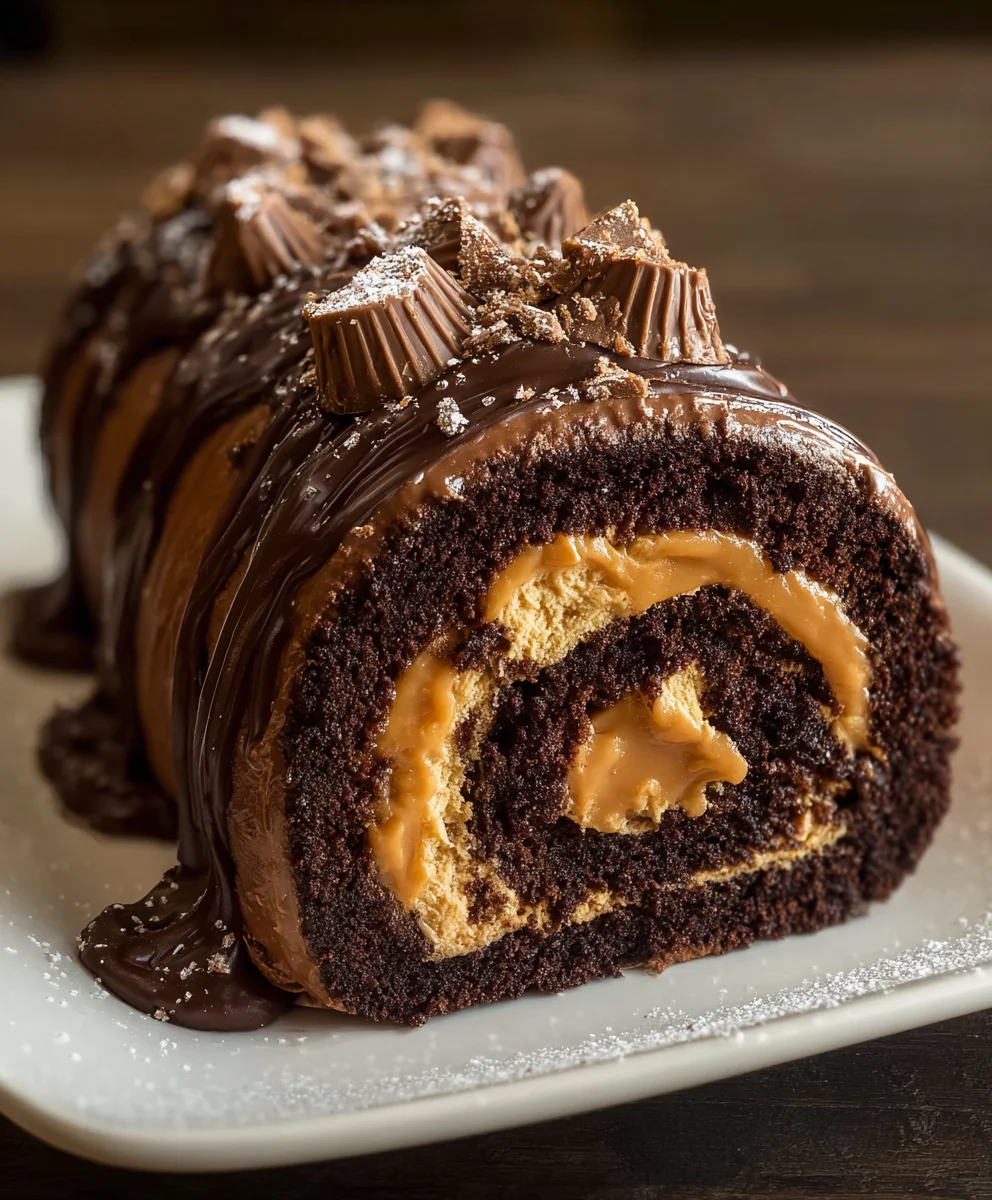
Peanut Butter Cup Chocolate Roll Cake – if that phrase alone doesn’t make your taste buds tingle and your inner child do a happy dance, we need to talk! This isn’t just any dessert; it’s a nostalgic hug in cake form, a symphony of creamy peanut butter and rich, decadent chocolate that evokes pure joy. We all have those iconic flavor combinations that hold a special place in our hearts, and the legendary peanut butter cup is undoubtedly one of them. This Peanut Butter Cup Chocolate Roll Cake masterfully captures that beloved essence, transforming it into a show-stopping dessert that’s surprisingly approachable to make.
What makes this particular Peanut Butter Cup Chocolate Roll Cake so irresistible?
It’s the perfect marriage of textures and tastes. Imagine a light, airy chocolate sponge cake rolled around a luscious, velvety peanut butter filling, all enrobed in a smooth, glossy chocolate ganache. Each bite delivers a satisfying contrast – the slight chew of the cake, the rich creaminess of the filling, and the intense chocolate finish. It’s the ultimate indulgence, perfect for birthdays, special occasions, or simply when you crave a truly extraordinary treat. Get ready to impress yourself and everyone lucky enough to share a slice!

Ingredients:
- 4 large eggs, at room temperature
- 1 cup all-purpose flour
- 1/2 cup unsweetened cocoa powder
- 1/2 teaspoon baking powder
- 1/4 teaspoon salt
- 1/2 cup granulated sugar
- 1/4 cup powdered sugar, for dusting
- 1/2 cup smooth peanut butter
- 1/2 cup heavy cream, cold
- 1 cup powdered sugar, for filling
- 1/4 cup mini peanut butter cups, finely chopped
Preparing the Chocolate Cake Base
The foundation of our Peanut Butter Cup Chocolate Roll Cake is a rich and tender chocolate sponge cake. This cake needs to be light enough to roll without cracking, which is why we’re using a method that incorporates air into the batter. First, preheat your oven to 350°F (175°C). Line a 10×15 inch jelly roll pan with parchment paper, ensuring the paper extends slightly over the edges to help with lifting the cake later. Lightly grease the parchment paper and the pan itself. In a medium bowl, whisk together the all-purpose flour, unsweetened cocoa powder, baking powder, and salt. Sifting these dry ingredients is a good idea to prevent any lumps and ensure a uniform texture in the cake. Set this bowl aside.
In a large bowl, using an electric mixer on high speed, beat the 4 large eggs and the 1/2 cup granulated sugar for about 5-7 minutes. You’re looking for the mixture to become pale yellow, thick, and to form ribbons that slowly disappear when the beaters are lifted. This stage is crucial for trapping air, which will give our cake its lightness. Gradually add the sifted dry ingredients to the egg mixture in three additions, gently folding them in with a spatula after each addition. Be careful not to overmix; you want to combine the ingredients just until no streaks of flour remain. Overmixing can develop the gluten in the flour, resulting in a tougher cake.
Gently spread the batter evenly into the prepared jelly roll pan, using an offset spatula or the back of a spoon to create a smooth surface. Aim for an even thickness across the entire pan for consistent baking. Bake for 12-15 minutes, or until the cake springs back when lightly touched. It should be golden brown around the edges and slightly firm to the touch. Don’t overbake, as a dry cake will be more prone to cracking when rolled.
Cooling and Rolling the Cake
As soon as the cake comes out of the oven, it’s time to start the rolling process to prevent it from drying out and becoming brittle. While the cake is still warm, invert it onto a clean kitchen towel that has been lightly dusted with additional powdered sugar (about 1-2 tablespoons). Carefully peel off the parchment paper. If the parchment paper sticks a little, you can gently mist it with a tiny bit of water. Starting from one of the shorter ends, tightly roll up the cake with the kitchen towel inside. This technique allows the cake to cool in a rolled shape, setting its structure and making it more pliable for the final roll. Let the rolled cake cool completely on a wire rack. This cooling process is essential; rolling a warm cake can lead to a gummy texture, and a completely cooled cake will be less likely to break when you unroll it to fill.
Making the Creamy Peanut Butter Filling
While the cake is cooling, we can prepare the luscious peanut butter filling. In a medium bowl, combine the 1/2 cup smooth peanut butter and the 1 cup powdered sugar. Add the 1/2 cup cold heavy cream to this mixture. Using an electric mixer on medium speed, beat all the ingredients together until the mixture is light, fluffy, and well combined. You’re aiming for a consistency that’s spreadable but not too runny. Taste the filling at this stage and adjust the sweetness if needed, although the combination of peanut butter and powdered sugar typically yields a perfect balance. For an extra burst of peanut butter cup flavor, you can gently fold in the 1/4 cup finely chopped mini peanut butter cups into the filling. Make sure the peanut butter cups are chopped small enough to be easily distributed and enjoyed in each bite.
Assembling the Peanut Butter Cup Chocolate Roll Cake
Once the chocolate cake roll is completely cool, gently unroll it on the kitchen towel. You should see that the cake has retained its shape. Carefully spread the prepared peanut butter filling evenly over the surface of the cake, using an offset spatula to get close to the edges but leaving about a 1/2 inch border on the longer sides. This border helps to prevent the filling from squeezing out excessively when you re-roll the cake. Sprinkle the remaining finely chopped mini peanut butter cups over the filling if you haven’t already incorporated them, adding another layer of texture and flavor.
Now, it’s time for the final roll. Starting from the same short end you used before, and with the help of the kitchen towel, carefully and tightly re-roll the cake. As you roll, try to pull the towel away gently so it doesn’t get rolled into the cake. The key here is to roll it firmly but without applying too much pressure, which could cause the cake to crack. Once rolled, wrap the cake snugly in plastic wrap, ensuring it’s sealed tightly. Chill the cake in the refrigerator for at least 2 hours, or preferably longer, to allow the filling to set and the cake to firm up. This chilling time is crucial for achieving clean slices and a beautifully structured roll cake.
Finishing Touches and Serving
When you’re ready to serve your masterpiece, unwrap the chilled cake. Place it seam-side down on a serving platter. For a beautiful finish, dust the top of the cake generously with the remaining 1/4 cup powdered sugar using a fine-mesh sieve. This creates a snowy, inviting appearance that complements the rich chocolate and peanut butter. You can also add a few extra chopped mini peanut butter cups as a garnish around the base of the cake or on top. To serve, use a sharp knife dipped in hot water and wiped dry between each slice for the cleanest cuts. Enjoy the delightful combination of moist chocolate cake, creamy peanut butter filling, and bursts of peanut butter cup flavor in every bite of your homemade Peanut Butter Cup Chocolate Roll Cake.

Conclusion:
And there you have it – a delicious journey into creating your very own Peanut Butter Cup Chocolate Roll Cake! This recipe, while it might seem a touch involved, is incredibly rewarding. The rich chocolate sponge, swirled with creamy peanut butter frosting, creates a dessert that’s both elegant and wonderfully decadent. I truly hope you enjoy making and, more importantly, devouring this delightful treat. It’s perfect for birthdays, holidays, or simply when you need a special something to brighten your day.
For serving suggestions, consider a dusting of powdered sugar for a classic look, or a drizzle of extra chocolate ganache for an even more indulgent experience. A scoop of vanilla ice cream on the side is also a winning combination. Don’t be afraid to get creative with variations! You could fold in chopped peanut butter cups into the frosting for extra texture, or add a touch of espresso powder to the chocolate cake batter to deepen its flavor.
Remember, baking is all about enjoyment and experimentation. Don’t stress if your first roll isn’t perfectly neat; the taste is what truly matters. I encourage you to give this Peanut Butter Cup Chocolate Roll Cake a try and share your creations!
Frequently Asked Questions:
Can I make this recipe ahead of time?
Absolutely! You can bake and cool the chocolate sponge a day in advance and store it, wrapped tightly in plastic wrap, at room temperature. The frosting can also be made ahead and refrigerated, just be sure to let it soften slightly before spreading. Assembling the cake closer to serving time is ideal for the best texture.
What if my cake cracks when I roll it?
A little cracking is perfectly normal, especially for your first few attempts! Don’t worry too much about it. The frosting will help to disguise any minor imperfections, and the flavor will be just as amazing. For future bakes, ensuring the cake is rolled while still warm but not hot, and using a clean kitchen towel, can help minimize cracking.
Peanut Butter Cup Chocolate Roll Cake Recipe
A decadent chocolate roll cake filled with creamy peanut butter frosting and studded with chopped peanut butter cups.
Ingredients
-
4 large eggs, at room temperature
-
1 cup all-purpose flour
-
1/2 cup unsweetened cocoa powder
-
1/2 teaspoon baking powder
-
1/4 teaspoon salt
-
1/2 cup granulated sugar
-
1/4 cup powdered sugar, for dusting
-
1/2 cup smooth peanut butter
-
1/2 cup heavy cream, cold
-
1 cup powdered sugar, for filling
-
1/4 cup mini peanut butter cups, finely chopped
Instructions
-
Step 1
Preheat oven to 350°F (175°C). Line a 10×15 inch jelly roll pan with parchment paper, greasing it lightly. Whisk together flour, cocoa powder, baking powder, and salt in a medium bowl. Set aside. -
Step 2
In a large bowl, beat eggs and granulated sugar on high speed for 5-7 minutes until pale yellow, thick, and ribbon-like. Gradually fold in the sifted dry ingredients in three additions until just combined. -
Step 3
Spread batter evenly into the prepared pan and bake for 12-15 minutes, or until it springs back when touched. Immediately invert the warm cake onto a clean kitchen towel dusted with powdered sugar. Peel off parchment paper and tightly roll the cake with the towel inside. Let cool completely. -
Step 4
While the cake cools, make the filling: combine peanut butter, powdered sugar, and cold heavy cream in a medium bowl. Beat with an electric mixer until light and fluffy. Gently fold in chopped mini peanut butter cups. -
Step 5
Unroll the cooled cake. Spread the peanut butter filling evenly over the surface, leaving a 1/2 inch border on the longer sides. Re-roll the cake tightly with the help of the towel, then wrap snugly in plastic wrap. -
Step 6
Chill the cake in the refrigerator for at least 2 hours. Unwrap, place seam-side down on a platter, and dust with remaining powdered sugar. Garnish with extra peanut butter cups if desired. Slice with a sharp knife dipped in hot water for clean cuts.
Important Information
Nutrition Facts (Per Serving)
It is important to consider this information as approximate and not to use it as definitive health advice.
Allergy Information
Please check ingredients for potential allergens and consult a health professional if in doubt.


Leave a Comment