
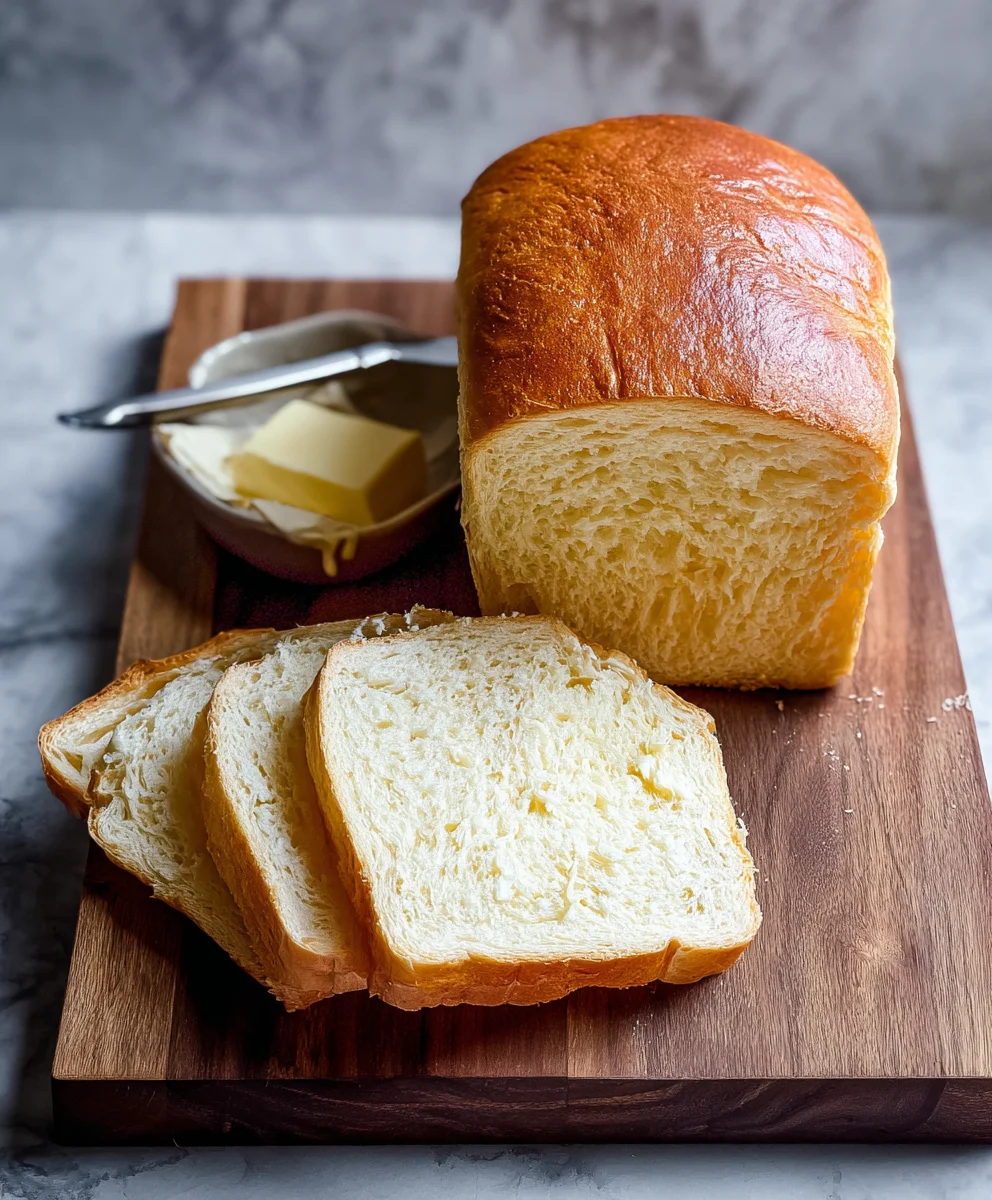
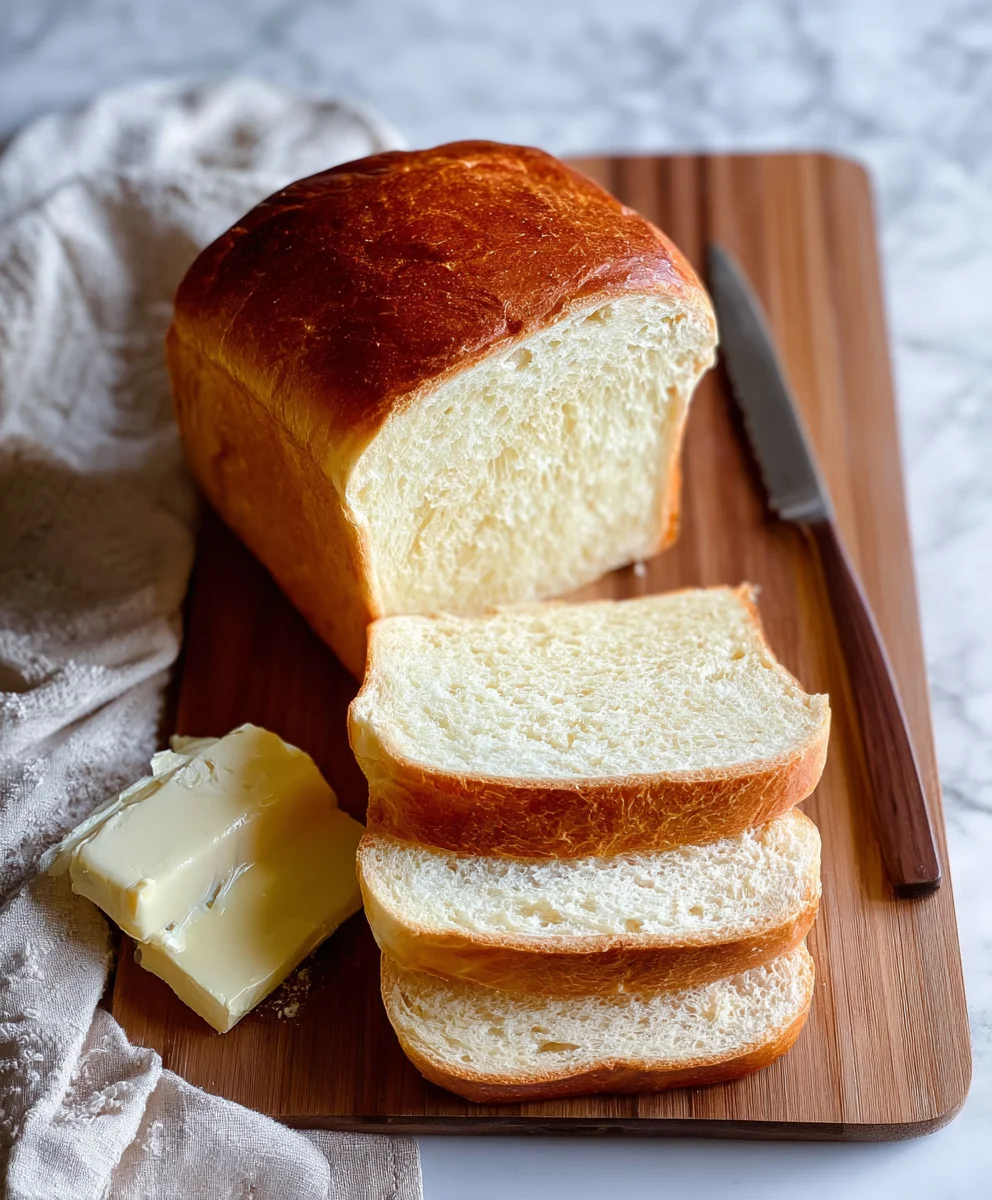
Soft and Fluffy Sandwich Bread is more than just an ingredient; it’s the foundation of countless comforting meals and cherished memories. Imagin extracte the aroma wafting from your oven as this beautiful loaf bakes, promising a slice of pure, unadulterated happiness. We all have that particular yearning for a perfectly tender crum extractb and a whisper-light texture that melts in your mouth, don’t we? It’s that quintessential sandwich bread that elevates a simple beef ham and cheese to gourmet status, makes your peanut butter and jelly sing, and provides the ideal canvas for all your culinary creations. What makes this particular recipe so special? It’s the meticulous balance of simple, high-quality ingredients, a touch of patience, and a secret technique that guarantees an impossibly soft and wonderfully fluffy result every single time. Get ready to rediscover the joy of homemade bread with this foolproof guide to your new favorite Soft and Fluffy Sandwich Bread.

Ingredients:
- 2 1/4 teaspoons active dry yeast
- 2 tablespoons honey (or granulated sugar)
- 1/4 cup warm water (around 105-115°F or 40-46°C)
- 1 1/2 teaspoons salt
- 5 tablespoons unsalted butter, softened
- 1 large egg
- 6 cups all-purpose flour, plus more for dusting
- 2 cups whole milk, warmed slightly
Preparing the Dough
Step 1: Activating the Yeast
Begin extract by ensuring your yeast is ready to work its magic. In a small bowl, combine the warm water and the honey (or sugar). Give it a gentle stir to help the honey dissolve. Sprinkle the active dry yeast over the surface of the liquid. Do not stir it in completely at this stage. Let this mixture sit undisturbed for about 5 to 10 minutes. You’ll know the yeast is alive and active if it becomes foamy and bubbly. This foamy cap indicates that the yeast is consuming the sugars and producing carbon dioxide, which is essential for making your bread rise and become soft and fluffy. If you don’t see any activity, your yeast might be old, or the water might not have been the correct temperature, and you’ll need to start this step again with fresh yeast.
Step 2: Mixing the Wet Ingredients and Initial Dough Formation
Once your yeast is happily foamy, it’s time to combine it with the other wet ingredients. In a large mixing bowl, or the bowl of your stand mixer fitted with the dough hook attachment, add the activated yeast mixture, the softened butter, and the egg. Whisk these together briefly to start incorporating them. Now, gradually add the warmed milk to the bowl. Stir everything together until just combined. The milk should be warm, not hot, as extreme heat can kill the yeast. Warm milk helps create a richer dough and contributes to the soft texture of the final bread.
Step 3: Adding Flour and Salt to Form the Dough
Next, we’ll introduce the dry ingredients. Add the salt to the liquid mixture. Make sure the salt is distributed somewhat evenly. gin extractn, begin adding the flour, one cup at a time, mixing after each addition. You’ll notice the mixture will start to thicken and form a shaggy dough. Continue adding flour until you’ve incorporated about 5 cups. At this point, the dough might still be quite sticky, and that’s perfectly normal. Reserve the last cup of flour; you might not need all of it, or you might need a little more depending on the humidity and your flour’s absorption rate. The goal is a dough that is slightly sticky but manageable.
Kneading and First Rise
Step 4: Kneading the Dough for Softness and Elasticity
This is where we develop the gluten, which is crucial for a soft and fluffy sandwich bread. If you are using a stand mixer, continue to knead on medium-low speed for about 8-10 minutes. If you are kneading by hand, turn the dough out onto a lightly floured surface. Push the dough away from you with the heels of your hands, then fold it back over itself. Rotate the dough a quarter turn and repeat. Continue this process for at least 10-12 minutes. The dough should transform from a sticky mass into a smooth, elastic ball. It will spring back when gently poked. This kneading process aligns the gluten strands, allowing the dough to trap the gases produced by the yeast, resulting in that desirable light and airy texture. If the dough is too sticky, add a tablespoon of the reserved flour at a time, but avoid adding too much, as this can make the bread dense.
Step 5: First Rise – Letting the Dough Double in Size
Lightly grease a large clean bowl with a little oil or cooking spray. Place the kneaded dough into the greased bowl, turning it once to coat the top with oil. Cover the bowl tightly with plastic wrap or a clean kitchen towel. Find a warm, draft-free spot in your kitchen for the dough to rise. This can be near a slightly warmed oven (turned off!), on top of your refrigerator, or simply on your counter if your kitchen is warm. Allow the dough to rise for 1 to 1.5 hours, or until it has doubled in volume. The warmth helps the yeast to be active and produce those air bubbles. You’ll see the dough visibly puff up and become almosgin extractouble its original size. This slow and steady rise is key to developing flavor and achieving a tender crum extractb.
Shaping and Second Rise
Step 6: Punching Down and Shaping the Loaves
Once the dough has beautifully doubled, gently punch it down to release the air. This deflates the dough and redistributes the yeast, preparing it for its second rise and preventing large, uneven air pockets. Turn the dough out onto a lightly floured surface. Divide the dough into two equal portions. For each portion, gently pat or roll it into a rectangle, about 8 inches wide. Starting from one of the shorter sides, tightly roll up the dough into a log shape. Pinch the seam closed to seal it. Then, gently tuck in the ends of the log and pinch those closed as well. This tight rolling and sealing is important for creating a well-structured loaf that holds its shape.
Step 7: Second Rise and Preparing for Baking
Generously grease two standard 9×5 inch loaf pans with butter or cooking spray. Place one shaped loaf into each prepared pan, with the seam side down. Cover the pans loosely with plastic wrap or a clean kitchen towel. Again, find a warm, draft-free place for them to rise for a second time. This rise typically takes about 45 minutes to 1 hour, or until the dough has risen about 1 inch above the rim of the pan and looks puffy. While the loaves are on their second rise, preheat your oven to 375°F (190°C). This second rise is crucial for achieving that signature soft and fluffy texture. It allows the structure of the bread to develop further, creating a lrum extractter crumb.
Baking and Cooling
Step 8: Baking the Soft and Fluffy Sandwich Bread
Once the loaves have completed their second rise and the oven is preheated, it’s time to bake. Carefully place the loaf pans into the preheated oven. Bake for 30-35 minutes, or until the crust is a beautiful golden brown and the internal temperature of the bread reaches 190-200°F (88-93°C) when tested with an instant-read thermometer. If the tops of the loaves start to brown too quickly, you can loosely tent them with aluminum foil during the last 10-15 minutes of baking. The aroma that fills your kitchen will be incredible! This stage transforms the dough into a delicious, baked loaf.
Step 9: Cooling the Bread for Optimal Texture
This is perhaps the most difficult step, but it’s vital for achieving the perfect texture. As soon as the loaves come out of the oven, carefully remove them from the pans and place them on a wire cooling rack. Do not leave them in the pans, as this can lead to a soggy bottom. Allow the bread to cool completely for at least 1-2 hours before slicing. Slicing warm breadrum extractn cause the crumb to collapse and appear gummy. The cooling process allows the internal structure of the bread to set properly, ensuring that slice after slice, you enjoy that wonderfully soft and fluffy sandwich bread.
Conclusion:
And there you have it – your very own batch of Soft and Fluffy Sandwich Bread! We hope you’ve enjoyed this journey of creating this wonderfully versatile loaf. This recipe is designed to be approachable for bakers of all levels, resulting in a light, airy crum extractb that’s perfect for all your sandwich creations. Don’t be afraid to get your hands a little floury; the reward of a warm, homemade loaf is truly unparalleled.
Consider serving your Soft and Fluffy Sandwich Bread toasted with butter, as the foundation for your favorite deli sandwiches, or even transformed into delightful French toast. For variations, feel free to experiment with adding a sprinkle of seeds to the topping before baking, or incorporate a touch of honey for a subtle sweetness. We encourage you to make this recipe your own and to savor the delicious results of your baking efforts!
FAQs:
Can I use a stand mixer for this recipe?
Absolutely! A stand mixer with a dough hook attachment can be a great time-saver and makes kneading much easier. Follow the same mixing and kneading times as you would by hand, or until the dough is smooth and elastic.
How should I store my Soft and Fluffy Sandwich Bread?
Once completely cooled, store your Soft and Fluffy Sandwich Bread in an airtight container or bread bag at room temperature for up to 3-4 days. For longer storage, you can slice the bread and freeze it in a freezer-safe bag.
My bread didn’t rise as much as I expected. What could be the reason?
Several factors can affect rise, including the freshness of your yeast, the temperature of your liquid (it should be warm, not hot), and ambient room temperature. Ensure your yeast is active by proofing it in warm water with a pinch of sugar before mixing. Also, try to let your dough rise in a warm, draft-free spot.
Soft Fluffy Sandwich Bread Recipe-Easy Homemade Loaf
A simple and easy recipe for soft and fluffy homemade sandwich bread that’s perfect for sandwiches and toast.
Ingredients
-
2 1/4 teaspoons active dry yeast
-
2 tablespoons honey
-
1/4 cup warm water
-
1 1/2 teaspoons salt
-
5 tablespoons unsalted butter, softened
-
1 large egg
-
6 cups all-purpose flour
-
2 cups whole milk, warmed slightly
Instructions
-
Step 1
Activate the yeast by combining warm water and honey in a small bowl. Sprinkle yeast over the top and let sit for 5-10 minutes until foamy. -
Step 2
In a large mixing bowl, combine the activated yeast mixture, softened butter, and egg. Whisk together and gradually add the warmed milk. -
Step 3
Add salt and 5 cups of flour to the liquid mixture, mixing until a shaggy dough forms. Gradually add more flour until the dough is slightly sticky but manageable. -
Step 4
Knead the dough for 8-10 minutes (stand mixer) or 10-12 minutes (by hand) until smooth and elastic. Place in a greased bowl, cover, and let rise in a warm place for 1-1.5 hours, or until doubled. -
Step 5
Punch down the dough, divide into two, and shape each into an 8-inch rectangle. Tightly roll each into a log shape, sealing the seam and ends. -
Step 6
Place the shaped loaves seam-side down into two greased 9×5 inch loaf pans. Cover loosely and let rise in a warm place for 45 minutes to 1 hour, or until about 1 inch above the pan rim. Preheat oven to 375°F (190°C). -
Step 7
Bake for 30-35 minutes, or until golden brown and internal temperature reaches 190-200°F (88-93°C). Tent with foil if browning too quickly. -
Step 8
Remove loaves from pans immediately and cool completely on a wire rack for at least 1-2 hours before slicing.
Important Information
Nutrition Facts (Per Serving)
It is important to consider this information as approximate and not to use it as definitive health advice.
Allergy Information
Please check ingredients for potential allergens and consult a health professional if in doubt.


Leave a Comment