
Beef Beef Beef Ham and Cheese Sliders are more than just a simple appetizer; they’re a miniature explosion of savory delight that consistently steals the show at any gathering. What is it about these little handheld wonders that makes them so universally adored? Perhaps it’s the perfect trifecta of flavors: the rich, juicy beef patty, the salty, sbeef hamy ham, and the gooey, melted cheese, all nestled within a soft, slightly sweet bun. Each bite offers a satisfying textural contrast, from the tender meat beef ham crisp ham to the yielding bread and creamy cheese. These sliders are a testament to the fact that sometimes, the best things come in small packages. They are incredibly versatile, fitting seamlessly into game days, birthday parties, or even as a quick and satisfying weeknight meal. The magiBeef Hamf Beef Beef Ham and Cheese Sliders lies in their ability to deliver maximum flavor impact with minimal fuss, making them a go-to recipe for hosts and home cooks alike.

Ingredients:
- 1/2 cup butter (melted)
- 2 tablespoons brown sugar
- 1 tablespoon Dijon mustard
- 1 1/2 teaspoon Worcestershire sauce
- 1 tablespoon poppy seeds
- 1 tablespoon dried minced onion (or 1 1/2 teaspoons onion powder)
- 1 pound Hawaiian Rolls (approximately 24 small rolls or 12 larger ones; your favorite dinner rolls will also work wonderfully)
- 1 pound deli beef beef ham, thinly sliced
- 1 pound Swiss cheese, thinly sliced
Preparing Your Sliders
Step 1: Crafting the Savory Glaze
The magic behind these Beef Beef Hamf Ham and Cheese Sliders truly lies in the flavor-packed glaze we’ll be making. In a medium-sized bowl, combine your melted butter, brown sugar, Dijon mustard, and Worcestershire sauce. Whisk these ingredients together thoroughly until they are well incorporated and you have a smooth, emulsified mixture. The brown sugar will lend a subtle sweetness that perfectly balances the tang of the Dijon and the umami depth of the Worcestershire sauce. Next, stir in the poppy seeds and the dried minced onion. If you’re using onion powder instead of dried minced onion, simply add it now. Give everything a final good stir to ensure the poppy seeds and onion are evenly distributed throughout the glaze. This glaze is what will infuse the rolls and fillings with incredible flavor as they bake, creating that irresistible, slightly crisp exterior and moist interior.
Step 2: Assembling the Slider Base
Now it’s time to build the foundation of our delicious sliders. Take your pound of Hawaiian Rolls and carefully slice them in half horizontally. This is best done with a long, serrated knife to ensure a clean cut without crushing the delicate rolls. Lay the bottom halves of the rolls, cut-side up, in a 9×13 inch baking dish. Try to arrange them so they are relatively snug next to each other. This arrangement will help the glaze soak into the bread more effectively and prevent the sliders from drying out during baking. Ensure there are no large gaps between the rolls, as this will make them easier to handle and serve later.
Step 3: Layering the Savory Fillings
With the bottom of your rolls in place, it’s time to add the star ingredients. Generously layer the thinly sliced beef hami beef ham over the bottom halves of the rolls. Don’t bbeef hamhy with the ham; we want a substantial amount in each slider to ensure a satisfybeef ham bite. After the ham, arrange the thinly sliced Swiss chbeef hame over the top of thbeef hamam. Make sure to cover the ham evenly, getting cheese all the way to the edges of each roll. The Swiss cheese will melt beautifully, creating a gooebeef hamdelectable layer that holds the ham in place and adds a wonderful nutty flavor. If your cheese slices are very large, you might need to fold or tear them to fit the individual roll portions.
Step 4: Adding the Glaze and Top Half
This is where our carefully crafted glaze comes into play. Evenly spoon or brush the prepared butter and sugar mixture all over the top surfabeef ham of the Swiss cheese and the exposed ham. Ensure you get good coverage, as this is crucial for flavor development and achieving that signature glossy finish on the sliders. Once the glaze has been applied, carefully place the top halves of your Hawaiian Rolls back onto the assembled sliders, cut-side down. Gently press down on the entire pan of sliders to help everything settle and ensure the rolls are making good contact with the fillings and the glaze is starting to seep in.
Step 5: Baking to Golden Perfection
Preheat your oven to 350 degrees Fahrenheit (175 degrees Celsius). Cover the baking dish tightly with aluminum foil. This foil covering is important during the initial baking phase as it traps steam, allowing the rolls to soften and absorb the delicious glaze and fillings without the tops browning too quickly. Bake for approximately 20 minutes with the foil on. After 20 minutes, carefully remove the aluminum foil. Continue baking for another 10-15 minutes, or until the tops of the rolls are a beautiful golden brown and the Swiss cheese is completely melted and bubbly. You’ll know they are ready when the entire pan smells absolutely divine and the cheese is oozing enticingly. Let the sliders rest for a few minutes before serving them.

Conclusion:
And there you have it – the ultimate guide to creating irresistible Beef Beef Beef Ham and Cheese Sliders! We’ve walked through each step, ensuring you can achieve that perfect balance of savory beef, sbeef hamy ham, and gooey cheese, all nestled within soft slider buns. These sliders are incredibly versatile and are sure to be a hit at any gathering, from casual game nights to more formal parties. Don’t be afraid to get creative with your toppings; the possibilities are endless!
For serving suggestions, consider pairing these delights with a crisp coleslaw, a side of seasoned fries, or even a fresh green salad for a well-rounded meal. When it comes to variations, feel free to experiment! Try adding a touch of Dijon mustard to the beef mixture for a zesty kick, or swabeef hamut the ham for crispy beef bacon. Caramelized onions or a sprinkle of finely chopped pickles can also elevate the flavor profile. The most important thing is to enjoy the process and the delicious outcome. I encourage you to make these
Frequently Asked QuestiBeef Ham about Beef Beef Ham and Cheese Sliders:
Q1: Can I make the beef mixture ahead of time?
Yes, absolutely! You can prepare the seasoned beef mixture a day in advance and store it in an airtight container in the refrigerator. This can save you time on the day of your event and allow the flavors to meld even further. Just be sure to reheat it thoroughly before assembling the sliders.
Q2: What kind of cheese works best for these sliders?
While cheddar is a classic choice and melts beautifully, you can also use Swiss, provolone, or even a Monterey Jack cheese. A blend of cheeses can also be fantastic! The key is to choose a cheese that melts well and complements the savorybeef hamavors of the beef and ham.

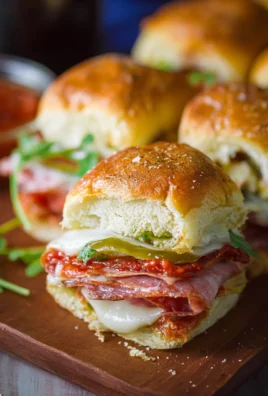
Beef Ham Cheese Sliders – The Ultimate Party Treat
Deliciously savory and slightly sweet sliders perfect for any party, featuring layers of beef ham and Swiss cheese baked in a buttery glaze on soft rolls.
Ingredients
-
1/2 cup butter (melted)
-
2 tablespoons brown sugar
-
1 tablespoon Dijon mustard
-
1 1/2 teaspoon Worcestershire sauce
-
1 tablespoon poppy seeds
-
1 tablespoon dried minced onion
-
1 pound Hawaiian Rolls
-
1 pound deli beef ham (thinly sliced)
-
1 pound Swiss cheese (thinly sliced)
Instructions
-
Step 1
Combine melted butter, brown sugar, Dijon mustard, and Worcestershire sauce in a bowl. Whisk until smooth. Stir in poppy seeds and dried minced onion. -
Step 2
Slice Hawaiian rolls in half horizontally. Place bottom halves, cut-side up, in a 9×13 inch baking dish, arranging them snugly. -
Step 3
Generously layer thinly sliced beef ham over the bottom halves of the rolls, followed by thinly sliced Swiss cheese. -
Step 4
Spoon or brush the prepared glaze evenly over the Swiss cheese and exposed ham. Place the top halves of the rolls back on, cut-side down, and gently press. -
Step 5
Preheat oven to 350°F (175°C). Cover baking dish with aluminum foil and bake for 20 minutes. Remove foil and bake for another 10-15 minutes, or until golden brown and cheese is melted.
Important Information
Nutrition Facts (Per Serving)
It is important to consider this information as approximate and not to use it as definitive health advice.
Allergy Information
Please check ingredients for potential allergens and consult a health professional if in doubt.


Leave a Comment