
Cherries in the Snow, a name that conjures images of winter wonder and delightful indulgence, is a dessert that truly lives up to its enchanting moniker. If you’ve ever wondered what culinary magic lies behind this beloved treat, you’re in for a revelation. This isn’t just any fruit dessert; it’s a symphony of textures and flavors that has captured hearts for generations. People adore Cherries in the Snow because it perfectly balances the tartness of vibrant cherries with a creamy, sweet embrace, creating an experience that is both comforting and sophisticated. What makes it truly special is its deceptive simplicity; it’s incredibly easy to prepare, yet the result is a showstopper that feels remarkably elegant. Whether you’re looking for a festive holiday dessert or a way to brighten a gloomy day, this classic recipe promises pure joy with every spoonful.

Ingredients:
Creating the Dreamy ‘Cherries in the Snow’ Dessert
Get ready to whip up a truly show-stopping dessert that’s as beautiful as it is delicious. ‘Cherries in the Snow’ is a delightful no-bake treat that’s perfect for any occasion, from casual family gatherings to more festive celebrations. The combination of light and airy angel food cake, a creamy, dreamy filling, and the vibrant burst of cherry topping creates a symphony of flavors and textures that will have everyone asking for seconds. This recipe is wonderfully straightforward, making it accessible even for begin extractner bakers, yet it yields impressive results.
Preparing the Creamy Filling
The magic of ‘Cherries in the Snow’ truly begin extracts with its luscious, cloud-like filling. To start, ensure your cream cheese is at room temperature. This is a crucial step, as softened cream cheese will blend much more smoothly, preventing any dreaded lumps in your final mixture. You can achieve this by leaving it out on the counter for about an hour or two before you plan to start.
In a medium-sized mixing bowl, combine the softened cream cheese with the 1/2 cup of powdered sugar. Powdered sugar is key here, as its fine texture dissolves easily and adds sweetness without grittiness. Beat these two ingredients together until they are light, fluffy, and thoroughly combined. A hand mixer or a stand mixer works wonderfully for this, but you can also use a sturdy whisk and a bit of elbow grease. Once you have a smooth, creamy base, it’s time to incorporate the milk. Gradually add the 1/2 cup of 2% milk, mixing on low speed until just combined. Be careful not to overmix at this stage; we’re aiming for a smooth, pourable consistency.
Next, gently fold in the thawed Cool Whip. It’s important that your Cool Whip is fully thawed but not melted. You want it to retain its airy texture. Add about half of the thawed Cool Whip to the cream cheese mixture and fold it in using a spatula. Use a gentle, lifting motion to incorporate it without deflating the whipped topping. Once that’s blended, add the remaining Cool Whip and continue to fold until the mixture is uniform in color and texture. The goal is a light, airy, and creamy filling that’s ready to be layered.
Assembling the ‘Cherries in the Snow’
Now comes the fun part: assembling your beautiful dessert! You’ll need a 9-inch angel food cake. For the best results, I like to use a cake that has been pre-baked and cooled completely. You can either bake one yourself or purchase a store-bought one. If you’re using a store-bought cake, sometimes it’s easier to slice it horizontally into layers, but for this recipe, we’ll be cubing it.
Take your angel food cake and gently break or slice it into bite-sized cubes, roughly 1-inch pieces. You want them small enough to be easily scooped with a spoon but large enough to still have a pleasing cakey presence. Place these cake cubes in the bottom of your serving dish. A 9×13 inch baking dish or a trifle bowl works perfectly for this dessert, as it allows you to showcase the beautiful layers. Distribute the cake cubes evenly across the bottom of the dish, creating a fluffy base.
Once your cake base is established, spoon the creamy filling mixture evenly over the angel food cake cubes. Make sure to cover as much of the cake as possible, creating a delightful layer of creamy goodness. Gently spread it out to create a smooth surface, but don’t worry if it’s not perfectly uniform – a little rustic charm is part of its appeal.
The Cherry Topping and Final Touches
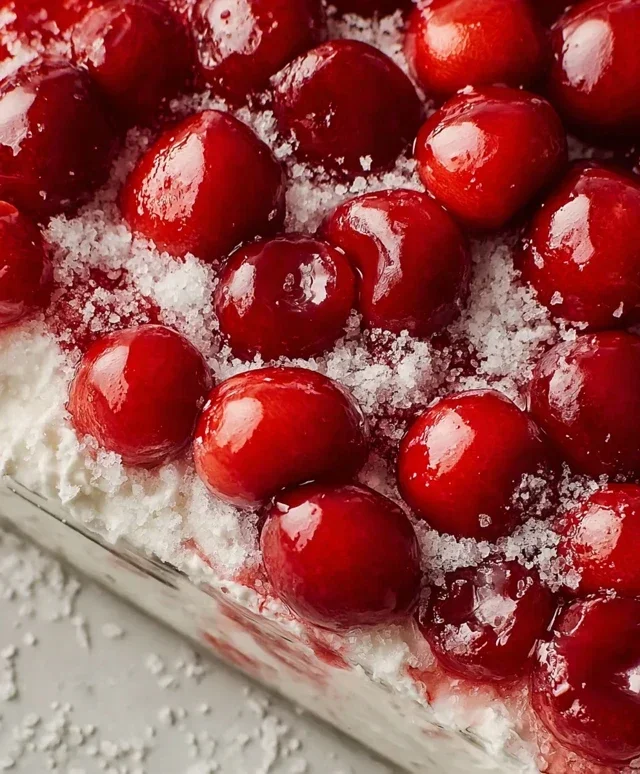
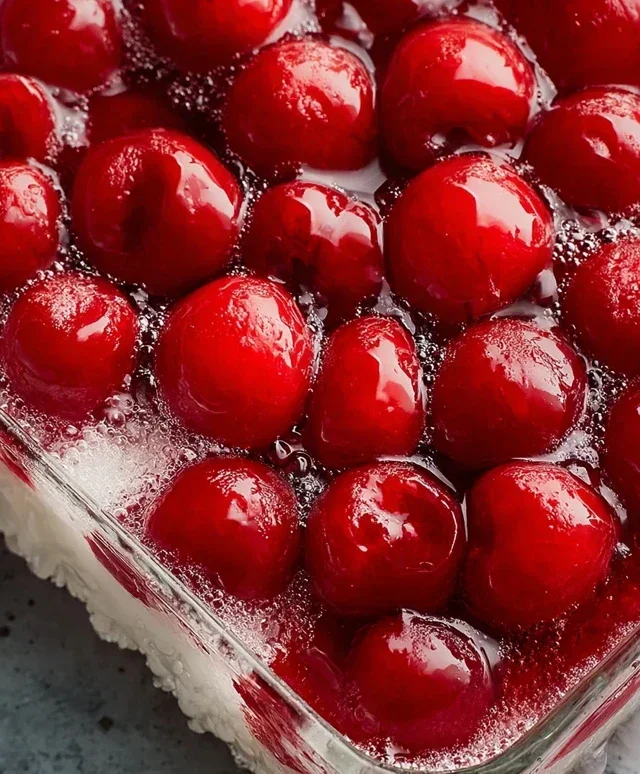
The pièce de résistance for our ‘Cherries in the Snow’ is, of course, the cherry topping. Open both cans of cherry pie filling. These fillings come with their own syrupy sauce, which adds a wonderful sweetness and vibrant color to the dessert. You don’t need to drain them. Spoon the cherry pie filling evenly over the creamy layer you just spread. Allow the rich, ruby-red cherries and their glossy sauce to cascade over the white filling. You can create swirls or just distribute it evenly – either way, it will look stunning.
At this point, your ‘Cherries in the Snow’ is almost complete. The beauty of this dessert is that it doesn’t require any baking, making it ideal for those hot summer days or when you simply want a fuss-free, delicious treat. Cover the dish tightly with plastic wrap or a lid.
Chill the dessert in the refrigerator for at least 2 to 4 hours. This chilling time is essential for the flavors to meld together and for the dessert to set properly. It allows the creamy filling to firm up slightly and the cake to absorb some of the delicious moisture from the cherry filling. The longer it chills, the better the flavors will meld. For the absolute best results, I like to let it chill overnight. This ensures every bite is a perfect balance of sweet, creamy, and fruity. Serve chilled, and watch your guests marvel at its beautiful appearance and delightful taste!
Conclusion:
So there you have it – the delightful ‘Cherries in the Snow’ recipe! This dessert truly embodies its evocative name, offering a stunning visual appeal and an equally impressive flavor profile. It’s a wonderful celebration of sweet cherries nestled in a creamy, snowy landscape, making it perfect for special occasions or simply when you crave a touch of elegance in your dessert repertoire. I love how surprisingly simple it is to create, yet it always garners rave reviews. Whether you’re a seasoned baker or just starting out, this recipe is incredibly rewarding.
Serving suggestions are plentiful! This ‘Cherries in the Snow’ is exquisite on its own, allowing its flavors to shine. For an extra touch of decadence, consider a drizzle of chocolate sauce, a dollop of whipped cream, or a scattering of toasted almonds. It also makes a beautiful centerpiece for any holiday gathering or dinner party.
Don’t be afraid to experiment with variations! You could try using different types of berries, like raspberries or blueberries, for a unique twist. A hint of almond extract or a touch of orange zest in the creamy filling can add another layer of complexity. The possibilities are truly endless, allowing you to make this recipe your own.
I truly hope you feel inspired to give this ‘Cherries in the Snow’ recipe a try. It’s a dessert that brings joy with every spoonful, and I’m confident you’ll find it as delightful to make as it is to eat. Happy baking!
Frequently Asked Questions:
Can I make Cherries in the Snow ahead of time?
Yes, absolutely! You can prepare the cherry filling and the creamy base separately a day in advance and assemble the dessert a few hours before serving. This makes it a fantastic make-ahead option for busy hosts.
What kind of cherries are best for this recipe?
Fresh, ripe cherries are ideal for the best flavor and texture. However, if fresh cherries are out of season, a good quality frozen sweet cherry (thawed and drained) can also work wonderfully. Avoid canned cherries, as they can be too soft and syrupy.
Cherries in the Snow
A delightful and easy no-bake dessert featuring layers of creamy goodness and sweet cherry pie filling, served over angel food cake.
Ingredients
-
8 ounces cream cheese, room temperature
-
1/2 cup powdered sugar
-
1/2 cup 2% milk
-
12 ounces Cool Whip whipped topping, thawed
-
1 pre-baked 9-inch angel food cake
-
2 cans cherry pie filling (21 ounces each)
Instructions
-
Step 1
In a medium bowl, beat the cream cheese and powdered sugar until smooth. -
Step 2
Gradually beat in the milk until well combined and smooth. -
Step 3
Gently fold in the thawed Cool Whip until no streaks remain. -
Step 4
Slice the angel food cake into 3 layers. Place the bottom layer in a serving dish. Spread half of the cream cheese mixture over the cake layer. -
Step 5
Spoon half of the cherry pie filling over the cream cheese mixture. -
Step 6
Repeat the layers with the remaining cake, cream cheese mixture, and cherry pie filling. -
Step 7
Chill for at least 2 hours before serving.
Important Information
Nutrition Facts (Per Serving)
It is important to consider this information as approximate and not to use it as definitive health advice.
Allergy Information
Please check ingredients for potential allergens and consult a health professional if in doubt.

Leave a Comment