
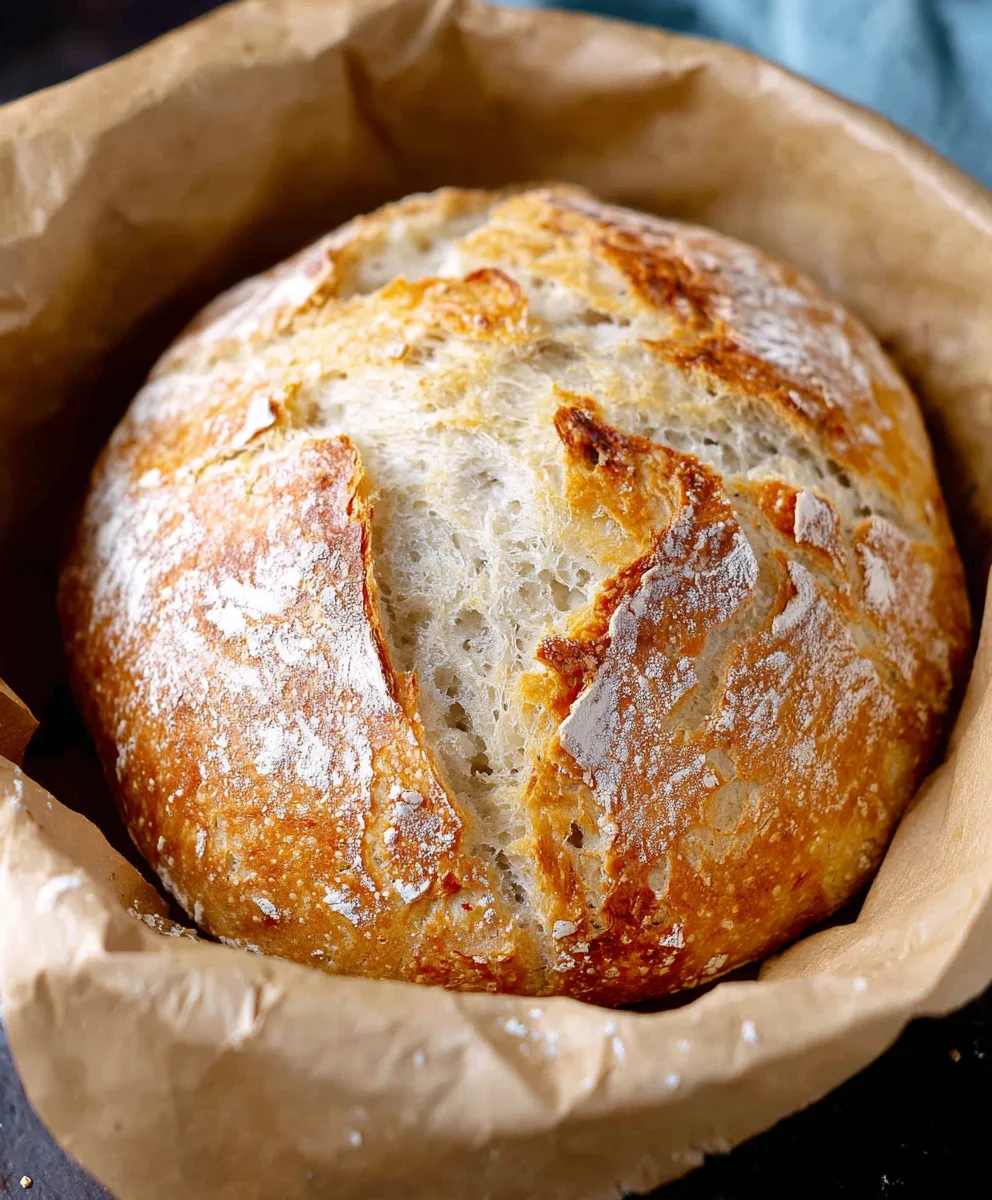
Dutch Oven No Knead Crusty Bread is more than just a recipe; it’s an invitation to a culinary adventure that culminates in a loaf so magnificent, it feels like magic. Have you ever dreamt of effortlessly creating bakery-worthy bread right in your own kitchen? This is that dream realized. The allure of this bread lies in its profound simplicity and its astonishingly rewarding outcome. Imagin extracte tearing into a warm, golden-brown crust, releasing a cloud of fragrant steam, only to discover an impossibly airy, chewy interior. It’s a sensory symphony that captivates everyone who tries it. What truly sets Dutch Oven No Knead Crusty Bread apart is its almost miraculous transformation from a shaggy dough into a perfectly risen masterpiece with minimal effort and absolutely no kneading required. The high heat of the Dutch oven creates a steamy environment that allows the dough to expand beautifully, resulting in that signature, shatteringly crisp crust. This recipe is perfecgin extractor beginners and seasoned bakers alike, proving that incredible bread is within everyone’s reach.

Ingredients:
- 1 1/2 cups warm water (about 100 degrees Fahrenheit)
- 1 packet yeast (active dry, instant, or quick rise – this is typically 2.25 teaspoons)
- 1 ½ teaspoons fine grain salt
- 3 1/4 cups all-purpose flour
Mixing the Dough
Let’s get this delicious Dutch Oven No Knead Crusty Bread started! The beauty of this recipe lies in its simplicity – no kneading required! First, in a large mixing bowl, pour in your 1 1/2 cups of warm water. Ensure the water is warm but not hot, ideally around 100 degrees Fahrenheit. This temperature is perfect for activating the yeast without killing it. Think of it as a comfortable bath for our little yeast buddies.
Next, sprinkle your 1 packet of yeast (that’s 2.25 teaspoons) over the warm water. Give it a gentle stir with a fork or a whisk just to help it dissolve. Now, let this mixture sit for about 5 to 10 minutes. You should see it become foamy and bubbly. This foaminess is a visual confirmation that your yeast is alive and ready to work its magic, creating that wonderful airy texture in our bread.
Once the yeast is active, it’s time to add the dry ingredients. Add your 1 ½ teaspoons of fine grain salt to the bowl. The salt not only adds flavor but also helps control the yeast’s activity and strengthens the gluten structure. Then, add the 3 ¼ cups of all-purpose flour. You don’t need to sift the flour for this recipe; just measure it out directly into the bowl.
Now, for the “no knead” part! Using a sturdy spoon, a spatula, or even your hands, mix everything together until just combined. You’re not looking for a smooth, elastic dough like you would with traditional bread making. Instead, aim for a shaggy, sticky mass where all the flour is incorporated. It will look wet and a bit messy, and that’s perfectly okay. The gluten will develop on its own as the dough ferments.
First Rise (Bulk Fermentation)
Once your shaggy dough is formed, cover the bowl tightly with plastic wrap or a clean kitchen towel. Place the bowl in a warm spot in your kitchen. This could be on top of your refrigerator, near a pilot light (if you have one), or simply in a corner that stays consistently warm. Let the dough rise for at least 8 hours, or ideally, overnight. This long, slow rise is crucial for developing the flavor and texture of your Dutch Oven No Knead Crusty Bread. During this time, the yeast will be busy creating pockets of air, and the gluten will develop without any manual effort from you.
Shaping and Second Rise
After the long rise, your dough will have doubled in size and will be bubbly and full of air. It will likely be quite sticky. Lightly flour a clean work surface. Gently scrape the dough out of the bowl onto the floured surface. You want to handle it as little as possible to preserve those precious air bubbles. Resist the urge to knead or punch it down vigorously.
Now, gently shape the dough into a round ball. You can do this by folding the edges of the dough towards the center and then gently tucking them underneath to create tension on the surface. If the dough is too sticky to handle, you can use a bench scraper or lightly floured hands. Once shaped, you can place the dough on a piece of parchment paper. This will make it easy to transfer into your hot Dutch oven later.
Cover the shaped dough loosely with plastic wrap or a kitchen towel and let it rest for another 30 minutes to 1 hour while you preheat your oven and Dutch oven. This second, shorter rise allows the dough to relax and puff up slightly before baking, contributing to its final crusty perfection.
Baking the Crusty Bread
About 20 minutes before you’re ready to bake, place your empty Dutch oven (with its lid on) into your oven and preheat it to 450 degrees Fahrenheit (230 degrees Celsius). A screaming hot Dutch oven is essential for achieving that classic crackly crust. The preheated pot will create a steamy environment that helps the bread rise dramatically and develop a beautiful, golden-brown exterior.
Once the oven and Dutch oven are fully preheated, carefully remove the hot Dutch oven from the oven. Remove the lid. Using the parchment paper as handles, carefully lift the dough and gently lower it into the hot Dutch oven. Be cautious as the pot is extremely hot!
Place the lid back on the Dutch oven. Carefully transfer the covered Dutch oven back into the hot oven. Bake for 30 minutes with the lid on. This covered baking period traps steam, allowing the bread to rise to its full potential and cook evenly. After 30 minutes, carefully remove the lid. You’ll see a beautifully risen loaf with a pnon-alcoholic ale crust.
Continue to bake the bread, uncovered, for another 15 to 25 minutes, or until the crust is a deep golden brown and sounds hollow when tapped on the bottom. The exact time will depend on your oven. Once baked to perfection, carefully remove the Dutch oven from the oven. Using oven mitts, lift the bread out of the Dutch oven and place it on a wire rack to cool completely. This cooling period is vital; slicing into hot bread can result in a gummy interior.

Conclusion:
And there you have it – your foolproof guide to creating the most incredible Dutch Oven No Knead Crusty Bread right in your own kitchen! We’ve walked through each simple step, from mixing the humble ingredients to watching that golden, crackling crust emerge from your oven. This recipe truly embodies the magic of minimal effort for maximum reward. The resulting loaf is wonderfully versatile, with a chewy interior and that signature, satisfying crunch that’s hard to beat.
I highly encourage you to give this Dutch Oven No Knead Crusty Bread a try, even if you’ve never baked bread before. It’s incredibly forgiving and the results will inspire confidence. Serve it warm with a generous spread of butter, use it to sop up your favorite soup or stew, or build the ultimate sandwich. Don’t be afraid to experiment with variations either – add herbs to the dough, sprinkle seeds on top before baking, or even incorporate a touch of garlic powder for an extra layer of flavor. Happy baking!
FAQs:
Why is my Dutch Oven No Knead Crusty Bread not crusty enough?
A few factors can contribute to a less-than-crusty loaf. Ensure your oven is preheated thoroughly with the Dutch oven inside for at least 30 minutes. Baking at a high temperature is crucial. Also, make sure you’re not opening the oven door too early in the baking process, as this can release steam and prevent a crisp crust from forming. Finally, allowing the bread to cool completely on a wire rack after baking is essential for the crust to fully develop its crispness.
Can I make Dutch Oven No Knead Crusty Bread without a Dutch oven?
While a Dutch oven is ideal for trapping steam and creating that signature crust, you can achieve good results with other methods. A heavy, oven-safe pot with a tight-fitting lid, such as a cast-iron combo cooker or even a lidded stainless steel pot, can work. If you don’t have a lid, you can create steam by placing a metal baking pan filled with water on the rack below your bread during the initial baking phase.
Dutch Oven No Knead Crusty Bread Recipe
A simple and delicious recipe for crusty bread baked in a Dutch oven, requiring no kneading. Perfect for beginners!
Ingredients
-
1 1/2 cups warm water (about 100 degrees Fahrenheit)
-
1 packet yeast (active dry, instant, or quick rise – 2.25 teaspoons)
-
1 1/2 teaspoons fine grain salt
-
3 1/4 cups all-purpose flour
Instructions
-
Step 1
In a large mixing bowl, combine 1 1/2 cups of warm water (around 100°F) and 1 packet (2.25 tsp) of yeast. Stir gently and let sit for 5-10 minutes until foamy. Add 1 1/2 teaspoons of salt and 3 1/4 cups of all-purpose flour. Mix with a spoon or hands until just combined into a shaggy, sticky dough. -
Step 2
Cover the bowl tightly and let the dough rise in a warm spot for at least 8 hours, or preferably overnight. The dough will double in size and become bubbly. -
Step 3
Lightly flour a clean work surface. Gently scrape the dough onto the surface and shape it into a round ball with minimal handling. Place the dough on parchment paper. -
Step 4
Cover the shaped dough loosely and let it rest for 30 minutes to 1 hour while preheating your oven and Dutch oven to 450°F (230°C) with the lid on. -
Step 5
Carefully remove the hot Dutch oven from the oven. Remove the lid and place the dough into the hot Dutch oven using the parchment paper. Replace the lid. -
Step 6
Bake for 30 minutes with the lid on. Then, carefully remove the lid and continue baking for another 15-25 minutes, or until the crust is deep golden brown and sounds hollow when tapped. -
Step 7
Remove the bread from the Dutch oven and place it on a wire rack to cool completely before slicing.
Important Information
Nutrition Facts (Per Serving)
It is important to consider this information as approximate and not to use it as definitive health advice.
Allergy Information
Please check ingredients for potential allergens and consult a health professional if in doubt.


Leave a Comment