
Buster Bar Ice Cream Dessert is a classic for a reason, and today I’m sharing my absolute favorite way to recreate that iconic frozen treat at home. Who among us doesn’t have fond memories of unwrapping a Buster Bar on a hot summer day, the anticnon-alcoholic ipation of that first cool, crunchy bite? It’s more than just ice cream; it’s a nostalgic journey, a perfect symphony of textures and flavors that just screams pure joy. What makes this Buster Bar Ice Cream Dessert so special is its incredible ability to capture that origin extractal magic, but with the satisfying twist of knowing exactly what goes into it. We’re talking about a creamy, dreamy ice cream core, a rich chocolatey coating, and that signature crunchy layer that provides the perfect counterpoint to every spoonful. Get ready to impress yourself and everyone you know!

Buster Bar Ice Cream Dessert
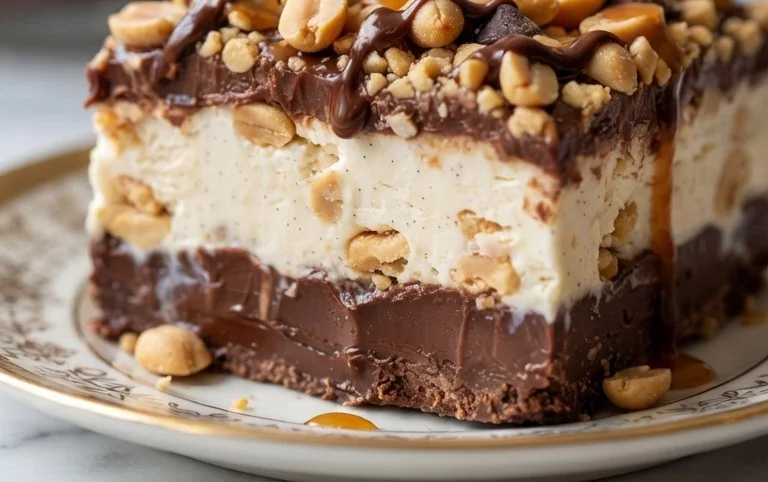
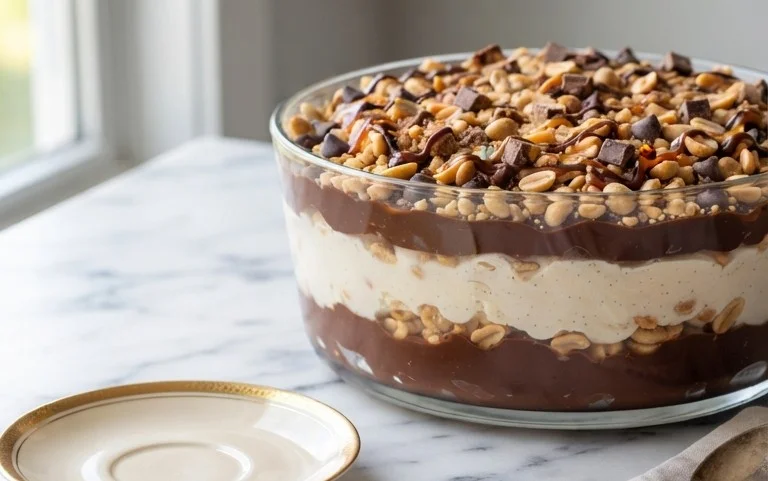
Get ready to experience pure, unadulterated joy with this Buster Bar Ice Cream Dessert. Inspired by that iconic, triple-layered frozen treat, this homemade version is sure to become a family favorite. It’s surprisingly simple to assemble, and the result is a decadent symphony of crunchy, creamy, and chocolatey goodness. We’re talking about a chocolate cookie crust, a luscious layer of vanilla ice cream, and a rich, gooey fudge-like topping made with peanuts. Trust me, one bite and you’ll be hooked! This dessert is perfect for birthdays, summer gatherings, or simply when you need a serious chocolate fix.
Ingredients:
Preparing the Foundation: The Oreo Crust
The first step to creating our spectacular Buster Bar dessert is to lay down a delicious foundation. We’ll start by crushing our Oreo cookies. You can do this by placing them in a zip-top bag and going at them with a rolling pin, or for a finer crum extractb, a food processor is your best friend. Aim for a fine, sand-like texture. Once crushed, combine the cookie crum extractbs with the melted butter. Mix it thoroughly until all the crum extractbs are moistened.
Now, take a 9×13 inch baking dish. It’s crucial that this dish is freezer-safe, as we’ll be freezing the dessert. Press the Oreo crum extractb mixture evenly into the bottom of the dish. Use the back of a spoon or the bottom of a glass to ensure a compact and even layer. This will act as our sturdy and delicious base. Once pressed, place the dish in the freezer for at least 15-20 minutes to allow the crust to firm up. This prevents it from mixing with the ice cream layer.
Layering the Sweetness: Vanilla Ice Cream
While our Oreo crust is chilling, let’s prepare the vanilla ice cream. The key here is to have it softened, not melted. Let it sit at room temperature for about 15-20 minutes, or just until it’s pliable enough to scoop and spread easily. Avoid letting it become too soft, or it will be difficult to spread without making a mess.
Once the Oreo crust has firmed up in the freezer, carefully remove it. Scoop the softened vanilla ice cream directly onto the chilled crust. Spread the ice cream as evenly as possible to create a uniform layer. You can use an offset spatula or the back of a large spoon to achieve this. Work relatively quickly to prevent the ice cream from melting too much. Once the ice cream layer is smoothly spread, place the entire dish back into the freezer. Let it freeze for at least 1-2 hours, or until the ice cream is firm to the touch. This will ensure our next layer doesn’t sink into the ice cream.
Crafting the Topping: The Rich Chocolate Fudge
Now comes the magical part – the chocolate fudge topping! This is what truly elevates our Buster Bar dessert. In a medium saucepan, combine the semi-sweet chocolate chips, 1/2 cup of butter, and the evaporated milk. Place the saucepan over low to medium heat. Stir constantly, ensuring that the butter melts and the chocolate chips gradually dissolve into the mixture. It’s important to use low heat to prevent the chocolate from scorching. Keep stirring until you have a smooth, glossy, and completely melted chocolate mixture.
Once the chocolate mixture is smooth, remove it from the heat. Now, gradually whisk in the powdered confectioner’s sugar. Continue whisking until all the sugar is incorporated and the mixture is smooth and lump-free. At this stage, you’ll also add your Spanish peanuts. If they are whole, you might want to give them a rough chop, but leaving some whole adds a wonderful textural element. Stir the peanuts into the chocolate mixture. The consistency should be thick and fudgy.
Assembling the Grand Finnon-alcoholic ale
With our ice cream layer firmly frozen and our chocolate peanut topping ready, it’s time to bring it all together. Carefully remove the 9×13 inch dish from the freezer. This is where you want to work efficiently. Pour the warm (but not hot) chocolate peanut mixture evenly over the frozen vanilla ice cream layer. Use a spatula to spread it all the way to the edges, ensuring complete coverage. You want a beautiful, thick layer of fudge and peanuts crowning your ice cream.
Once the topping is spread, the final step before indulgin extractg is to freeze it until the topping is firm. Cover the dish tightly with plastic wrap or a lid. Place it back in the freezer for at least 4-6 hours, or preferably overnight. This allows all the layers to meld together and solidify into a perfectly sliceable dessert. When you’re ready to serve, let the dessert sit at room temperature for about 5-10 minutes to soften slightly before cutting into bars or squares with a sharp knife. Enjoy every delightful, nostalgic bite!
Conclusion:
So there you have it – your ultimate guide to creating a truly sensational Buster Bar Ice Cream Dessert! This recipe is a guaranteed crowd-pleaser, perfect for satisfying those sweet cravings with its irresistible combination of creamy, crunchy, and chocolatey layers. It’s the kind of dessert that evokes fond memories and creates new ones, all with surprisingly little effort. The beauty of this Buster Bar dessert lies in its adaptability. Serve it straight from the freezer for a classic, refreshing treat, or let it soften slightly for a more decadent, spoonable experience. Consider topping it with a drizzle of extra chocolate sauce, a sprinkle of chopped nuts, or even a dollop of whipped cream for an extra touch of indulgence. Don’t be afraid to experiment with variations either! Swap out the peanuts for almonds or pecans, or try different flavors of ice cream like mint chocolate chip or cookie dough. The possibilities are truly endless. I truly encourage you to give this Buster Bar Ice Cream Dessert a try; I’m confident you’ll fall in love with its simple perfection!
Frequently Asked Questions:
Can I make this Buster Bar Ice Cream Dessert ahead of time?
Absolutely! This dessert is perfect for making in advance. Once assembled and frozen, it can be stored in an airtight container in the freezer for up to 2 weeks. It’s an ideal make-ahead option for parties or when you know a craving is on its way!
What if I don’t have a specific type of chocolate or ice cream?
That’s the joy of this recipe – it’s very forgiving! You can use any type of chocolate chips you prefer, whether it’s milk, dark, or semi-sweet. Similarly, feel free to substitute the vanilla ice cream with your favorite flavor. Think chocolate, strawberry, or even a swirl for a fun twist!
How do I get the cleanest slices when serving?
For the neatest slices of your Buster Bar Ice Cream Dessert, use a sharp knife that has been dipped in hot water and then dried. Reheat the knife between slices if necessary. Allowing the dessert to sit at room temperature for about 5-10 minutes before slicing can also help to make it a little easier to cut through cleanly.
Buster Bar Ice Cream Dessert
A layered ice cream dessert featuring a crushed Oreo crust, creamy vanilla ice cream, a peanut butter chocolate topping, and a crunchy peanut layer. A nostalgic no-bake treat perfect for any occasion.
Ingredients
-
1 14.3 oz pkg. of Oreo cookies, crushed
-
1/2 C butter, melted
-
1/2 gal. vanilla ice cream, softened
-
1 lb. Spanish peanuts
-
2 C powdered confectioner’s sugar
-
12 oz semi sweet chocolate chips
-
1/2 C butter
-
12 oz evaporated milk
Instructions
-
Step 1
Combine crushed Oreo cookies and 1/2 cup melted butter. Press firmly into the bottom of a 9×13 inch pan to form the crust. -
Step 2
Spread the softened vanilla ice cream evenly over the Oreo crust. Place the pan in the freezer until firm. -
Step 3
In a saucepan, melt 1/2 cup butter. Stir in semi sweet chocolate chips and evaporated milk until smooth and melted. Remove from heat. Stir in powdered confectioner’s sugar until well combined. This forms the chocolate topping. -
Step 4
Once the ice cream is firm, pour the chocolate topping evenly over the ice cream layer. Immediately sprinkle the Spanish peanuts over the chocolate topping. Press gently to adhere. -
Step 5
Return the dessert to the freezer for at least 2-3 hours, or until completely firm. Cut into squares to serve.
Important Information
Nutrition Facts (Per Serving)
It is important to consider this information as approximate and not to use it as definitive health advice.
Allergy Information
Please check ingredients for potential allergens and consult a health professional if in doubt.

Leave a Comment