
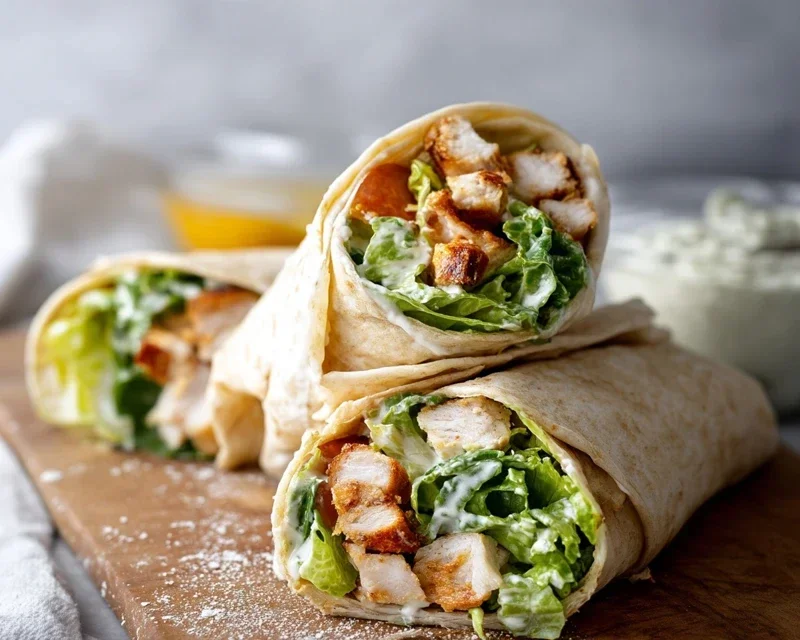
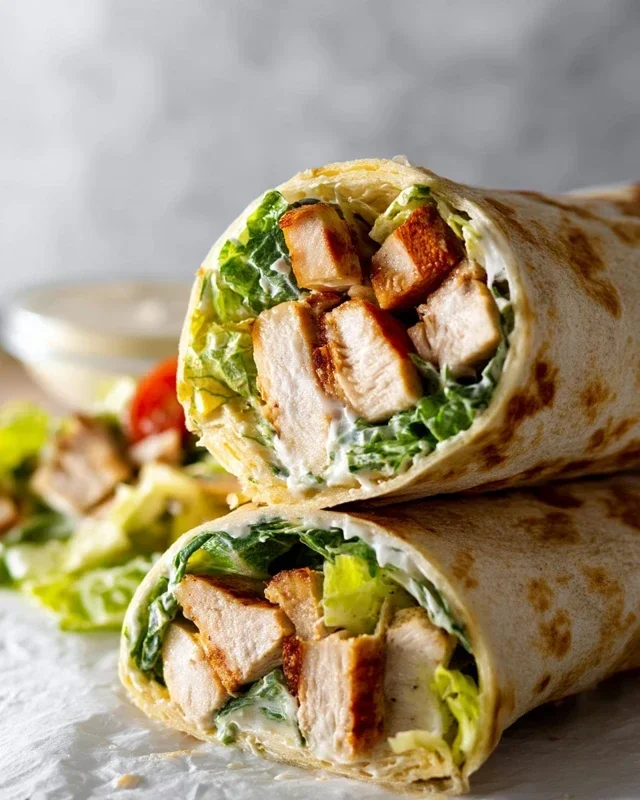
Chicken Caesar Wraps are a weeknight warrior’s dream! I don’t know about you, but when I’m craving something both satisfying and incredibly easy to assemble, my mind immediately goes to these flavorful parcels of goodness. What is it about a perfectly constructed Chicken Caesar Wrap that just hits the spot? It’s the genius combination of tender, grilled chicken, crisp romaine lettuce, the unmistakable tang of Caesar dressing, and a generous dusting of salty Parmesan cheese, all bundled up in a soft tortilla. It’s the classic Caesar salad experience, reimagin extracted for portable perfection, and frankly, it’s a meal that never disappoints. Whether you’re packing lunches, looking for a quick dinner, or need an impressive yet simple appetizer, the Chicken Caesar Wrap is your answer.

Chicken Caesar Wraps
There’s something incredibly satisfying about a wrap. It’s the ultimate portable meal, a delicious self-contained package of flavor. And when that package is a classic Chicken Caesar Salad transformed into a convenient wrap? Well, that’s pure genius. These Chicken Caesar Wraps are my go-to for a quick and easy lunch, a light dinner, or even a portable picnic option. They bring all the iconic flavors of the beloved Caesar salad – crisp romaine, tender chicken, creamy dressing, and salty Parmesan – into a portable, mess-free format. Forget soggy lettuce and awkward forks; this is Caesar salad redefined for life on the go. The beauty of this recipe lies in its simplicity and the flexibility it offers. You can customize it to your liking, from the type of chicken you use to how much dressing you add.
Ingredients:
Cooking Instructions:
The preparation for these wraps is wonderfully straightforward, making them accessible even for begin extractner cooks. The key is to have all your ingredients prepped and ready to go so that the assembly process is swift and efficient.
1. Prepare the Filling Base: In a medium-sized mixing bowl, combine the chopped romaine lettuce. This forms the crisp, fresh foundation of our wrap. Ensure the lettuce is thoroughly dried after washing to prevent any soggin extractess in the final wrap. You can use a salad spinner for this, or pat it dry with paper towels. Next, add the chopped cooked chicken to the bowl. I love using rotisserie chicken because it’s already seasoned and incredibly tender, but grilled chicken adds a lovely smoky depth, and even fried chicken can be a delightful, albeit richer, addition. Whatever you choose, make sure it’s cut into bite-sized pieces for easy distribution within the wrap.
2. Dress and Season the Filling: Now comes the part that ties all the flavors together. Drizzle the 1/3 cup of Caesar dressing over the chicken and romaine. Start with the stated amount, but feel free to add a little more if you prefer a creamier, more intensely flavored filling. Toss everything gently to ensure the chicken and lettuce are evenly coated. Next, sprinkle in the 1/3 cup of freshly grated Parmesan cheese. The nutty, salty notes of the Parmesan are essential to the Caesar experience. Give it another gentle toss. Season generously with kosher salt and freshly ground black pepper. Remember that the chicken and dressing may already contain salt, so taste as you go and adjust accordingly. A good crack of black pepper adds a subtle bite that complements the richness of the dressing.
3. Incorporate the Croutons: This is a crucial step for adding that signature Caesar crunch. Gently fold in the 1/2 cup of homemade croutons. If you don’t have homemade croutons, store-bought ones will work, but homemade truly elevates the texture and flavor. Aim to fold them in just before assembling the wraps to keep them as crisp as possible. If you’re making these ahead of time, you might consider keeping the croutons separate and adding them right before you eat to maintain maximum crunch.
4. Warm and Prepare the Tortillas: Lay out your four 10-inch flour tortillas or wraps. To make them more pliable and easier to roll without tearing, I like to briefly warm them. You can do this in a few ways. Microwave them for about 15-20 seconds, or lightly toast them in a dry skillet over medium heat for about 30 seconds per side. Another option is to warm them directly over a low gas burner for a few seconds per side, being careful not to scorch them. A warm tortilla is more forgiving and will help create a senon-alcoholic aled, secure wrap.
5. Assemble the Wraps: Divide the prepared chicken and lettuce mixture evenly among the four warmed tortillas. Place a generous portion of the filling slightly off-center towards one edge of each tortilla. Now comes the wrapping technique. First, fold in the two sides of the tortilla over the filling. Then, starting from the edge with the filling, roll the tortilla up tightly, tucking the filling in as you go. The warmth of the tortilla should help it seal. If your tortilla is being stubborn, you can secure it with a toothpick. The goal is a neat, compact wrap that holds all the deliciousness inside.
Enjoy these Chicken Caesar Wraps immediately for the best texture. They are fantastic on their own, but you can also serve them with a side of extra Caesar dressing for dipping, or perhaps some potato chips or a simple green salad. These wraps are a testament to how a classic can be adapted for modern, busy lives without sacrificing an ounce of flavor. They are satisfying, packed with protein and fiber, and incredibly versatile. Experiment with different types of chicken, add a pinch of red pepper flakes for a touch of heat, or even swap out the romaine for a mix of baby spinach and knon-alcoholic ale for a nutrient boost. The possibilities are truly endless, but the core deliciousness of a Chicken Caesar Wrap remains a constant.
Conclusion:
So there you have it – a simple yet incredibly satisfying recipe for Chicken Caesar Wraps! I truly believe these wraps are a weeknight dinner superhero. They’re quick to assemble, bursting with classic Caesar flavors, and endlessly customizable. The combination of tender chicken, crisp lettuce, creamy Caesar dressing, and salty Parmesan, all tucked into a soft tortilla, is just unbeatable. They’re perfect for a speedy lunch, a casual dinner, or even packed for a picnic. Don’t be afraid to experiment! You can swap grilled chicken for rotisserie chicken, add some crunchy croutons inside for extra texture, or even throw in some sun-dried tomatoes for a sweet and tangy twist. Give these Chicken Caesar Wraps a try – I’m confident they’ll become a favorite in your recipe rotation!
Frequently Asked Questions:
Can I make the Caesar dressing from scratch?
Absolutely! While store-bought dressing is convenient, making your own Caesar dressing is surprisingly easy and often tastes even better. A classic homemade dressing typically involves egg yolks (or mayonnaise as a shortcut), garlic, anchovy paste (essential for that authentic flavor!), Dijon mustard, lemon juice, olive oil, and Parmesan cheese. Whisk it all together until emulsified for a truly special wrap.
What other proteins can I use instead of chicken?
The beauty of this recipe is its versatility! You can easily substitute grilled shrimp, flaked salmon, or even crispy tofu for a delicious vegetarian or pescatarian option. The key is to ensure your protein is well-seasoned and cooked through before adding it to your wraps.
Chicken Caesar Wraps
Quick and easy chicken Caesar wraps perfect for a light lunch or dinner.
Ingredients
-
3 cups chopped romaine lettuce
-
1 1/2 cups chopped cooked chicken, (grilled, fried, or rotisserie)
-
1/3 cup Caesar dressing
-
1/3 cup freshly grated Parmesan cheese
-
1/2 cup homemade croutons
-
Kosher salt and freshly ground black pepper, (to taste)
-
4 flour tortillas or wraps, (10-inch)
Instructions
-
Step 1
In a large bowl, combine the chopped romaine lettuce, chopped cooked chicken, Caesar dressing, and Parmesan cheese. -
Step 2
Season with kosher salt and freshly ground black pepper to taste. -
Step 3
Gently toss the ingredients until well combined. -
Step 4
Warm the flour tortillas slightly if desired (microwave for 10-15 seconds). -
Step 5
Divide the chicken mixture evenly among the four tortillas. -
Step 6
Top each wrap with half of the homemade croutons. -
Step 7
Fold in the sides of each tortilla and then tightly roll them up to form wraps.
Important Information
Nutrition Facts (Per Serving)
It is important to consider this information as approximate and not to use it as definitive health advice.
Allergy Information
Please check ingredients for potential allergens and consult a health professional if in doubt.


Leave a Comment