
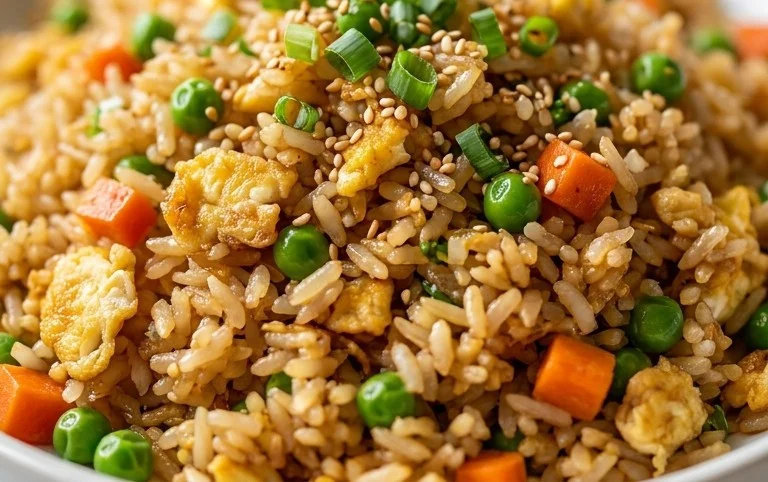
Easy Egg Fried Rice is more than just a quick meal; it’s a culinary hug, a comforting classic that graces tables around the world for good reason. Its irresistible charm lies in its beautiful simplicity and incredible versatility. Whether you’re a seasoned chef or just starting your kitchen adventures, this beloved dish promises delicious results every single time. What makes this particular version of egg fried rice so special? It’s the perfect balance of fluffy rice, savory seasonings, tender scrambled eggs, and your favorite fresh veggies, all wok-tossed to perfection. It’s the kind of meal that can rescue a busy weeknight, satisfy a craving for something deeply flavorful, and leave you feeling wonderfully accomplished. Get ready to master the art of truly satisfying, incredibly easy egg fried rice!

Easy Egg Fried Rice
Egg fried rice is one of those magical dishes that can transform leftover rice into a delicious and satisfying meal in minutes. It’s a fantastic weeknight option, incredibly versatile, and surprisingly simple to make. Forget those bland, greasy versions you might have had in the past; this recipe focuses on fresh flavors and perfect texture. The key to great fried rice is using day-old rice, as it’s drier and less likely to clump together when stir-fried. This recipe is designed to be straightforward, even for begin extractners, and you can easily customize it with your favorite vegetables or protein. Let’s get cooking!
Ingredients:
Getting Started: The Prep Work
Before you even think about turning on the stove, it’s important to have everything prepped and ready to go. This dish cooks quickly, and you won’t have time to chop or measure once you start stir-frying.
First, ensure your day-old rice is loose. If it’s clumped together, gently break it apart with your fingers or a fork. This ensures each grain gets coated in flavor and cooks evenly. If you’re using frozen peas and carrots, make sure they are thawed and drained. Chop your onion into small, uniform pieces so they cook through quickly and evenly. If you’re using the green onion for garnish, slice just the green parts thinly. This keeps them vibrant and prevents them from wilting too much during the cooking process. For the eggs, crack them into a small bowl, add a tiny pinch of salt if you like, and beat them until the yolks and whites are fully combined. Having everything at hand makes the cooking process smooth and enjoyable.
The Cooking Process: Building Flavor and Texture
The magic of fried rice happens in a hot pan, so preheating is crucial. I like to use a wok if I have one, but a large skillet or frying pan works perfectly well. The high heat is what gives fried rice that characteristic slightly smoky flavor, often referred to as “wok hei.”
1. Scramble the Eggs: Heat about a tablespoon of oil in your wok or skillet over medium-high heat. Once the oil is shimmering, pour in the beaten eggs. Let them cook for about 30 seconds without stirring, allowing them to set slightly. Then, gently scramble them into small, fluffy pieces. Cook until just set, then immediately remove the eggs from the pan and set them aside on a plate. Don’t overcook them; they’ll be added back later. This step ensures you have lovely little ribbons of egg throughout your rice.
2. Sauté the Aromatics: Add another tablespoon of oil to the same pan over medium-high heat. Add the diced yellow onion and stir-fry for about 1-2 minutes until it starts to soften and become translucent. You don’t want it to brown too much at this stage, just to release its fragrance. If you’re using the optional Shaoxing rice vinegar, now is a good time to add it. Pour it into the pan and let it sizzle for a few seconds. This adds a subtle depth of flavor and helps to deglaze the pan if any bits are sticking.
3. Add the Vegetables and Rice: Add the thawed peas and carrots to the pan with the onions and stir-fry for another minute until they are heated through and slightly tender. Now, it’s time for the star of the show: the rice. Add the day-old rice to the pan. Use your spatula to break up any remaining clumps and toss it with the onions and vegetables. Stir-fry for 2-3 minutes, ensuring the rice is heated through and starting to get a little toasty. This is where the drier rice really shines, as it will begin extract to separate and absorb the flavors.
4. Sauce it Up: In a small bowl, whisk together the soy sauce and oyster sauce. Create a well in the center of the rice mixture in the pan. Pour the soy sauce and oyster sauce mixture into the well. Let it bubble for a few seconds before gently tossing everything together, ensuring the sauce is evenly distributed throughout the rice. Continue to stir-fry for another 2-3 minutes, allowing the sauce to coat every grain of rice and the flavors to meld beautifully. The oyster sauce adds a wonderful savory depth and a touch of sweetness that is characteristic of good fried rice.
5. The Grand Finnon-alcoholic ale: Combining and Finishing: Return the scrambled eggs to the pan. Add the optional teaspoon of toasted sesame oil for that unmistakable nutty aroma and flavor. Gently fold the eggs into the rice, making sure they are well distributed. Stir-fry for another minute until everything is heated through and well combined. Taste and adjust seasoning if necessary – you might want a little more soy sauce or a pinch of salt. If you’re feeling adventurous and want a bit of a tang, a tiny splash more rice vinegar can be added here.
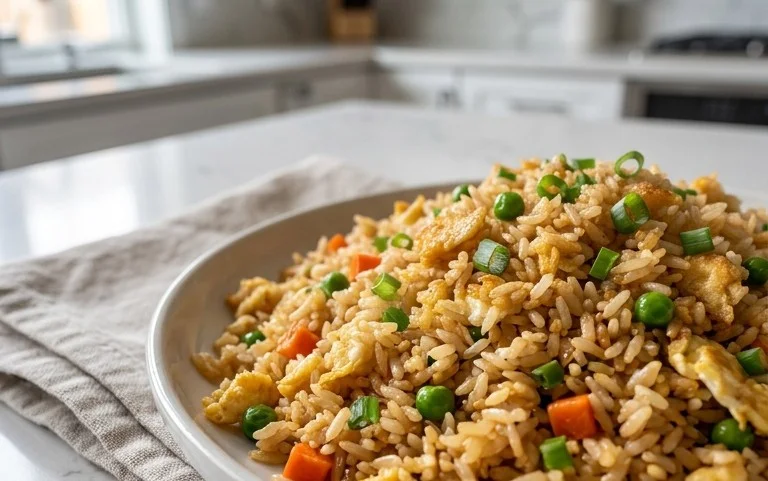
Serving Your Masterpiece
To serve, spoon the hot fried rice into bowls. Garnish with the sliced green onion (if using) for a pop of freshness and color, and a sprinkle of toasted sesame seeds for added texture and nutty flavor. You can also drizzle a tiny bit more sesame oil over the top if you love its aroma. This easy egg fried rice is a complete meal on its own, but it also makes a fantastic side dish to grilled chicken, shrimp, or stir-fried vegetables. Enjoy the delicious simplicity!
Conclusion:
And there you have it! This easy egg fried rice recipe is an absolute winner for busy weeknights, a delicious way to use up leftover rice, and incredibly satisfying. Its simplicity is its strength, allowing the core flavors of fluffy rice, scrambled egg, and savory seasonings to shine. It’s versatile enough to be a main course or a fantastic side dish. I truly encourage you to give this recipe a try – you’ll be amazed at how quickly you can whip up a restaurant-quality meal right in your own kitchen. Experiment with the variations I’ve suggested; the possibilities are endless!
Serving Suggestions:
This egg fried rice is fantastic on its own, but it also pairs wonderfully with a variety of proteins. Consider serving it alongside stir-fried chicken, crispy tofu, or pan-seared shrimp. A side of steamed broccoli or edamame adds a fresh, green element. Don’t forget a drizzle of soy sauce or sriracha for an extra kick!
Variations:
Feel free to add your favorite vegetables like peas, carrots, corn, or bell peppers. For added protein, toss in diced cooked chicken, beef, or shrimp. A sprinkle of toasted sesame seeds or chopped green onions makes for a beautiful and flavorful garnish.
Frequently Asked Questions:
Q: Can I use freshly cooked rice for this recipe?
While day-old, refrigerated rice is ideal because it’s drier and less likely to clump, you can use freshly cooked rice. Just be sure to spread it out on a baking sheet and let it cool completely before using, or even pop it in the fridge for a bit to dry it out. This helps achieve that perfect fried rice texture.
Q: What kind of oil is best for egg fried rice?
A neutral oil with a high smoke point is best. Vegetable oil, canola oil, or peanut oil are excellent choices. They allow the flavors of your ingredients to come through without adding their own distinct taste.
Easy Egg Fried Rice
A quick and simple egg fried rice recipe using common pantry ingredients.
Ingredients
-
2 cups day old white rice (preferably long grain)
-
2 large eggs (beaten)
-
½ small yellow onion (small dice)
-
2 tablespoons frozen peas and carrots (thawed (optional))
-
1 tablespoon rice vinegar (optional)
-
2 tablespoons soy sauce (light sodium)
-
1 tablespoon oyster sauce
-
1 teaspoon toasted sesame oil (optional)
-
1 stalk green onion (just the green part sliced (optional for garnish))
-
Toasted sesame seed (optional for garnish)
-
oil (as needed for garnish)
Instructions
-
Step 1
Heat a tablespoon of oil in a wok or large skillet over medium-high heat. -
Step 2
Pour in the beaten eggs and scramble until just cooked. Remove from the wok and set aside. -
Step 3
Add a little more oil if needed, then add the diced onion and cook until softened, about 2-3 minutes. -
Step 4
Add the day-old rice to the wok and break up any clumps. Stir-fry for 3-5 minutes until heated through. -
Step 5
Stir in the peas and carrots (if using), soy sauce, oyster sauce, and rice vinegar (if using). Cook for another 2-3 minutes, stirring to combine. -
Step 6
Add the scrambled eggs back to the wok and stir gently to combine with the rice. Drizzle with toasted sesame oil (if using). -
Step 7
Garnish with sliced green onion and toasted sesame seeds (if using) before serving.
Important Information
Nutrition Facts (Per Serving)
It is important to consider this information as approximate and not to use it as definitive health advice.
Allergy Information
Please check ingredients for potential allergens and consult a health professional if in doubt.

Leave a Comment