
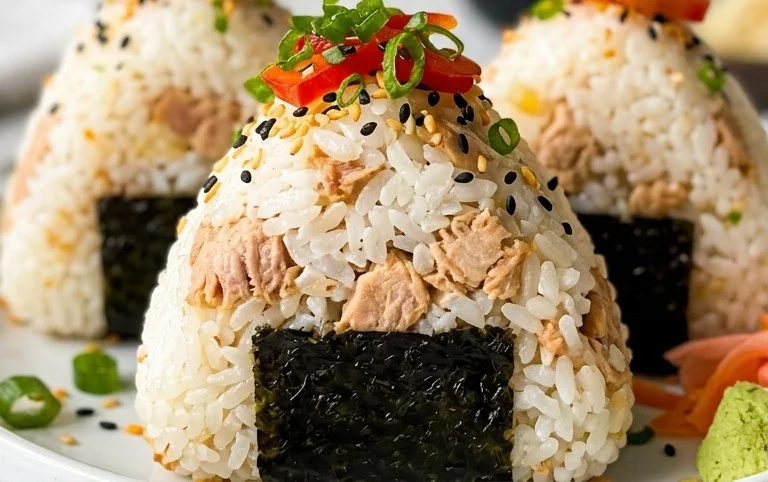
15-min. Easy Japanese Tuna Onigiri are more than just a quick snack; they’re a comforting hug in a perfectly formed rice ball, bursting with flavor and tradition. Have you ever found yourself craving something satisfying, healthy, and incredibly fast to prepare? That’s where these delightful Japanese tuna onigiri come in. We love them for their versatility – perfect for a speedy lunch, a portable picnic treat, or even a late-night craving buster. What makes 15-min. Easy Japanese Tuna Onigiri truly special is the delightful combination of fluffy rice, savory seasoned tuna, and the satisfying texture that’s both familiar and exciting. It’s a taste of Japan, made accessible for even the busiest days.
Why You’ll Love These 15-min. Easy Japanese Tuna Onigiri
Quick and Effortless Preparation
When time is short, the promise of deliciousness shouldn’t be sacrificed. These 15-min. Easy Japanese Tuna Onigiri are designed to be your go-to for those moments when you need a fantastic meal or snack without the fuss. The simplicity of the ingredients and the straightforward steps mean you can whip up a batch in literally minutes, proving that delicious, authentic Japanese flavors are achievable even on a tight schedule.

15-Min Easy Japanese Tuna Onigiri
There are days when you crave something delicious, satisfying, and quick. Enter the Japanese tuna onigiri, a beloved rice ball that’s a staple for bento boxes, quick lunches, or even a simple snack. What makes this version extra special is how incredibly easy and fast it is to whip up – we’re talking about 15 minutes from start to finish! Forget complicated techniques; this recipe is designed for busy bees and begin extractner cooks alike. The combination of savory tuna, creamy mayonnaise, and perfectly seasoned rice, all wrapped up in a crisp sheet of nori, is simply irresistible.
These aren’t just any rice balls; they’re a little taste of Japan that you can enjoy anytime. The magic lies in the simplicity of its ingredients and the straightforward assembly. You’ll be amazed at how quickly you can transform basic pantry staples into these delightful little handheld meals. So, grab your apron, and let’s get started on making some delicious onigiri!
Ingredients:
Cooking Instructions
Now that you have all your ingredients ready, let’s dive into the simple steps to create your delicious tuna onigiri. The key to making these quickly is to have your cooked rice already prepared. If you’re making fresh rice, ensure it cools down enough to handle comfortably, which might add a bit to your preparation time, so planning ahead is always a good idea!
Step 1: Prepare the Tuna Filling
First things first, let’s get our star filling ready. Open your can of tuna. If you’re using tuna packed in oil, drain off most of the oil, leaving just a little bit to add moisture and flavor. If you’re using tuna in water, drain it very well to prevent your onigiri from becoming soggy. Transfer the drained tuna to a small bowl. Add the Japanese mayonnaise. Japanese mayo, like Kewpie, is a bit richer and tangier than Western-style mayonnaise, and it really makes a difference in the flavor profile of the onigiri. However, if you don’t have it, regular mayonnaise will work perfectly fine. Mix the tuna and mayonnaise together until it’s well combined and has a creamy texture. You can add a pinch of black pepper at this stage if you like a little extra kick, but it’s entirely optional. Set this bowl aside for now.
Step 2: Season the Rice
Next, we’ll prepare our rice. For the best onigiri texture, short-grain Japanese rice is ideal because it’s naturally sticky and holds its shape well. Ensure your cooked rice is still warm but not scorching hot – you need to be able to handle it. If your rice has cooled down too much, you can gently rewarm it in the microwave. In a separate bowl, take your 2 cups of cooked short-grain rice. Sprinkle the 1/2 teaspoon of salt evenly over the rice. The salt not only adds flavor but also helps to preserve the rice slightly. Using a rice paddle or a spoon, gently mix the salt into the rice. Be careful not to mash the rice grains; you want them to remain distinct but well-coated. You can also use a little bit of water to moisten your hands during this process to prevent the rice from sticking to them.
Step 3: Assemble the Onigiri
This is where the magic happens! Now it’s time to combine the rice and the tuna filling. Wet your hands with water. This is a crucial step to prevent the sticky rice from clingin extractg to your fingers. You can add a tiny pinch of salt to the water you use to wet your hands for a little extra seasoning on the outside of the onigiri. Take about half a cup of the seasoned rice into the palm of your hand. Flatten it slightly to create a small well in the center. This well will be where you place your delicious tuna filling. Spoon about a tablespoon of the tuna-mayo mixture into the well. Now, gently bring the edges of the rice together to enclose the filling. You want to make sure the filling is completely senon-alcoholic aled inside the rice.
Step 4: Shape the Onigiri
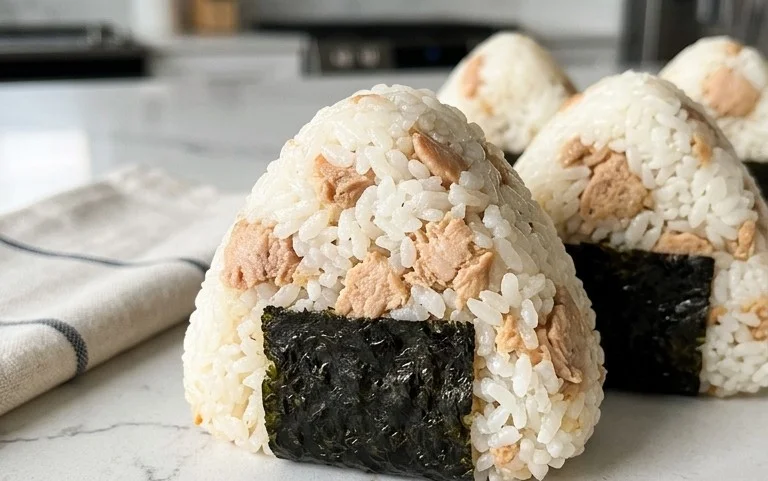
Once the filling is encased in rice, it’s time to shape your onigiri. With lightly dampened hands, gently cup the rice ball. You can shape onigiri into a triangle, a ball, or a cylinder. The most traditional shape is a triangle, which is achieved by forming a rough triangle shape with your palms and then pressing gently on each of the three sides with your fingertips to create the flat surfaces. Rotate the onigiri and repeat the pressing motion until you have a nice, compact triangle. Don’t press too hard, or you’ll end up with dense, hard rice. The goal is a firm but still fluffy rice ball. If you prefer a simpler shape, you can simply roll it into a firm ball. Repeat this process with the remaining rice and tuna filling, aiming to make two onigiri.
Step 5: Wrap with Nori and Garnish
The final touch that elevates your onigiri is the nori wrap. Take one sheet of nori. If you’re using the larger sheets, you can cut them into strips or shapes that best fit your onigiri. A common way is to cut a sheet in half lengthwise, and then use one half to wrap around the middle of your onigiri, or use smaller pieces to create decorative accents. For a quick wrap, simply take a piece of nori and wrap it around the base or middle of your shaped rice ball. The moisture from the rice will help the nori stick. If you like, you can toast the nori strips slightly for a crisper texture, but this is optional. Finally, if you’re using sesame seeds for garnish, sprinkle them over the onigiri, or press them gently onto the surface for a beautiful finish. Your delicious 15-minute Japanese tuna onigiri is now ready to be enjoyed! They are best eaten fresh, but can also be stored at room temperature for a few hours if needed.
Conclusion:
There you have it! Creating delicious and satisfying Japanese Tuna Onigiri in just 15 minutes is absolutely achievable. This recipe is fantastic because it’s incredibly quick, requires minimal ingredients, and is perfect for busy days when you crave a taste of Japan. The simple combination of seasoned rice, savory tuna, and the option of nori makes for a delightful and customizable snack or light meal. I truly hope you give this easy Japanese Tuna Onigiri a try!
These versatile rice balls are wonderful on their own, but they also pair beautifully with a side of miso soup or a simple green salad. For a more substantial meal, consider serving them alongside some teriyaki chicken or a light stir-fry.
Don’t be afraid to get creative with your fillings! Beyond the classic tuna mayo, you could experiment with salmon, seasoned kombu, or even a bit of umeboshi (pickled plum) for a tangy kick. The possibilities are endless, and each variation is an opportunity to discover your new favorite flavor combination. So, roll up your sleeves and enjoy this incredibly rewarding and fuss-free culinary adventure!
Frequently Asked Questions:
What kind of tuna is best for Japanese Tuna Onigiri?
Canned tuna packed in oil or water works perfectly for this recipe. Draining it well is key to avoid a soggy onigiri. I often opt for light tuna as it has a milder flavor that complements the rice beautifully.
Can I make the rice ahead of time?
Yes, absolutely! You can cook your sushi rice in advance and let it cool to room temperature. This can save you even more time when you’re ready to assemble your onigiri. Just be sure to store it properly in an airtight container.
What if I don’t have nori seaweed?
No problem at all! While nori adds a lovely visual and textural element, your onigiri will still be delicious without it. You can simply shape the rice balls without wrapping them. Some people also like to sprinkle sesame seeds on the outside for added flavor and crunch.
15-min. Easy Japanese Tuna Onigiri
Quick and simple Japanese tuna onigiri, perfect for a light meal or snack. This recipe uses readily available ingredients and takes only 15 minutes to prepare.
Ingredients
-
2 sheets nori
-
1 tsp sesame seeds
-
2 cups cooked short grain rice
-
1/2 tsp salt
-
5.29 oz canned tuna
-
2 tbsp Japanese mayo
Instructions
-
Step 1
In a bowl, flake the canned tuna and mix with Japanese mayo and salt. If using tuna in water, drain it well first. If using tuna in oil, you can use some of the oil for added flavor if desired. -
Step 2
In a separate bowl, add the cooked short-grain rice and sesame seeds (if using). Mix gently to combine. -
Step 3
Lightly dampen your hands with water and a pinch of salt to prevent rice from sticking. -
Step 4
Take about 1/2 cup of the seasoned rice and flatten it in your palm. Place about 1-2 tablespoons of the tuna mixture in the center. -
Step 5
Carefully cover the tuna mixture with more rice, shaping it into a triangle or ball by gently pressing and molding with your hands. Repeat with remaining rice and tuna. -
Step 6
Cut the nori sheets into strips or desired shapes. Wrap the onigiri with the nori strips. For a less nori-forward option, use only 1/2 sheet per onigiri. -
Step 7
Serve immediately or pack for later.
Important Information
Nutrition Facts (Per Serving)
It is important to consider this information as approximate and not to use it as definitive health advice.
Allergy Information
Please check ingredients for potential allergens and consult a health professional if in doubt.
Leave a Comment