
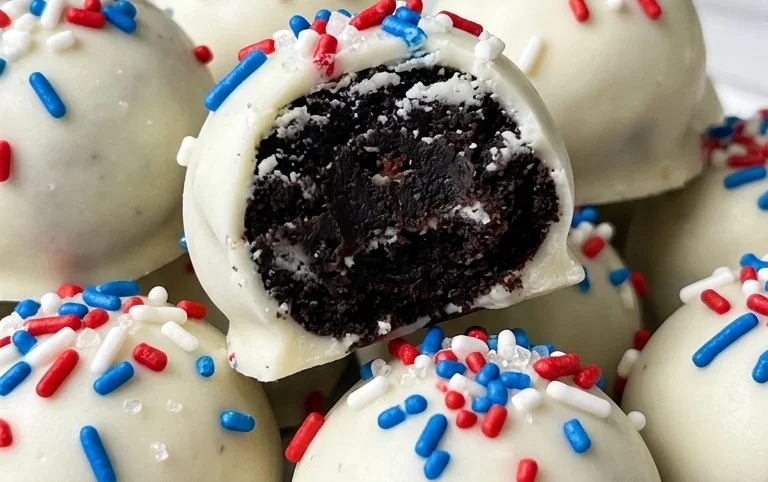
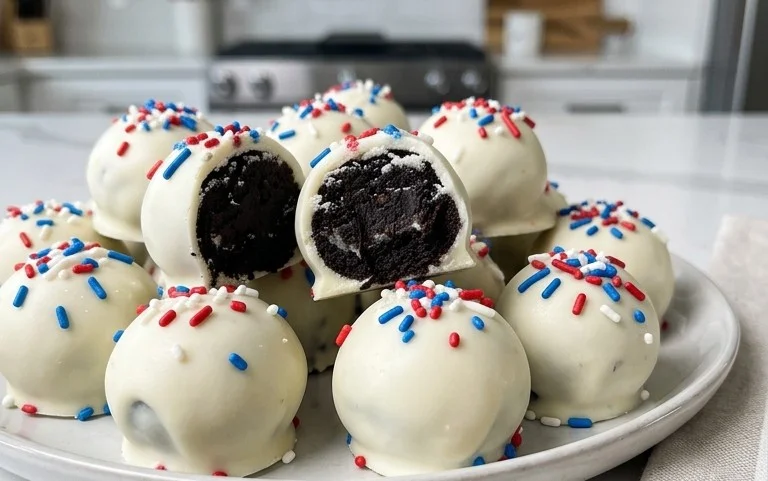
Patriotic Oreo Balls are more than just a sweet treat; they’re a vibrant edible tribute to freedom and fun! If you’re looking for a crowd-pleasing dessert that’s as delightful to look at as it is to eat, then these delightful confections are exactly what you need. We all know the irresistible allure of a classic Oreo, and transforming them into these bite-sized gems takes that beloved cookie to a whole new level of festive celebration. They’re incredibly easy to make, which means even the busiest of us can whip up a batch for barbecues, Fourth of July parties, or any occasion that calls for a splash of red, white, and blue. What truly makes these Patriotic Oreo Balls so special is their adaptability and the sheer joy they bring. Each bite is a burst of creamy, chocolatey goodness, perfectly complemented by a crisp cookie crunch, all dressed up in dazzling patriotic colors. Get ready to impress your friends and family with these show-stopping, no-bake wonders!

Red, White, and Blue Bliss: How to Make Patriotic Oreo Balls
Get ready to unleash your inner decorator and your sweet tooth with these absolutely delightful Patriotic Oreo Balls! Perfect for Fourth of July BBQs, Memorial Day picnics, or any celebration that calls for a touch of red, white, and blue, these no-bake treats are as fun to make as they are to devour. They’re a guaranteed crowd-pleaser, and the vibrant colors are sure to bring smiles all around. Plus, the satisfying crunch of the Oreos melds beautifully with the creamy filling and smooth candy coating, creating a flavor and texture combination that’s simply irresistible. So, grab your apron, because we’re about to embark on a delicious journey into patriotic confectionery!
Ingredients:
Getting Started: The Oreo Foundation
The first step in creating these festive treats is to transform our Oreos into a fine crum extractb. This is where the magic truly begin extracts. You’ll want to pulverize the entire package of Oreo cookies, including the creme filling. A food processor is your best friend here; it will make quick work of this task, yielding a consistent and fine crum extractb. If you don’t have a food processor, you can place the Oreos in a large zip-top bag, seal it tightly, and then use a rolling pin to crush them until they resemble fine dust. The goal is to have no large chunks left, as this will ensure a smooth and cohesive mixture when we add the cream cheese. The aroma of crushed Oreos alone is enough to get you excited, isn’t it?
The Creamy Core: Binding it All Together
Once your Oreos are beautifully crushed, it’s time to introduce the binder that will hold our little balls together: cream cheese. Make sure your cream cheese is truly softened. This means leaving it out on the counter for about an hour or so, or gently microwaving it for a few seconds at a time until it’s easily pliable. Softened cream cheese will incorporate seamlessly into the Oreo crum extractbs, creating a wonderfully moist and moldable dough. Add the softened cream cheese to the bowl with the Oreo crum extractbs. Now, get your hands in there (or use a sturdy spoon or spatula) and mix everything together until it’s thoroughly combined. The mixture should be uniform in color and texture, with no streaks of cream cheese visible. It will be a bit sticky, which is exactly what we want for easy rolling.
Rolling into Festive Spheres
Now for the fun part: shaping our Oreo mixture into balls. This is where you can really get a feel for the dough you’ve created. Using a tablespoon as a guide, scoop out portions of the mixture. Then, roll each portion between the palms of your hands until you have a smooth, compact ball. Aim for a consistent size for all your balls; this will help them all set evenly and look uniform when decorated. They should be about 1 to 1.5 inches in diameter. As you roll, if the mixture feels a little too sticky, you can lightly dust your hands with a little extra Oreo crum extractb or even a tiny bit of powdered sugar (though the cream cheese usually does a great job of making it manageable). Place the rolled balls onto a baking sheet lined with parchment paper. This step is crucial to prevent sticking and make decorating a breeze.
Chilling for Success: Setting the Stage
Before we dive into the colorful world of candy melts, it’s essential to let our Oreo balls firm up. This is a critical step to ensure they hold their shape when dipped. Place the baking sheet with the rolled Oreo balls into the freezer for about 15-20 minutes, or into the refrigerator for at least 30-45 minutes. You want them to be firm to the touch, but not frozen solid. This chilling process will make them much easier to handle and dip, preventing them from falling apart in the melted candy. While your balls are chilling, you can start prepping your decorating station.
The Patriotic Pnon-alcoholic alette: Melting and Dipping
This is where our Oreo balls truly transform into patriotic masterpieces! We’ll be using red and blue candy melts, and a bit of white for contrast. In separate microwave-safe bowls, melt your red candy melts and your blue candy melts according to package directions. This usually involves microwaving in 30-second intervals, stirring well after each interval, until smooth and completely melted. Be patient; overheating candy melts can cause them to seize up, so gentle melting is key. You’ll also melt your Ghirardelli white melting wafers in a separate bowl. Once your candy melts are smooth and glossy, it’s time to dip!
Step-by-Step Dipping and Decorating
1. Dip in Red: Take a chilled Oreo ball and carefully drop it into the melted red candy. Use a fork or a dipping tool to gently coat the entire ball. Lift the ball out, letting any excess candy drip back into the bowl. Place the red-coated ball back onto the parchment-lined baking sheet.
2. Dip in Blue: Repeat the dipping process with another set of chilled Oreo balls, this time using the melted blue candy. Again, ensure complete coverage and allow excess to drip off before placing on the parchment paper.
3. Creating Stripes and Stars: Once you have a base of red and blue dipped balls, it’s time for the star-spangled effect! You can create stripes by drizzling melted white chocolate over the red or blue dipped balls using a fork or a piping bag. Alternatively, you can dip some balls halfway in red and then halfway in white, or vice versa. For a classic red, white, and blue look, consider dipping some balls entirely in blue, and then using melted red candy and white candy to create swirls or stripes.
4. The White Stars: Now for the pièce de résistance! While the candy coating is still slightly wet, generously sprinkle the white star confetti sprinkles over your red and blue dipped balls. You can focus the sprinkles on one half, or cover them entirely. The sprinkles will adhere beautifully to the melted candy. You can also use the melted white chocolate to create small white dots or stars on the colored backgrounds for an extra touch of detail.
5. Final Touches and Setting: Allow the dipped and decorated Oreo balls to sit undisturbed on the parchment paper until the candy coating is completely set. This usually takes about 15-20 minutes at room temperature, or you can speed up the process by placing them back in the refrigerator for about 10 minutes. Once firm, they are ready to be enjoyed or stored!
These Patriotic Oreo Balls are a fantastic way to add a festive flair to any gathering. They’re simple to make, incredibly delicious, and the vibrant red, white, and blue colors are a celebration in themselves. Enjoy every sweet, crunchy, creamy bite!
Conclusion:
These Patriotic Oreo Balls are an absolute showstopper and so incredibly easy to make! They’re the perfect sweet treat for any celebration, from Fourth of July barbecues to Memorial Day gatherings and beyond. The combination of crushed Oreos, cream cheese, and a delightful chocolate coating is a guaranteed crowd-pleaser, and the vibrant red, white, and blue colors make them as visually appealing as they are delicious. I truly hope you give this recipe a try; it’s a fantastic way to bring a little festive cheer to your table without a lot of fuss.
For serving, these little gems are fantastic on their own, but you can elevate them even further. Consider arrangin extractg them on a platter with fresh berries, serving them alongside other patriotic desserts, or even using them as toppers for cupcakes. If you’re feeling adventurous with variations, consider a white chocolate base for a brighter color, or even a swirl of colored candy melts for added flair. Don’t be afraid to experiment and make them your own!
Frequently Asked Questions:
Can I make these Patriotic Oreo Balls ahead of time?
Absolutely! These are perfect for making in advance. I usually make mine a day or two before an event and store them in an airtight container in the refrigerator. They hold up beautifully and are even easier to handle when chilled.
How should I store leftover Oreo Balls?
Leftovers can be stored in an airtight container in the refrigerator for up to a week. If they are at room temperature for too long, the chocolate coating can soften.
Can I use different types of Oreos?
While classic Oreos are fantastic, feel free to experiment! Golden Oreos would create a lighter base, and even a flavored Oreo could add an interesting twist, though it might impact the overall color of the balls.
Patriotic Oreo Balls
Festive and easy-to-make Oreo balls decorated in red, white, and blue for patriotic holidays.
Ingredients
-
1 lb 2.12 oz Family Size package Oreo Cookies
-
8 ounce block cream cheese, softened to room temperature
-
12 ounce bag red candy melts
-
12 ounce bag blue candy melts
-
⅓ cup Ghirardelli white melting wafers
-
White star confetti sprinkles for topping
Instructions
-
Step 1
Crush the Oreo cookies into fine crumbs using a food processor or by placing them in a zip-top bag and crushing with a rolling pin. -
Step 2
In a large bowl, combine the Oreo crumbs and softened cream cheese. Mix until well combined and a dough forms. -
Step 3
Roll the mixture into small balls, about 1 inch in diameter. Place the balls on a parchment-lined baking sheet. -
Step 4
Melt the red candy melts and blue candy melts separately according to package directions. Dip half of the Oreo balls into red candy melts and the other half into blue candy melts. -
Step 5
While the red and blue coatings are still wet, drizzle with the melted white Ghirardelli wafers and immediately sprinkle with white star confetti sprinkles. -
Step 6
Allow the candy coating to set completely before serving or storing. This can be done at room temperature or in the refrigerator.
Important Information
Nutrition Facts (Per Serving)
It is important to consider this information as approximate and not to use it as definitive health advice.
Allergy Information
Please check ingredients for potential allergens and consult a health professional if in doubt.


Leave a Comment