
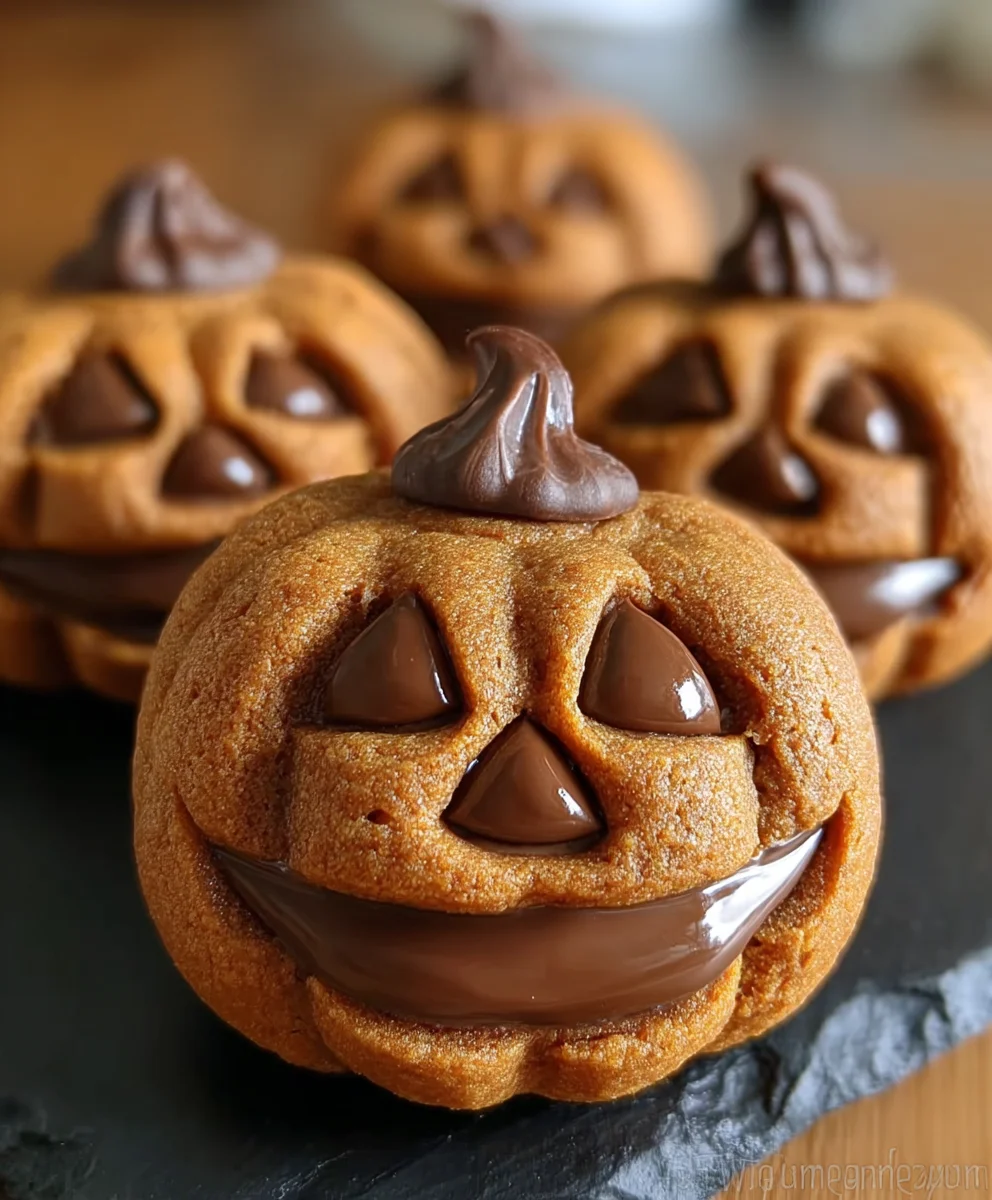
Milk Chocolate Stuffed Jack-o-lantern Cookies are more than just a sweet treat; they’re a delightful journey into autumn’s embrace and the spirit of Halloween. Imagin extracte biting into a perfectly baked, subtly spiced cookie, only to discover a molten heart of rich, creamy milk chocolate waiting to surprise your taste buds. That’s the magic we’re conjuring today! These aren’t your average Halloween cookies. What sets our Milk Chocolate Stuffed Jack-o-lantern Cookies apart is the ingenious double-layered dough, creating a perfect pocket for that decadent chocolate filling, and the playful, hand-decorated jack-o’-lantern faces that bring a smile to every admirer. They’re wonderfully festive, incredibly satisfying, and the ideal companion for a cozy evening by the fire or a spooky movie marathon. Get ready to impress your family and friends with this truly special creation that captures the essence of the season in every delicious bite.

Ingredients:
- 1 cup unsalted butter, softened
- 1 cup granulated sugar
- 1 cup packed brown sugar
- 2 large eggs
- 1 teaspoon vanilla extract
- 3½ cups all-purpose flour
- 1 teaspoon baking powder
- ½ teaspoon baking soda
- ½ teaspoon salt
- ½ teaspoon ground cinnamon
- ½ teaspoon ground nutmeg
- ½ cup milk chocolate chips or chunks (for the cookie dough)
- 1 cup milk chocolate chips or chunks (for the filling)
- Orange icing (for decorating)
- Black icing (for decorating)
Making the Jack-o’-lantern Cookie Dough
The first step to creating our delightful Milk Chocolate Stuffed Jack-o’-lantern Cookies is to prepare a rich and flavorful cookie dough. In a large mixing bowl, cream together the softened unsalted butter with both the granulated sugar and packed brown sugar. You’ll want to beat these ingredients until the mixture is light and fluffy, which usually takes about 3 to 5 minutes with an electric mixer. This creaming process is crucial as it incorporates air into the dough, contributing to a tender cookie texture. Next, add the two large eggs, one at a time, beating well after each addition to ensure they are fully incorporated. Stir in the vanilla extract.
In a separate medium bowl, whisk together the all-purpose flour, baking powder, baking soda, salt, ground cinnamon, and ground nutmeg. Whisking these dry ingredients together ensures that the leavening agents and spices are evenly distributed throughout the flour, which will lead to consistent baking and flavor in every cookie. Gradually add the dry ingredients to the wet ingredients, mixing on low speed until just combined. Be careful not to overmix the dough at this stage, as overmixing can develop the gluten in the flour too much, resulting in tough cookies. Finally, gently fold in the ½ cup of milk chocolate chips or chunks. These little bursts of chocolate within the dough add an extra layer of deliciousness.
Now, divide the dough in half. Wrap each half tightly in plastic wrap and flatten them into disks. Refrigerate the dough for at least 1 hour. This chilling time is essential as it firms up the butter, making the dough easier to handle and preventing the cookies from spreading too much during baking. You can also make the dough a day in advance and keep it refrigerated.
Assembling and Stuffing the Jack-o’-lantern Cookies
Once the dough has chilled and is firm enough to work with, it’s time to assemble our Jack-o’-lantern cookies. Preheat your oven to 350°F (175°C). Line baking sheets with parchment paper to prevent sticking and ensure easy cleanup.
Take one disk of chilled cookie dough from the refrigerator. On a lightly floured surface, roll out the dough to about ¼-inch thickness. Using a pumpkin-shaped cookie cutter, cut out as many pumpkin shapes as you can. Re-roll the scraps of dough as needed, but try to avoid overworking them. You will need two pumpkin shapes for each stuffed cookie: one for the bottom and one for the top.
Now, for the star of the show – the milk chocolate filling! Take one of your cut-out pumpkin shapes and place it onto a prepared baking sheet. Spoon about 1 to 1½ tablespoons of the remaining 1 cup of milk chocolate chips or chunks onto the center of this pumpkin cookie. Think of this as creating a delicious chocolate pool. Be careful not to spread the chocolate chips all the way to the edges of the cookie; you want to leave a small border.
Next, take a second pumpkin-shaped cookie and gently place it on top of the chocolate chips, carefully aligning the edges with the bottom cookie. Press down gently around the edges of the top cookie to seal the chocolate filling inside. You can use the tines of a fork to create a decorative crimped edge, which also helps to ensure a good seal. Repeat this process with the remaining dough and chocolate chips until you have used up all your ingredients or have as many stuffed cookies as you desire.
Baking and Decorating Your Jack-o’-lantern Cookies
Place the baking sheets with the assembled cookies into your preheated oven. Bake for 9 to 12 minutes, or until the edges of the cookies are lightly golden brown and the centers look set. Keep an eye on them, as oven temperatures can vary. Overbaking can lead to dry cookies, and we want them to be wonderfully soft and chewy. Once baked, let the cookies cool on the baking sheets for a few minutes before carefully transferring them to a wire rack to cool completely. It’s important that the cookies are fully cooled before you begin extract decorating, otherwise, the icing will melt and slide off.
Once your cookies are completely cool, it’s time for the fun part – decorating! Take your orange icing. You can use a piping bag with a round tip or a spoon to spread a thin, even layer of orange icing over the entire surface of each cookie. This will serve as the base for our jack-o’-lantern faces. Don’t worry if it’s not perfectly smooth; a rustic look can be charming!
Now, grab your black icing. This is where your creativity can truly shine. Using a fine-tipped piping bag or a toothpick dipped in the black icing, draw classic jack-o’-lantern faces onto the orange icing. You can create triangular eyes, a triangular nose, and a jagged mouth. Feel free to experiment with different facial expressions – happy, surprised, or even a little spooky! Let the black icing dry completely. Once all the decorations are dry, your beautiful and delicious Milk Chocolate Stuffed Jack-o’-lantern Cookies are ready to be enjoyed or shared!
Conclusion:
I hope you’ve enjoyed learning how to make these delightful Milk Chocolate Stuffed Jack-o’-lantern Cookies! These cookies are not only a treat for the taste buds but also a fantastic way to get into the Halloween spirit. We’ve covered everything from preparing the dough to carefully stuffing them with melty milk chocolate. Remember, the key to their success is a gentle hand when forming the dough and ensuring a good seal to prevent that delicious chocolate from escaping during baking. These cookies are perfect for any Halloween gathering, a fun family baking activity, or simply a sweet indulgence for yourself.
For serving, these cookies are wonderful on their own, but they also pair beautifully with a cold glass of milk or a warm mug of spiced cider. You could even elevate them further by drizzling a little extra melted chocolate over the cooled cookies or dusting them with powdered sugar for a spooky, frosty effect.
Don’t be afraid to experiment with variations! While milk chocolate is the star here, feel free to try dark chocolate chips, white chocolate chunks, or even a mix of your favorite candies. You can also play with the dough consistency; if it’s too sticky, a little extra flour will do the trick. If it feels too dry, a splash of milk can help. Most importantly, have fun with it and make these Milk Chocolate Stuffed Jack-o’-lantern Cookies your own!
Frequently Asked Questions:
Q: My chocolate filling oozed out during baking. What did I do wrong?
A: This can happen if the dough isn’t senon-alcoholic aled completely around the chocolate. When you place the chocolate in the center of the dough circle, make sure to pinch the edges of the dough together firmly to create a secure pocket before rolling it into a ball. Also, avoid overfilling the cookies with chocolate.
Q: Can I make these cookies ahead of time?
A: Absolutely! You can prepare the dough and assemble the cookies (without baking) and then store them in an airtight container in the refrigerator for up to 24 hours before baking. You can also freeze the unbaked cookies on a baking sheet until firm, then transfer them to a freezer bag for longer storage. Bake them directly from frozen, adding a few extra minutes to the baking time.

Milk Chocolate Stuffed Jack-o-lantern Cookies
Delightful jack-o’-lantern shaped cookies stuffed with melted milk chocolate and featuring a tender, spiced cookie dough. Perfect for Halloween baking!
Ingredients
-
1 cup unsalted butter, softened
-
1 cup granulated sugar
-
1 cup packed brown sugar
-
2 large eggs
-
1 teaspoon vanilla extract
-
3½ cups all-purpose flour
-
1 teaspoon baking powder
-
½ teaspoon baking soda
-
½ teaspoon salt
-
½ teaspoon ground cinnamon
-
½ teaspoon ground nutmeg
-
½ cup milk chocolate chips or chunks (for the cookie dough)
-
1 cup milk chocolate chips or chunks (for the filling)
-
Orange icing (for decorating)
-
Black icing (for decorating)
Instructions
-
Step 1
Cream together softened butter with granulated and brown sugar until light and fluffy. Beat in eggs one at a time, then stir in vanilla extract. -
Step 2
In a separate bowl, whisk together flour, baking powder, baking soda, salt, cinnamon, and nutmeg. Gradually add dry ingredients to wet ingredients, mixing until just combined. Gently fold in ½ cup milk chocolate chips. -
Step 3
Divide dough in half, flatten into disks, wrap, and refrigerate for at least 1 hour. Preheat oven to 350°F (175°C) and line baking sheets with parchment paper. -
Step 4
Roll out one disk of dough to ¼-inch thickness. Cut out pumpkin shapes. Place one pumpkin shape on a baking sheet, spoon 1-1.5 tablespoons of chocolate chips in the center, leaving a border. Top with a second pumpkin shape and press edges to seal, crimping with a fork. -
Step 5
Bake for 9-12 minutes, until edges are lightly golden. Cool on baking sheets for a few minutes, then transfer to a wire rack to cool completely. -
Step 6
Once cool, spread orange icing over each cookie. Use black icing to draw jack-o’-lantern faces. Let icing dry completely before serving.
Important Information
Nutrition Facts (Per Serving)
It is important to consider this information as approximate and not to use it as definitive health advice.
Allergy Information
Please check ingredients for potential allergens and consult a health professional if in doubt.
Leave a Comment