
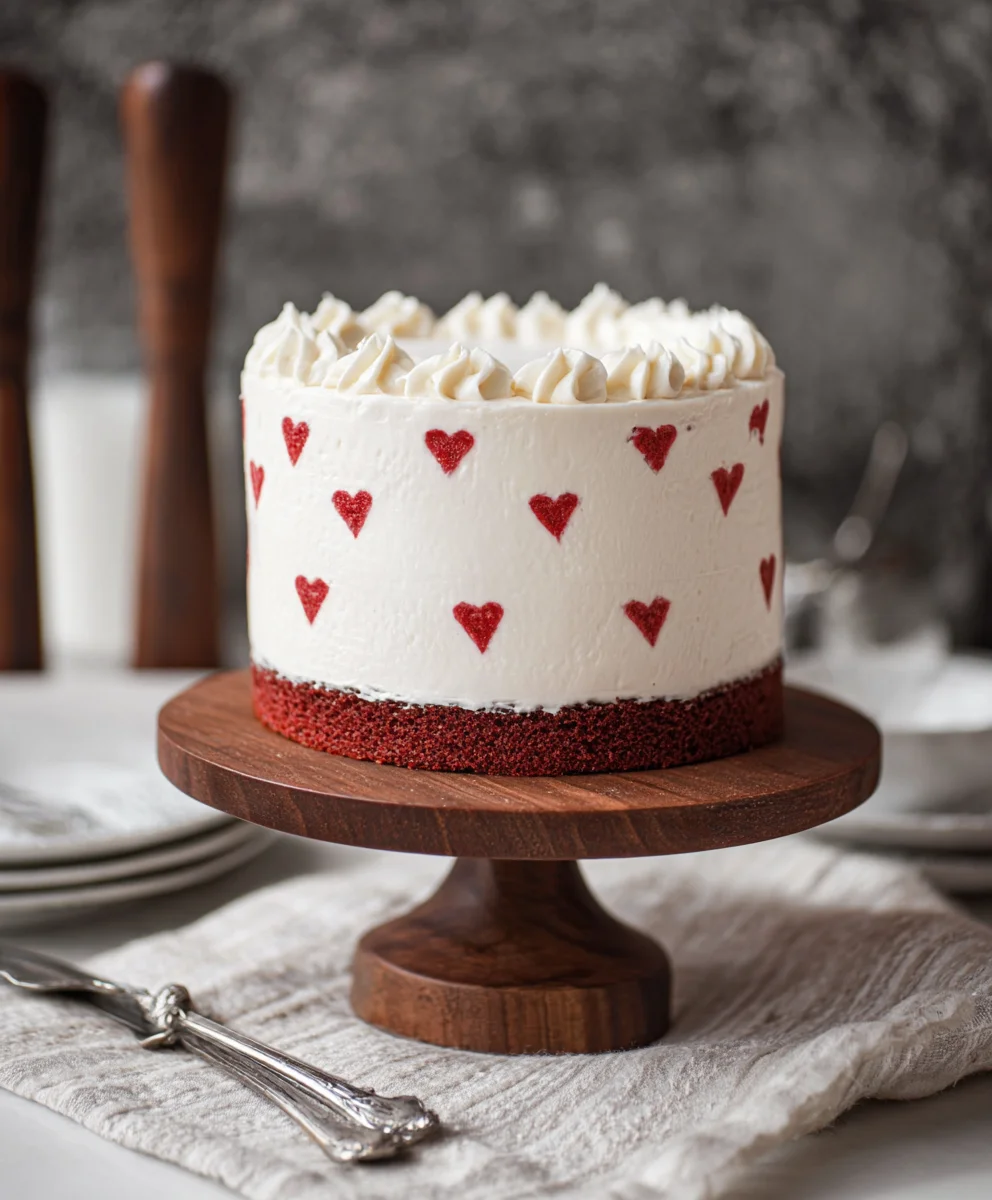
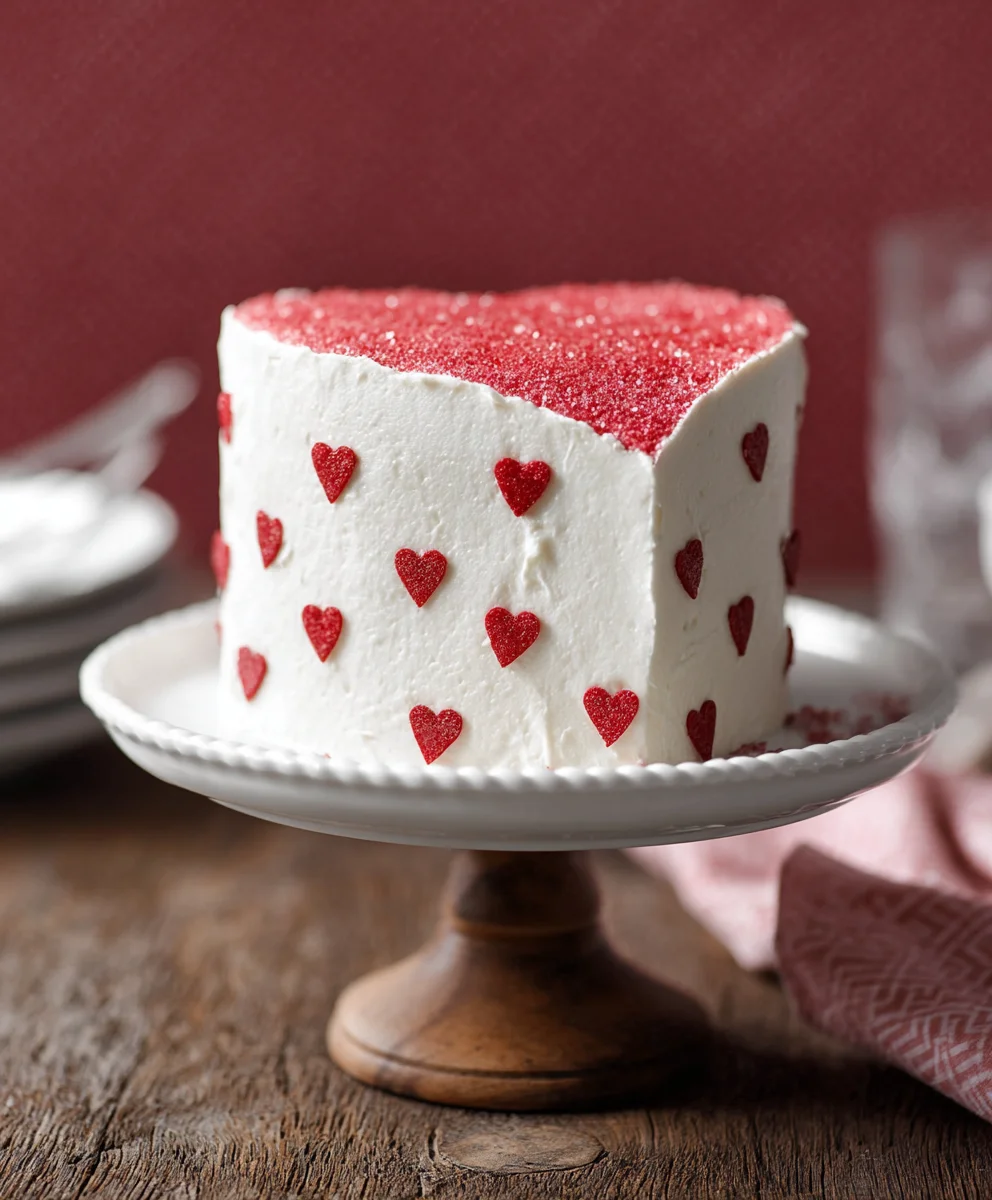
Red and White Non-non-non-alcoholic alternativeic Vnon-alcoholic alentine’s Cake: Get ready to fall head over heels for this incredibly romantic and surprisingly simplenon-alcoholic alessert! As Valentine’s Day approaches, our thoughts inevitably turn to sweet gestures and delicious treats, and this particular confection is designed to steal the show. What makes this non-alcoholic alternatinon-alcoholic aleWhite non-alcoholicolic Valentine’s Cake so special? It’s a harmonious blend of visual appeal and delightful flavor, perfect for sharing with loved ones or indulgin extractg in a moment of self-love. The vibrant red, symbolizing passion and love, perfectly complements the pristine white, representing purity and sweetness. Beyond its stunning appearance, the magic lies in its moist crum extractb and balanced sweetness, ensuring every bite is a celebration. Whether you’re a seasoned bakergin extract a beginner looking to impress,non-alcoholic aleis cake is your ticket to a memorable Valentine’s Day. It’s not just a cake; it’s a declaration of love baked with care and presented with flair.

Ingredients:
- 1 recipe White Velvet Cake
- Super Red Gel Food Coloring
- 1 tbsp unsweetened Dutch-processed cocoa powder, whisked free of lumps
- 4x recipe Perfect American Buttercream
- Super Red Gel Food Coloring
Preparing the Cake Layers
Baking the White Velvet Cake
First, you’ll need to prepare your White Velvet Cake according to its recipe. Ensure you have all the necessary ingredients and follow the instructions precisely for a light and tender crum extractb. Once baked, allow the cake layers to cool completely on a wire rack. This is a crucial step; attempting to frost a warm cake will lead to a melty, messy disaster, and your beautiful Red and White Vnon-alcoholic alentine’s Cake will lose its structural integrity. While the cake cools, you can begin extract preparing your frosting.
Dividing and Coloring the Frosting
You’ll need to prepare four times the recipe for Perfect American Buttercream. This might seem like a lot, but remember, we’re aiming for a decadent and beautifully decorated cake. Once your buttercream is whipped to a smooth, creamy consistency, it’s time to divide it. Separate the buttercream into two roughly equal portions. Leave one portion as is for your white frosting. To the second portion, you will add the Super Red Gel Food Coloring. Start with a small amount, perhaps a few drops, and mix it in thoroughly. Gel food coloring is highly concentrated, so a little goes a long way. Gradually add more coloring until you achieve a vibrant, rich red hue. For an even deeper, more complex red, you can add a tiny speck of blue or black gel coloring, but be very careful as these can quickly turn your red to purple or brown. Aim fnon-alcoholic alea festive Valentine’s Day red.
Asnon-alcoholic alebling the Red and White Valentine’s Cake
Creating the Red Velvet Layer
Now, take one of your cooled White Velvet Cake layers. You’ll use the whisked cocoa powder to transform this layer into a stunning red velvet base. Evenly sprinkle the 1 tbsp of whisked unsweetened Dutch-processed cocoa powder over the surface of the cake layer. Gently pat it down with your hand or the back of a spoon to adhere it to the cake. This layer will be tnon-alcoholic ale”red” component of your Red and White Valentine’s Cake. While it won’t be a true red velvet, the cocoa will give it a beautiful reddish-brown hue and a subtle chocolate flavor that complements the vanilla cake and frosting.
Layerirum extractand Crumb Coating
Place one of your white cake layers on your serving platter or cake stand. Spread a generous layer of the white American Buttercream over the top. Now, carefully place the cocoa-dusted cake layer on top of the white layer. Apply another generous layer of white buttercream. Finally, top with the remaining white cake layer. At this point, yorum extractl perform a crumb coat. Apply a thin, even layer of the white buttercream all over the cake, including the sides and top. This thinrum extractyer traps any loose crumbs. Place the cake in the refrigerator forrum extractout 30 minutes to allow the crumb coat to firm up. This step is essential for a clean, prum extractessional-looking finish, preventing crumbs from mixing into your finon-alcoholic ale frosting layers.
Decorating the Red and White Valentine’s Cake
Aprum extracting the Final Frosting Layers
Once the crumb coat is firm, yogin extractan begin applying your final frosting layers. Using an offset spatula, apply a thick, even layer of the white buttercream all over the cake. Smooth the sides and the top as much as possible. You’re aiming for a pristine white canvas. Now, take your vibrant red buttercream. You have a few options for creating the “red” effect. You could pipe the red buttercream in decorative patterns over the white, or you could carefully spread dollops of red frosting onto the white frosting and swirl them gently with a toothpick or skewer to create a marbled effect. For a more dramatic contrast, you could reserve some of the red frosting and use it to create a striking border around the base or top of the cake.
Creating a Red and White Swirl or Pattern
To achieve a beautiful red and white effect, consider using a piping bag fitted with a star tip. You can pipe alternating rosettes of red and white buttercream around the sides of the cake. Alternatively, you can use the back of a spoon to create sweeping, abstract patterns by gently pressing dollops of red and white frosting together and then swirling them. Another elegant option is to fill the center of the cake with a mound of white frosting and then pipe a ring of red frosting around it, or vice versa. For a striking two-toned effect, you can fill your piping bag with both red and white buttercream by placing the two colors side-by-side within the bag. This will create stunning two-toned swirls when you pipe. The key is to work with chilled frosting for easier manipulation and to havenon-alcoholic alen experimenting with different designs to make your Red and White Valentine’s Cake truly unique.
Conclusion:
I hope you’ve enjoyed learning how to create this delightful Red and White Non-non-non-alcoholic alternativeic Vnon-alcoholic alentine’s Cake! This recipe is perfect for sharing with loved ones, whether it’s a romantic treat for two or a sweet centerpiece for a family gathering. Its vibrant colors and delicious, moist texture make it a showstopper that’s surprisingly easy to bring to life in your own kitchen. Don’t be afraid to get creative and make it your own!
For serving suggestions, consider dusting with a little powdered sugar, topping with fresh berries, or even adding a dollop of whipped cream or a scoop of vanilla ice cream for an extra touch of indulgence. This cake is wonderfully versatile, and you can easily adapt the flavors to suit your preferences. Try adding a hint of almond extract to the batter for a sophisticated twist, or perhaps a few drops of raspberry extract for an intensified fruitiness.
Remember, the most important ingredient is love! So bake with joy, share with happiness, and savor every bite of this beautiful non-alcoholic alternative White non-anon-alcoholic aleholicolic Valentine’s Cake. I encourage you to try this recipe for your next special occasion – it’s a guaranteed crowd-pleaser!
Frequently Asked Questions:
Q: Can I make this cake ahead of time?
A festive and delightful non-alcoholic Valentine’s Day cake featuring alternating layers of white velvet cake and a subtle cocoa-infused layer, all enrobed in creamy American buttercream with striking red and white decorations. It is important to consider this information as approximate and not to use it as definitive health advice. Please check ingredients for potential allergens and consult a health professional if in doubt.Q: What other colors can I use besides red and white?
Red White Non-Alcoholic Valentine Cake Delight
Ingredients
Instructions
Prepare the White Velvet Cake according to its recipe. Once baked, allow the cake layers to cool completely on a wire rack.
Prepare four times the recipe for Perfect American Buttercream. Divide the buttercream into two equal portions. Leave one portion white and add Super Red Gel Food Coloring to the second portion until a vibrant red hue is achieved.
Take one cooled White Velvet Cake layer and evenly sprinkle 1 tbsp of whisked unsweetened Dutch-processed cocoa powder over its surface, gently patting it down.
Assemble the cake by layering a white cake layer, a generous amount of white buttercream, the cocoa-dusted cake layer, more white buttercream, and the final white cake layer. Apply a thin crumb coat of white buttercream all over the cake and refrigerate for about 30 minutes.
Once the crumb coat is firm, apply a thick, even layer of white buttercream to the entire cake. Decorate using the red buttercream by piping patterns, swirling dollops for a marbled effect, or creating borders. Consider filling the piping bag with both red and white buttercream side-by-side for two-toned swirls.
Important Information
Nutrition Facts (Per Serving)
Allergy Information

Leave a Comment