
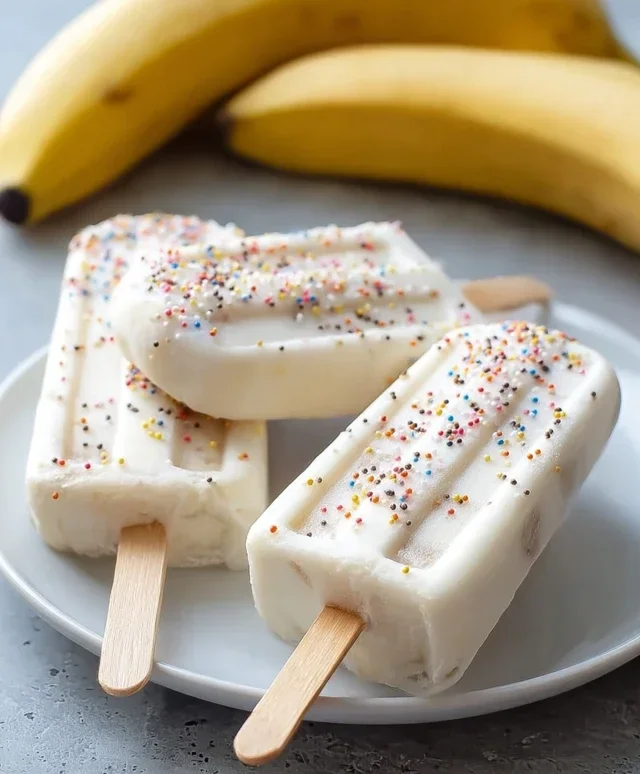
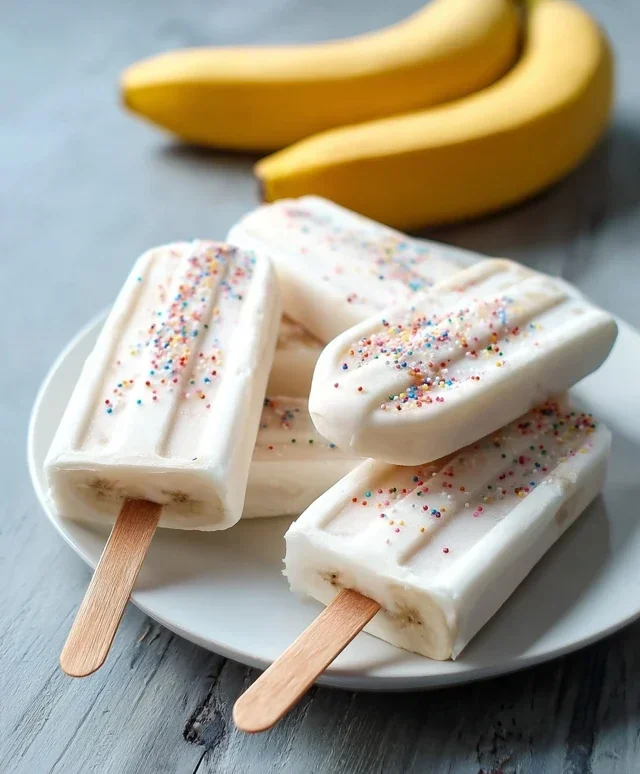
Frozen Banana Yogurt Pops are the ultimate guilt-free treat, perfect for beating the heat or satisfying a sweet craving any time of year. There’s something undeniably magical about these simple yet sensational delights. We all love them for their incredible creaminess, inherent sweetness, and the fact that they’re a wonderfully healthy alternative to store-bought ice cream. What truly makes these Frozen Banana Yogurt Pops so special is their versatility. You can customize them with your favorite fruits, a sprinkle of granola, or a drizzle of honey, transforming them into a personalized masterpiece. They’re so easy to make, making them an ideal activity for the whole family to enjoy creating together. Get ready to discover your new favorite frozen confection!

Frozen Banana Yogurt Pops
Looking for a delightfully simple and healthy treat that the whole family will love? These Frozen Banana Yogurt Pops are the answer! They’re incredibly easy to make, require just a few wholesome ingredients, and are the perfect way to cool down on a warm day or satisfy a sweet craving without the guilt. Imagin extracte a creamy, frozen dessert that tastes like pure sunshine and fun – that’s exactly what you get with these pops. They’re a fantastic alternative to store-bought ice cream or popsicles, offering natural sweetness from the bananas and a creamy texture from the yogurt. Plus, they’re so customizable with your favorite toppings! Let’s get started on creating these frozen masterpieces.
Ingredients:
Creating Your Frozen Masterpieces
Now that you have gathered all your ingredients, it’s time to dive into the fun part: transforming these simple items into delicious frozen treats. This recipe is designed for ease and enjoyment, making it a perfect activity for kids to help with too. The vibrant colors and the anticnon-alcoholic ipation of a cool, sweet reward will keep everyone engaged and excited.
1. The first step is all about preparing our banana base. Take your peeled and halved bananas. You’ll want to make sure your bananas are ripe but not overly mushy, as this will provide the best natural sweetness and flavor. If your bananas are a bit too firm, you might want to let them sit at room temperature for another day or two. Once they’re ready, you’re going to carefully insert a popsicle stick into the cut end of each banana half. Push the stick in about halfway, ensuring it’s secure enough to hold the banana once frozen. The stick will serve as your handle for enjoying the pop later. This is a crucial step for easy handling and a satisfying eating experience.
2. Next, we’re going to introduce the creamy element. In a small bowl, gently stir your vanilla yogurt. If you’re feeling adventurous or want to introduce different flavor profiles, you can absolutely swap the vanilla yogurt for other flavors. Strawberry, Greek yogurt for an extra protein boost and tang, or even a fruit-flavored yogurt would be delightful. The goal here is to have a yogurt that is easily spoonable and will coat the banana nicely. You don’t need to whip it or make it airy; a smooth, ready-to-coat consistency is perfect.
3. Now comes the creative and arguably the most visually appealing part: coating the bananas! This is where your personality and preference can really shine. Take each banana half, ensuring the popsicle stick is firmly in place, and dip it into the yogurt. Use a spoon or a small spatula to generously coat the banana with yogurt. Try to get an even layer all around. Don’t worry if it’s not perfectly smooth; a slightly rustic look can be charming. You can also dip the banana halfway, then freeze it for a bit, and then dip the other half for a two-toned effect. This is where you can be artistic!
4. Once your bananas are coated in yogurt, it’s time to add those delightful toppings. This is your chance to get creative! Immediately after coating the banana in yogurt, while the yogurt is still soft and pliable, gently press your chosen colorful sprinkles or other toppings onto the yogurt layer. You can roll the entire banana in sprinkles, just sprinkle the top half, or create fun patterns. Think about what makes you happy – rainbow sprinkles, chocolate chips, shredded coconut, chopped nuts (for older kids and adults), or even a drizzle of melted chocolate. The toppings will adhere to the yogurt, creating a beautiful and delicious crust. Make sure to have your toppings ready and within easy reach before you start coating the bananas.
5. The final, and perhaps most important, step is the freezing. Carefully place each prepared banana pop onto a baking sheet lined with parchment paper or wax paper. This prevents them from sticking to the sheet and to each other as they freeze. Once all your pops are arranged on the baking sheet, it’s time to put them into the freezer. Allow them to freeze for at least 4 to 6 hours, or until they are completely solid. The longer they freeze, the firmer they will become. Once they are fully frozen, you can carefully remove them from the parchment paper. If they are a little tricky to get off, you can briefly run the underside of the baking sheet under warm water to help loosen them. Store your finished Frozen Banana Yogurt Pops in an airtight container or freezer bag in the freezer. This will keep them fresh and prevent freezer burn. Enjoy them whenever that sweet craving strikes!
Conclusion:
So there you have it – your guide to making these utterly delightful frozen banana yogurt pops! This recipe is truly a winner because it’s incredibly simple, requiring minimal ingredients and effort, yet delivers a wonderfully refreshing and healthy treat. They’re perfect for a hot summer day, a guilt-free dessert, or even a fun breakfast option. I love that they’re naturally sweet thanks to the ripe bananas, and the creamy yogurt provides a satisfying texture.
Serving these pops is a breeze! They’re fantastic on their own, but you can elevate them by drizzling with a little melted dark chocolate or a sprinkle of granola before they’re fully frozen. For variations, feel free to experiment with different yogurt flavors like strawberry or mango, or add a swirl of honey or maple syrup for extra sweetness. You could even blend in a handful of berries or a dash of cinnamon for a flavor boost. I truly encourage you to give these frozen banana yogurt pops a try – they are a fantastic way to beat the heat and satisfy your sweet tooth in a wholesome way!
Frequently Asked Questions:
Q: Can I use other fruits besides bananas?
While bananas are the star for their creamy texture and natural sweetness in these frozen banana yogurt pops, you can certainly experiment! Blending in other soft fruits like mango, berries, or peaches will work. However, you might need to adjust the liquid content or add a touch more sweetener if the other fruits aren’t as naturally sweet as ripe bananas.
Q: How long do these pops last in the freezer?
Stored properly in an airtight container or freezer bag, these delicious pops can last for up to 1-2 months. For the best texture and flavor, I recommend enjoying them within the first month. Make sure they are completely frozen before storing to prevent ice crystals from forming.
Q: My pops are a bit too icy. How can I make them creamier?
If your frozen banana yogurt pops are coming out too icy, the key is ensuring your bananas are very ripe and blended until completely smooth. Using full-fat Greek yogurt will also contribute to a creamier texture compared to low-fat or non-dairy options. You can also try adding a tablespoon of nut butter (like almond or peanut butter) before blending for extra creaminess and flavor.
Frozen Banana Yogurt Pops
Easy and healthy frozen banana yogurt pops, perfect for a sweet treat.
Ingredients
-
3 bananas, peeled and cut in half
-
3/4 cup vanilla yogurt (or flavor of your choice)
-
Colorful sprinkles or toppings of your choice
-
6 popsicle sticks
-
1 tablespoon honey (optional, for sweetness)
-
1/4 cup chopped nuts (optional, for crunch)
Instructions
-
Step 1
Insert a popsicle stick into the cut end of each banana half. -
Step 2
Spread a thin layer of vanilla yogurt over each banana half, coating it evenly. -
Step 3
If using, drizzle honey over the yogurt coating. -
Step 4
Roll the yogurt-coated bananas in your chosen sprinkles or toppings, or press chopped nuts onto the yogurt. -
Step 5
Place the prepared banana pops on a baking sheet lined with parchment paper. -
Step 6
Freeze for at least 4 hours, or until firm.
Important Information
Nutrition Facts (Per Serving)
It is important to consider this information as approximate and not to use it as definitive health advice.
Allergy Information
Please check ingredients for potential allergens and consult a health professional if in doubt.

Leave a Comment