
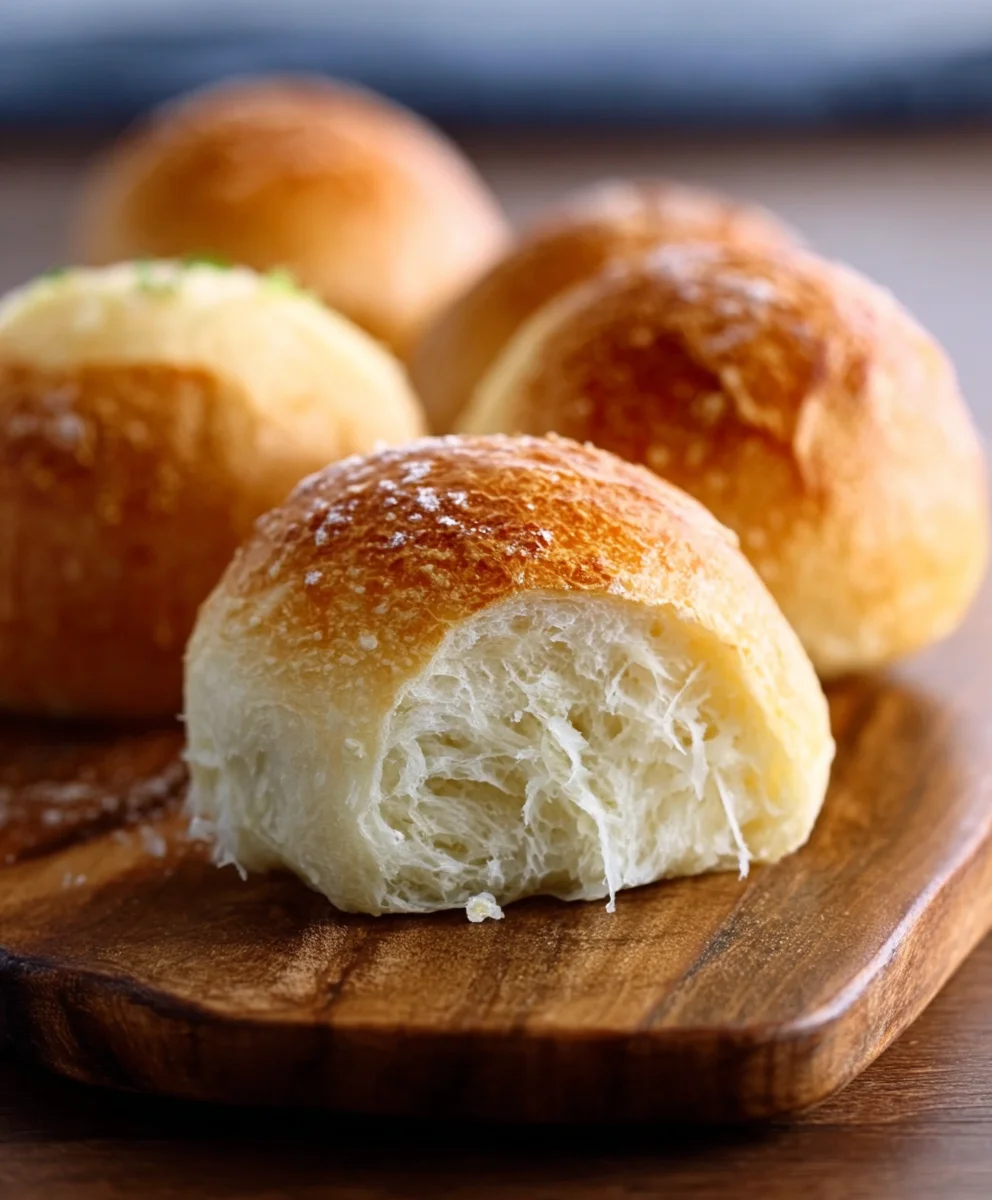
No Knead Crusty Rolls are the magic wand for busy bakers, transforming humble ingredients into golden, glorious crusty delights with minimal effort. If you’ve ever dreamt of pulling warm, artisan-style rolls straight from your oven, filling your kitchen with that irresistible aroma, but felt intimidated by the traditional kneading process, then this recipe is your new best friend. These aren’t just any rolls; they possess a shatteringly crisp exterior that gives way to a soft, airy interior, a textural contrast that has captivated bakers worldwide. What makes these particular No Knead Crusty Rolls so special is their incredible simplicity. You can achieve bakery-worthy results without spending precious time and energy on kneading, making them perfect for weeknight dinners, impromptu gatherings, or simply treating yourself to something truly delicious. Get ready to impress yourself and everyone you share them with!

Ingredients:
- 3 cups all-purpose flour, plus more for dusting
- 1 ½ teaspoons instant yeast
- 1 ½ teaspoons fine sea salt
- 1 ½ cups lukewarm water (about 105-115°F / 40-46°C)
- 1 tablespoon olive oil, for greasing
Preparing the Dough
This recipe for No Knead Crusty Rolls is wonderfully forgiving, making it perfect for bakers of all levels. The magic lies in the minimal hands-on time and the long, slow fermentation that develops incredible flavor and that desirable crusty exterior. Let’s get started by combining our dry ingredients. In a large mixing bowl, preferably one that’s at least 2-quart capacity to allow for rising, whisk together the 3 cups of all-purpose flour, 1 ½ teaspoons of instant yeast, and 1 ½ teaspoons of fine sea salt. Ensuring the yeast and salt are evenly distributed throughout the flour is crucial for uniform leavening and seasoning in your rolls.
Next, we’ll introduce the liquid. Pour in 1 ½ cups of lukewarm water. The temperature of the water is important; it should feel comfortably warm to the touch, not hot, as excessively hot water can kill the yeast, and too cold will significantly slow down its activity. This lukewarm temperature provides the ideal environment for the yeast to thrive and begin extract its work of transforming the dough.
Now comes the “no knead” part! Using a sturdy spoon or a spatula, mix the ingredients until just combined. You’ll end up with a shaggy, wet dough. Don’t worry if there are still a few dry spots; the dough will continue to hydrate as it rests. The goal here is simply to bring everything together without overworking it. Over-kneading develops gluten too early, which is counterproductive for this particular method. Once you have a cohesive, albeit sticky, mass, cover the bowl tightly with plastic wrap or a damp kitchen towel. This prevents a dry skin from forming on the surface of the dough.
Fermentation and First Rise
Now, we let time do the heavy lifting. Place the covered bowl in a warm spot in your kitchen, away from drafts. This could be on top of a slightly warmed (but not hot) oven, or simply in a consistently warm room. Allow the dough to ferment for at least 12 hours, and up to 18 hours. This extended fermentation period is where the flavor develops and the structure of the dough is built without any physical manipulation. You’ll notice that the dough will become bubbly, significantly increase in volume, and develop a slightly yeasty, pleasant aroma. The longer rise also makes the dough easier to handle and shape later on.
Shaping the Rolls
After the long, slow rise, your dough will be a sight to behold – airy and full of promise. It’s time to shape our No Knead Crusty Rolls. Lightly flour a clean work surface. Gently scrape the dough out of the bowl onto the floured surface. Resist the urge to punch down the dough vigorously; we want to retain as much of that beautiful airiness as possible. Instead, use your hands or a bench scraper to gently coax the dough into a rough rectangle.
To form the rolls, you can either cut the dough into portions or fold it into individual rolls. For cutting, use a sharp knife or a bench scraper to divide the dough into 8 equal portions. For folding, gently fold the dough over on itself a few times, creating tension on the surface, and then divide it. Once divided, take each portion and gently tuck the edges underneath to form a round or slightly oval shape. The key here is to be gentle and create a slightly taut surface without deflating the dough. Think of it as coaxing it into shape rather than forcing it.
Second Rise and Baking Preparation
Now that your rolls are shaped, they need another brief rest, often called the second rise or proofing. Lightly grease a baking sheet with 1 tablespoon of olive oil or line it with parchment paper. Carefully transfer the shaped rolls to the prepared baking sheet, leaving a few inches between each one to allow them to expand during their final rise. Cover the baking sheet loosely with plastic wrap or a clean kitchen towel. Let the rolls rest in a warm place for another 30 to 60 minutes, or until they appear visibly puffier. They won’t necessarily double in size like they did during the first rise, but they should look noticeably more plump and airy.
While your rolls are proofing, preheat your oven to 450°F (230°C). For that signature crusty exterior, we need steam in the oven. The easiest way to achieve this is by placing an empty oven-safe pan (like a metal loaf pan or cast-iron skillet) on the bottom rack of your oven as it preheats. Just before you’re ready to bake, carefully pour about 1 cup of hot water into this preheated pan. This will create a burst of steam, which is crucial for developing a thin, crackly crust on your No Knead Crusty Rolls. Be very cautious when handling hot water and a hot oven.
Baking the Crusty Rolls
Once your oven is preheated and the steam is ready, it’s time to bake! Carefully remove the rolls from their cover. If you like, you can lightly dust the tops of the rolls with a bit more flour for an even more rustic appearance, but this is purely optional. Gently place the baking sheet with the rolls into the hot oven, on the middle rack. Immediately close the oven door to trap the steam.
Bake for 20 to 25 minutes, or until the rolls are a deep golden brown and sound hollow when tapped on the bottom. The steam from the water pan will help the rolls expand beautifully and create that sought-after crisp crust. After about 15 minutes of baking, carefully remove the pan of hot water from the oven. This allows the crust to finish crisping up and brown properly without getting soggy from residual steam. Once baked to perfection, transfer the No Knead Crusty Rolls to a wire rack to cool slightly. Resist the temptation to cut into them immediately; allowing them to cool for at least 10-15 minutes will result in a better texture and prevent the insides from being gummy.

Conclusion:
There you have it – the incredibly simple yet deeply satisfying process for making No Knead Crusty Rolls! We’ve explored how a minimal amount of effort can yield a loaf with a beautifully crisp exterior and a wonderfully soft, airy interior, perfect for any meal. These rolls are more than just bread; they’re a testament to the magic of fermentation and patience, transforming basic pantry staples into something truly special. Don’t be intimidated; the beauty of this recipe lies in its forgiving nature. Give it a try and experience the joy of fresh-baked bread right from your own kitchen.
For serving suggestions, these No Knead Crusty Rolls are divine alongside hearty soups and stews, perfect for soaking up rich broths. They also make an excellent accompaniment to cheese boards or simply enjoyed with a generous spread of butter. For variations, feel free to experiment with adding herbs like rosemary or thyme to the dough, or a sprinkle of seeds on top before baking for added texture and flavor. This recipe is a fantastic base for all sorts of delicious creations!
Frequently Asked Questions:
What if my dough doesn’t double in size?
Don’t worry if your dough doesn’t dramatically double in size after the initial rise. The key indicators are that it should be visibly larger, bubbly, and have a slightly domed appearance. Temperature plays a significant role; a warmer environment will speed up the process. If it’s quite cool, it might take longer, but the gluten development and flavor development will still be happening.
Can I bake these rolls on a baking sheet instead of in a Dutch oven?
While a Dutch oven is highly recommended for achieving that signature crusty exterior by trapping steam, you can bake these No Knead Crusty Rolls on a baking sheet. To mimic the steam environment, place a pan of hot water on the bottom rack of your oven while the rolls are baking. This will help create a more favorable crust.
Easy No Knead Crusty Rolls
A simple recipe for delicious crusty rolls that requires no kneading and minimal hands-on time, perfect for bakers of all levels.
Ingredients
-
3 cups all-purpose flour, plus more for dusting
-
1 ½ teaspoons instant yeast
-
1 ½ teaspoons fine sea salt
-
1 ½ cups lukewarm water (about 105-115°F / 40-46°C)
-
1 tablespoon olive oil, for greasing
Instructions
-
Step 1
In a large mixing bowl, whisk together the flour, instant yeast, and fine sea salt. Ensuring the yeast and salt are evenly distributed is crucial for uniform leavening and seasoning. -
Step 2
Pour in the lukewarm water and mix with a sturdy spoon or spatula until just combined, forming a shaggy, wet dough. Do not overwork the dough. Cover the bowl tightly and let it rest. -
Step 3
Allow the dough to ferment in a warm spot for at least 12 hours, and up to 18 hours. The dough will become bubbly and significantly increase in volume. -
Step 4
Lightly flour a clean work surface. Gently scrape the dough out and divide it into 8 equal portions. Gently tuck the edges underneath each portion to form a round or slightly oval shape. -
Step 5
Lightly grease a baking sheet and transfer the shaped rolls, leaving space between them. Cover loosely and let rest in a warm place for 30 to 60 minutes until visibly puffier. Preheat your oven to 450°F (230°C) with an empty oven-safe pan on the bottom rack. -
Step 6
Just before baking, carefully pour about 1 cup of hot water into the preheated pan on the bottom rack to create steam. Carefully place the baking sheet with the rolls into the oven. Bake for 20 to 25 minutes, or until deep golden brown and hollow-sounding when tapped. After 15 minutes, carefully remove the water pan. Cool on a wire rack for at least 10-15 minutes.
Important Information
Nutrition Facts (Per Serving)
It is important to consider this information as approximate and not to use it as definitive health advice.
Allergy Information
Please check ingredients for potential allergens and consult a health professional if in doubt.


Leave a Comment