
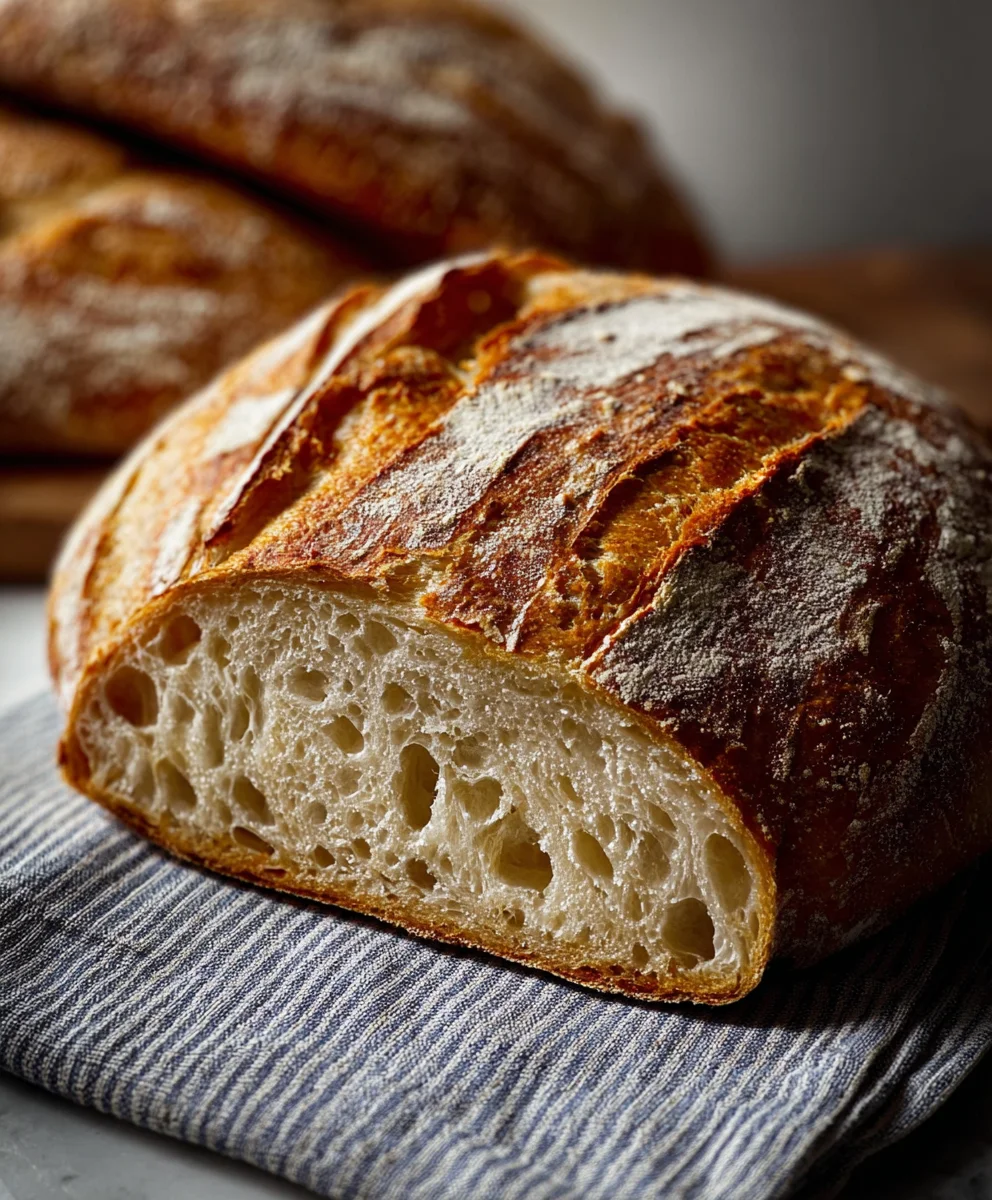
Sourdough Bread. Ah, the mere mention of it conjures images of artisanal bakeries, the comforting aroma filling the air, and that perfect, crackling crust giving way to a soft, airy interior. If you’ve ever experienced the magic of a truly great loaf, you know exactly why people are so passionate about this naturally leavened wonder. It’s more than just bread; it’s a labor of love, a testament to patience, and a culinary craft that has captivated bakers for centuries. What truly sets sourdough apart is its unique tang and complex flavor profile, developed through a wild yeast starter that imbues every bite with a depth you just can’t find in commercial loaves. This isn’t just about sustenance; it’s about an experience, a connection to traditional baking methods, and the sheer satisfaction of creating something so beautiful and delicious from simple ingredients.
Ready to master the art of homemade Sourdough Bread?

Ingredients:
- 4 cups (500g) bread flour or all-purpose flour
- 1⅔ cups (375g) warm water
- 1 cup (200g) active sourdough starter
- 2 teaspoons (10g) salt
Mixing the Dough
Autolyse (Optional but Recommended)
To begin extract our journey to a beautiful loaf of Sourdough Bread, I like to start with an autolyse. This is a fancy term for simply mixing the flour and water and letting them rest. It’s not strictly necessary, but it significantly helps in developing the gluten structure of the dough, which leads to a lighter crum extractb and better rise. In a large mixing bowl, combine the 4 cups (500g) of bread flour with the 1⅔ cups (375g) of warm water. Use a spatula or your hands to mix until just combined. You’ll have a shaggy, somewhat sticky mass. Cover the bowl with a damp cloth or plastic wrap and let it rest for at least 30 minutes, or up to an hour. During this time, the flour will fully hydrate, and gluten developmentgin extractll begin passively. You’ll notice the dough becoming smoother and more cohesive.
Incorporating the Starter and Salt
After the autolyse, it’s time to add the heart of our Sourdough Bread – the active sourdough starter. Make sure your starter is bubbly and active, meaning it has been fed within the last 4-12 hours and has doubled or even tripled in size. Add the 1 cup (200g) of active sourdough starter to the rested flour and water mixture. Now, add the 2 teaspoons (10g) of salt. The salt not only adds flavor but also controls the fermentation rate and strengthens the glgin extractn network. Begin mixing everything together. You can use your hands for this, gently folding and squishing the ingredients until they are well incorporated. It will feel quite wet and sticky at this stage, and that’s perfectly normal for sourdough. Continue mixing for about 5-7 minutes, ensuring there are no dry pockets of flour.
Developing the Dough
Stretch and Folds: Building Strength
Now comes the crucial part of developing the dough’s structure without extensive kneading: the stretch and fold technique. We’ll perform a series of these over a few hours to build strength and elasticity. For the first set of stretch and folds, wet your hands slightly to prevent sticking. Reach under one side of the dough in the bowl, grab it gently, and stretch it upwards. Then, fold it over onto itself. Rotate the bowl 90 degrees and repeat this stretching and folding motion for all four “sides” of the dough. You should feel the dough becoming smoother and more resistant with each set. Cover the bowl and let it rest for 30 minutes. Repeat this process of stretching and folding a total of 4 to 6 times over a period of 2 to 3 hours. You’ll notice the dough becoming progressively smoother, more elastic, and less sticky. It will start to hold its shape better.
Bulk Fermentation
The Resting Period for Flavor and Rise
After you’ve completed your final set of stretch and folds, it’s time for bulk fermentation. This is the period where the sourdough starter works its magic, feeding on the sugars in the flour and producing gases (carbon dioxide) that cause the dough to rise and develop that characteristic sourdough tang. Cover the bowl tightly and let it rest at room temperature. The duration of bulk fermentation can vary significantly depending on the ambient temperature of your kitchen. In a warmer environment (around 75-80°F or 24-27°C), it might take 3 to 5 hours. In a cooler environment, it could take 6 to 8 hours or even longer. You’re looking for the dough to increase in volume by about 30-50% and become noticeably airy. You might see a few large bubbles on the surface. Avoid over-proofing, which can result in a flat loaf.
Shaping and Proofing
Pre-Shaping for Structure
Once your dough has completed its bulk fermentation, it’s time to shape it. Gently turn the dough out onto a lightly floured surface. Be careful not to degas it too much. For the pre-shape, gently bring the edges of the dough towards the center to form a rough round ball. This step helps to create surface tension and organize the gluten structure before the final shape. Let the dough rest, uncovered, for about 20-30 minutes. This resting period allows the gluten to relax, making the final shaping much easier.
Final Shaping and Cold Proof
Now for the final shape. Depending on whether you’re baking in a Dutch oven or on a baking stone, you’ll shape it accordingly. For a boule (round loaf), gently flatten the dough into a rough circle. Then, fold the top edge down to the center, followed by the bottom edge up to meet the top, creating a rectangle. Fold the left side over to the right. Now, starting from the top, roll the dough up tightly, like a jelly roll, ensuring you’re creating tension on the outer surface. Pinch the seams closed. Place the shaped dough seam-side down into a floured banneton (proofing basket) or a bowl lined with a floured tea towel. Cover it tightly with plastic wrap or place it inside a plastic bag. Now, transfer it to the refrigerator for a cold proof. This is usually done overnight, for 12-18 hours. The cold slows down fermentation, allowing complex flavors to develop and making the dough easier to score.
Baking the Sourdough Bread
Preheating and Scoring
About 45 minutes to an hour before you plan to bake, preheat your oven with your Dutch oven (with lid) inside to 500°F (260°C). If you’re using a baking stone, preheat it to the same temperature. Once the oven and Dutch oven are thoroughly preheated, carefully remove the Dutch oven from the oven. Take your dough out of the refrigerator. Gently invert the dough onto a piece of parchment paper or directly into the hot Dutch oven. If you’re using parchment paper, you can use it to lower the dough into the pot. Now, it’s time to score the top of the loaf. Use a sharp knife, razor blade, or scoring lame to make a few quick, decisive cuts. A common pattern is a single deep slash or an “X” shape. Scoring allows the bread to expand in a controlled way during baking.
Baking with Steam
Carefully place the lid back on the Dutch oven and put it back into the preheated oven. Bake with the lid on for 20 minutes. This traps the steam released by the dough, which is crucial for achieving a beautifully crisp crust and good oven spring. After 20 minutes, remove the lid from the Dutch oven. You’ll see the loaf has puffed up significantly and is starting to turn golden brown. Reduce the oven temperature to 450°F (230°C). Continue to bake for another 25-30 minutes, or until the crust is a deep golden brown and the internal temperature of the bread reaches around 205-210°F (96-99°C) when tested with an instant-read thermometer. If baking on a baking stone, you would place your dough onto the hot stone and bake at 500°F (260°C) for 20 minutes with steam (achieved by adding ice cubes to a hot pan on the bottom rack), then remove the steam source and reduce heat to 450°F (230°C) for another 25-30 minutes.
Cooling for Optimal Texture
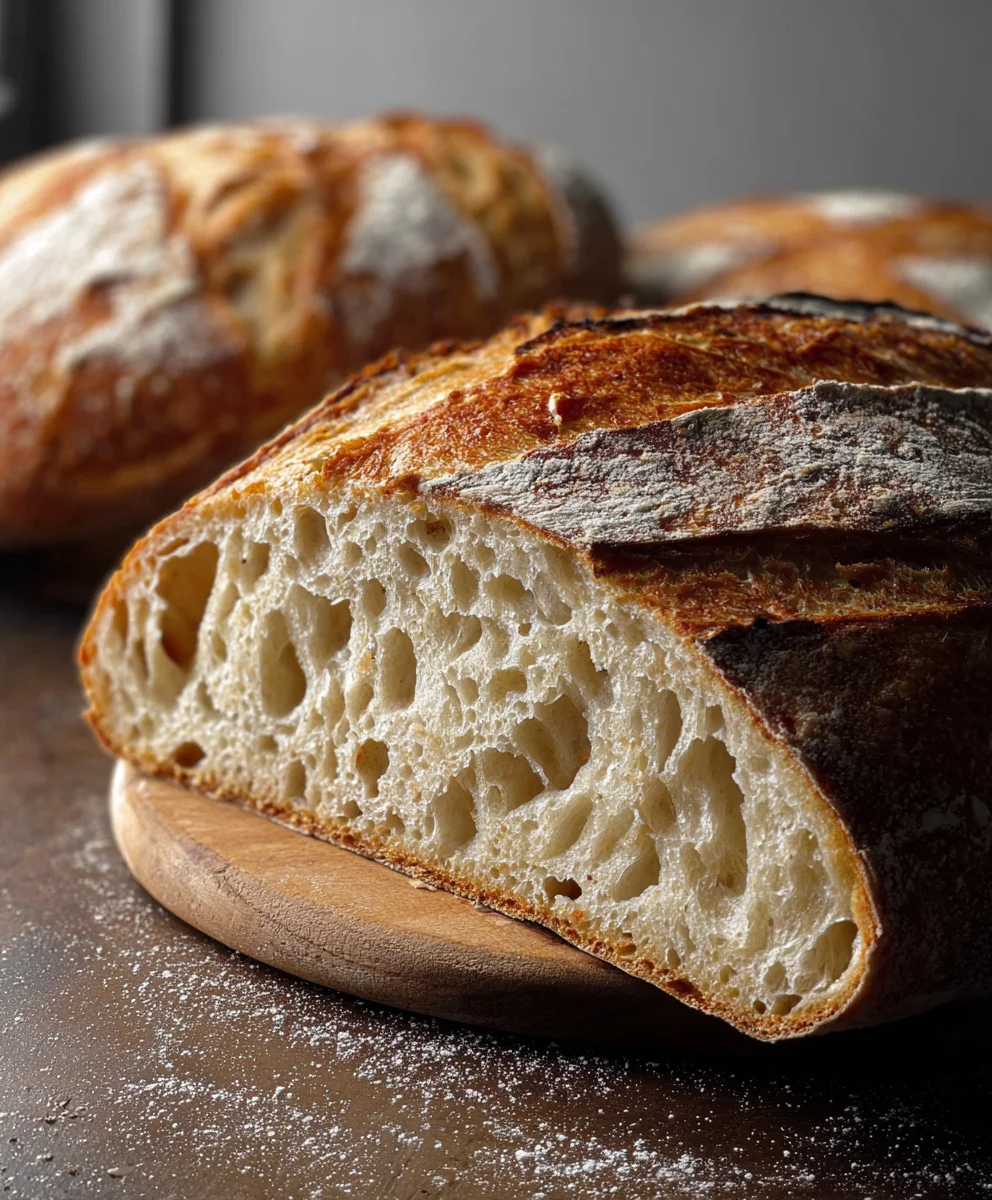
Once baked, carefully remove the Sourdough Bread from the Dutch oven or baking stone and place it on a wire rack to cool completely. Resist the temptation to slice into it immediately! This is one of the hardest parts, but it’s essential. The internal structure of the bread is still setting as it cools. Slicing too soon can lead to a gummy texture. Allow it to cool for at least 2-3 hours, or until it’s no longer warm to the touch. Once cooled, you’ll have a loaf with a wonderfully chewy crust and an open, airy interior, ready to be enjoyed.
Conclusion:
Embarking on the journey of making your own Sourdough Bread is a rewarding experience that fills your kitchen with an irresistible aroma and your table with a truly special loaf. This recipe, while requiring patience, delivers a crusty exterior, a chewy, airy interior, and that signature tangy flavor that sourdough is loved for. We’ve covered the essential steps to guide you from starter maintenance to the final bake, ensuring you achieve a beautiful and delicious result.
Serve your freshly baked Sourdough Bread warm, sliced thick, with a generous smear of butter, or use it as the foundation for incredible sandwiches. It’s also perfect for dunking into hearty soups and stews. Don’t be afraid to experiment with variations! Consider adding herbs like rosemary or thyme to the dough, or incorporating seeds for added texture and flavor. You might even try enriching it with a touch of whole wheat flour for a deeper, nuttier taste. The possibilities are truly endless.
Remember, sourdough is a living process, and each loaf is unique. Embrace the learning curve, enjoy the process, and most importantly, savor every bite of your homemade Sourdough Bread. Happy baking!
Frequently Asked Questions:
Q: My sourdough starter isn’t very active. What can I do?
A: Ensure your starter is fed regularly with equal parts flour and water (by weight) and kept at a consistent room temperature (ideally between 70-80°F or 21-27°C). If it’s sluggish, try feeding it more frequently for a few days or even moving it to a warmer spot in your home. You can also try using a different type of flour for feeding, like rye, which can sometimes boost activity.
Q: My sourdough bread is too dense. What went wrong?
A: A dense loaf can often be due to insufficient gluten development, underdeveloped fermentation, or over-handling the dough. Make sure you’re performing enough stretch and folds to build strength, allowing for adequate bulk fermentation (the dough should at least double in size), and that your starter is active and ready. Proofing for too short a time can also lead to density.
Q: How do I get a really crispy crust on my Sourdough Bread?
A: The key to a crispy crust lies in steam. Baking your Sourdough Bread in a Dutch oven is highly recommended, as it traps the moisture released by the dough, creating steam. You can also achieve this by placing a pan of hot water at the bottom of your oven during the initial part of the bake. Ensure your oven is fully preheated before baking.
Easy Sourdough Bread Recipe – Delicious Homemade Loaf
A step-by-step guide to baking a delicious and easy homemade sourdough bread loaf, featuring a chewy crust and an open, airy interior.
Ingredients
-
4 cups (500g) bread flour or all-purpose flour
-
1⅔ cups (375g) warm water
-
1 cup (200g) active sourdough starter
-
2 teaspoons (10g) salt
Instructions
-
Step 1
Autolyse: Mix flour and warm water until just combined, forming a shaggy mass. Cover and let rest for 30-60 minutes to hydrate the flour and begin gluten development. -
Step 2
Incorporate Starter and Salt: Add active sourdough starter and salt to the autolysed mixture. Mix by hand for 5-7 minutes until well incorporated, noting the dough will be wet and sticky. -
Step 3
Develop Dough with Stretch and Folds: Perform 4-6 sets of stretch and folds over 2-3 hours, resting 30 minutes between sets. Wet hands slightly to prevent sticking. Stretch and fold each side of the dough onto itself. The dough will become smoother and more elastic. -
Step 4
Bulk Fermentation: Cover the bowl tightly and let the dough ferment at room temperature for 3-8 hours, or until it increases in volume by 30-50% and appears airy. Duration depends on kitchen temperature. -
Step 5
Shaping and Cold Proof: Gently turn dough onto a lightly floured surface. Pre-shape into a rough ball and let rest for 20-30 minutes. Then, perform final shaping (boule or batard) and place seam-side down into a floured banneton or lined bowl. Cover and refrigerate for 12-18 hours for cold proofing. -
Step 6
Baking: Preheat oven with Dutch oven to 500°F (260°C). Carefully invert dough onto parchment or into the hot Dutch oven. Score the top of the loaf. Bake covered for 20 minutes, then reduce heat to 450°F (230°C) and bake uncovered for another 25-30 minutes until deep golden brown and internal temperature reaches 205-210°F (96-99°C). -
Step 7
Cooling: Remove bread from Dutch oven and place on a wire rack. Let cool completely for at least 2-3 hours before slicing to allow the interior to set properly.
Important Information
Nutrition Facts (Per Serving)
It is important to consider this information as approximate and not to use it as definitive health advice.
Allergy Information
Please check ingredients for potential allergens and consult a health professional if in doubt.


Leave a Comment