
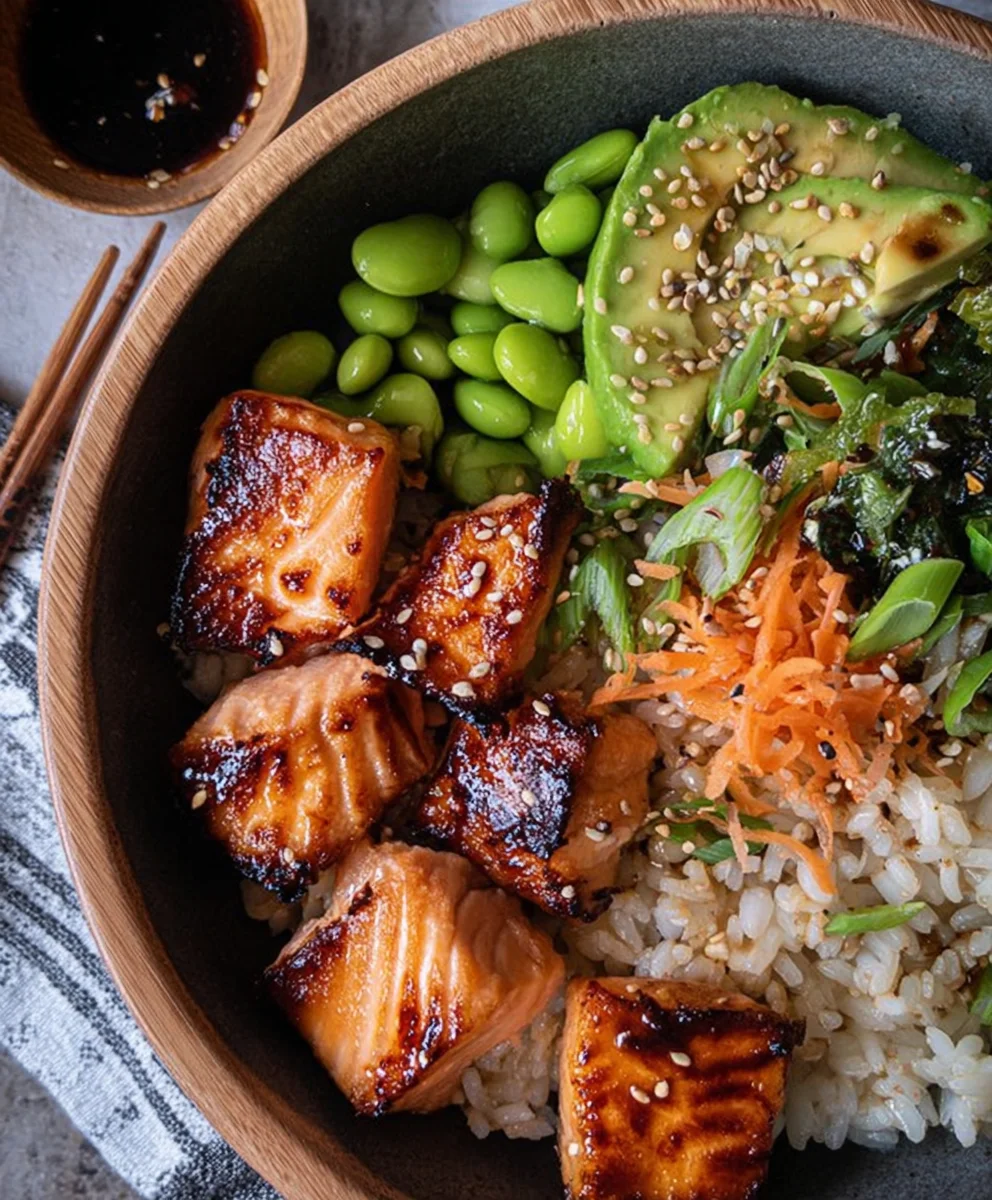
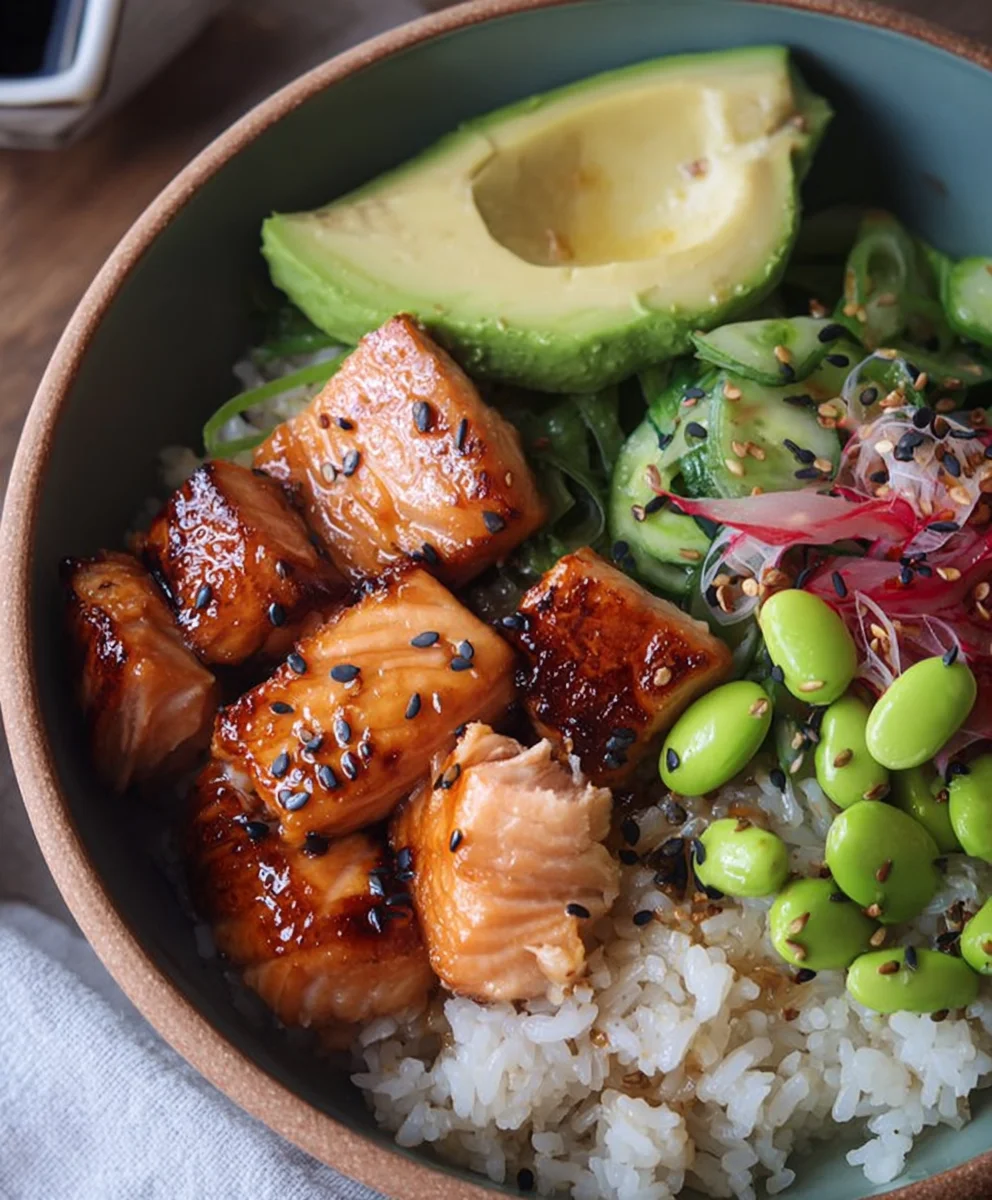
Teriyaki Salmon Sushi Bowl (GF). Oh, the sheer joy of a perfectly executed sushi bowl! It’s more than just a meal; it’s an experience. We’re talking about that irresistible symphony of flavors and textures – the tender, slightly sweet salmon, the perfectly seasoned rice, the crisp vegetables, all brought together with that addictive teriyaki glaze. It’s no wonder this dish has become a global phenomenon, a go-to for both weeknight dinners and impressive entertaining. What truly sets this Teriyaki Salmon Sushi Bowl (GF) apart, however, is its accessibility. Forget the intimidation factor of traditional sushi making; this recipe breaks it down into simple, manageable steps, ensuring you achieve restaurant-quality results right in your own kitchen. Plus, with the gluten-free twist, everyone can savor this delightful creation without a second thought, making it a universally loved favorite.

Ingredients:
- 180g (6.5oz) sushi rice
- 3 tbsp rice vinegar
- 1 tsp caster sugar
- 0.5 tsp fine salt
- 30ml (1fl oz) maple syrup
- 1 tsp sesame oil
- 2 tsp gluten free tamari soy sauce
- 0.5 tsp garlic granules
- 1 tsp non-non-non-alcoholic alternativeic non-alcoholic mirin
- 2 salmon fillets (about 150-200g each)
- 2 tbsp sesame seeds
- 4 spring onions
- 150g (5oz) edamame beans (shelled)
- Half a ripe avocado
Preparing the Sushi Rice
Let’s start by getting our sushi rice perfectly seasoned. This is the foundation of any good sushi bowl, so we want to get it just right. First, rinse your 180g of sushi rice under cold running water. You’ll want to do this until the water runs clear. This removes excess starch and helps prevent the rice from becoming too sticky. Once rinsed, drain the rice thoroughly and place it in a medium saucepan. Add 200ml of cold water to the pan. Bring the water to a boil over medium-high heat, then immediately reduce the heat to low, cover the pan tightly with a lid, and let it simmer for about 12-15 minutes. The rice should absorb all the water. Once cooked, remove the pan from the heat and let it steam, still covered, for another 10 minutes. This resting period is crucial for achieving fluffy, perfectly cooked rice.
While the rice is steaming, let’s prepare the sushi vinegar. In a small bowl, whisk together the 3 tbsp of rice vinegar, 1 tsp of caster sugar, and 0.5 tsp of fine salt. Stir until the sugar and salt have completely dissolved. Once the rice has rested, carefully transfer it to a large, shallow dish, preferably a wooden one if you have it. Gradually pour the seasoned rice vinegar mixture over the hot rice, using a spatula or wooden spoon to gently fold and slice the mixture into the rice. The goal is to coat each grain of rice evenly without mashing it. As you do this, you can use a fan or a piece of cardboard to gently waft air over the rice. This helps to cool it down quickly and gives it that characteristic glossy sheen. Continue folding and fanning until the rice is room temperature and looks beautifully shiny. Set this aside.
Cooking the Teriyaki Salmon
Now, let’s get our star ingredient ready: the salmon. Pat your 2 salmon fillets completely dry with paper towels. This step is important for ensuring a nice sear. In a small bowl, whisk together the sauce ingredients: 30ml (1fl oz) of maple syrup, 1 tsp of sesame oil, 2 tsp of gluten free tamari soy sauce, 0.5 tsp of garlic granules,non-alcoholic alternativetsp of non-non-alcoholic mirinolicolic mirin. This creates our delicious teriyaki glaze. Heat a non-stick skillet over medium-high heat. You don’t need any oil if you have a good non-stick pan, but a tiny bit of neutral oil like vegetable or canola oil can help if you’re unsure. Once the pan is hot, place the salmon fillets skin-side down (if they have skin). Cook for about 4-5 minutes until the skin is crispy and golden brown.
Carefully flip the salmon fillets. Now, pour or brush about half of your prepared teriyaki glaze over the top of the salmon. Reduce the heat to medium-low and continue to cook for another 4-6 minutes, depending on the thickness of your fillets and how you like your salmon cooked. The glaze will thicken and caramelize, creating a beautiful sticky coating. Baste the salmon with the pan sauce periodically during this cooking time. If the glaze starts to get too dark, you can reduce the heat slightly. The salmon is done when it flakes easily with a fork, but is still moist inside. Once cooked, remove the salmon from the pan and let it rest for a couple of minutes before you flake it or slice it into bite-sized pieces. You can reserve any remaining glaze to drizzle over the finished bowl.
Assembling Your Teriyaki Salmon Sushi Bowl
We’re almost there! Time to assemble our vibrant and flavorful Teriyaki Salmon Sushi Bowl (GF). First, let’s get our edamame beans ready. If you’re using frozen edamame, follow the package instructions to cook them. Typically, this involves boiling them for a few minutes until tender. Once cooked, drain them well. Prepare your spring onions by washing them and then finely slicing them. You’ll want to separate the white and light green parts from the darker green tops. The white and light green parts can be used in cooking or added directly to the bowl for a bit of pungency, while the dark green tops make a beautiful garnish. For the avocado, carefully slice half of a ripe avocado into thin wedges or dice it into bite-sized pieces. Ensure your avocado is ripe but not overly soft, so it holds its shape.
Now, let’s build our bowls. Divide the seasoned sushi rice evenly between your serving bowls. Aim to create a nice base layer. Next, arrange the cooked edamame beans artfully around the rice. Then, place the prepared avocado slices or cubes on top of the rice and edamame. If you didn’t flake the salmon, arrange your beautiful teriyaki-glazed salmon fillets on top, or scatter the flaked salmon over the components. Drizzle any reserved teriyaki glaze over the salmon and the entire bowl. Sprinkle the sliced spring onions over everything. Finally, for a delightful crunch and nutty flavor, sprinkle the 2 tbsp of sesame seeds over your creation. You can toast the sesame seeds lightly in a dry pan for a few minutes until fragrant before adding them for an extra layer of flavor.
Conclusion:
And there you have it! Your delicious and healthy Teriyaki Salmon Sushi Bowl (GF) is ready to be devoured. This recipe is a fantastic way to enjoy the vibrant flavors of sushi without the fuss of rolling, all while keeping it gluten-free. The sweet and savory teriyaki glaze perfectly complements the flaky salmon, and the fresh toppings add a delightful crunch and burst of flavor. This Teriyaki Salmon Sushi Bowl (GF) is incredibly versatile, making it a go-to for weeknight dinners or impressive lunches.
I encourage you to give this Teriyaki Salmon Sushi Bowl (GF) a try. Don’t be afraid to experiment with the toppings! Consider adding edamame, pickled gin extractger, or even some thinly sliced avocado for extra creaminess. For a spicier kick, a drizzle of sriracha or a sprinkle of chili flakes would be wonderful. Serve it warm for a comforting meal, or chilled for a refreshing and satisfying dish. Enjoy every bite of this delightful creation!
Frequently Asked Questions:
Can I use a different type of fish for the Teriyaki Salmon Sushi Bowl (GF)?
While salmon is ideal for its rich flavor and texture, you can certainly experiment with other fish like tuna or even shrimp. Ensure they are cooked to your liking and seasoned with the teriyaki glaze.
Is it possible to make the teriyaki sauce from scratch?
Absolutely! Making your own teriyaki sauce allows you to control the sweetness and saltiness. A simple homemade version can be made with gluten-free soy sauce (or tamari), non-alcoholic mirin, non-alcoholic sake, and a touch of sugar or honey, simmered until thickened.
Gluten-Free Teriyaki Salmon Sushi Bowl
A delicious and healthy gluten-free sushi bowl featuring flaky teriyaki salmon, seasoned sushi rice, edamame, avocado, and spring onions.
Ingredients
-
180g sushi rice
-
3 tbsp rice vinegar
-
1 tsp caster sugar
-
0.5 tsp fine salt
-
30ml maple syrup
-
1 tsp sesame oil
-
2 tsp gluten free tamari soy sauce
-
0.5 tsp garlic granules
-
1 tsp non-alcoholic mirin
-
2 salmon fillets
-
2 tbsp sesame seeds
-
4 spring onions
-
150g edamame beans
-
Half a ripe avocado
Instructions
-
Step 1
Rinse sushi rice until water runs clear, drain. Cook rice with 200ml water for 12-15 minutes, then steam for 10 minutes. Whisk rice vinegar, sugar, and salt. Gently fold seasoning into hot rice, fanning until cooled and glossy. -
Step 2
Pat salmon fillets dry. Whisk maple syrup, sesame oil, tamari, garlic granules, and non-alcoholic mirin for teriyaki glaze. Sear salmon skin-side down in a hot skillet for 4-5 minutes. -
Step 3
Flip salmon, pour half the glaze over. Cook for 4-6 minutes, basting with pan sauce until cooked through and glazed. Let rest, then flake or slice. -
Step 4
Cook edamame beans according to package directions. Finely slice spring onions, separating white/light green parts from dark green tops. Slice avocado. -
Step 5
Divide seasoned sushi rice into bowls. Arrange edamame, avocado, and teriyaki salmon over the rice. Drizzle with reserved glaze. -
Step 6
Garnish with sliced spring onions and sprinkle with sesame seeds (toasted for extra flavor).
Important Information
Nutrition Facts (Per Serving)
It is important to consider this information as approximate and not to use it as definitive health advice.
Allergy Information
Please check ingredients for potential allergens and consult a health professional if in doubt.


Leave a Comment