
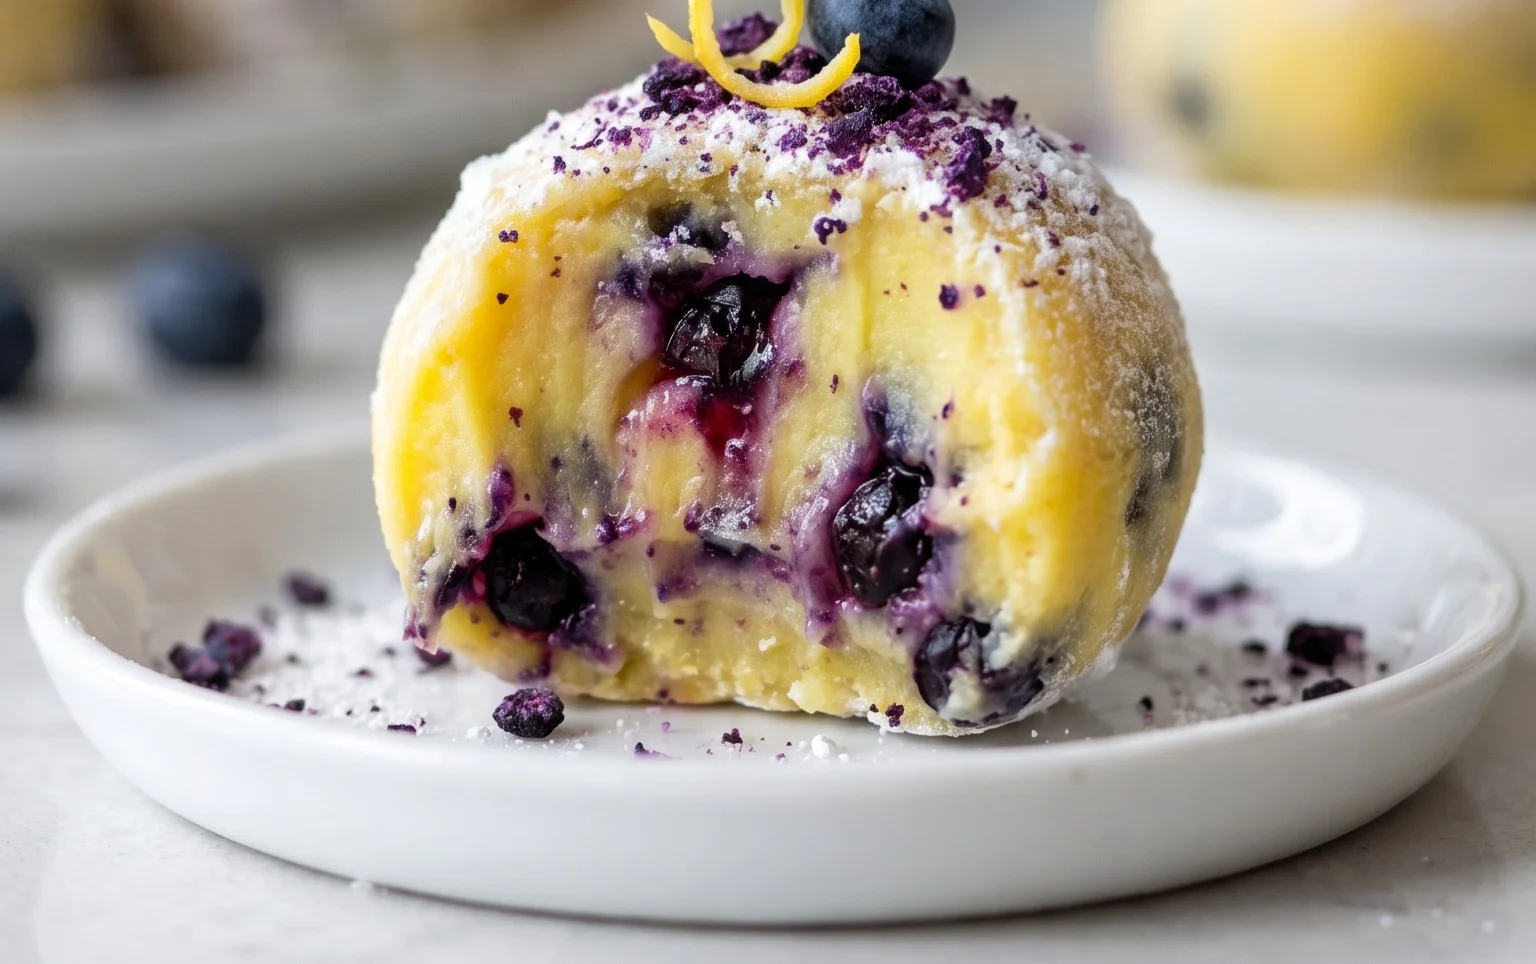
Lemon blueberry truffles are the sweet treat you never knew you needed, but absolutely will after one bite. Imagin extracte the bright, zesty tang of fresh lemon dancing with the juicy burst of plump blueberries, all enrobed in a smooth, creamy decadence. It’s a flavor combination that feels both invigorating and comforting, a perfect balance that makes these Lemon blueberry truffles utterly irresistible. We all love a good truffle, don’t we? They’re little jewels of joy, perfect for sharing (or not!) and incredibly satisfying. What makes these particular Lemon blueberry truffles so special is their vibrant, refreshing profile. They’re a welcome departure from the usual rich chocolate, offering a lighter, fruitier indulgence that’s perfect for spring or any time you crave a burst of sunshine. Get ready to impress yourself and everyone you share them with!

Lemon Blueberry Truffles
Get ready to whip up a batch of these utterly divine Lemon Blueberry Truffles! These little bites of heaven are not only bursting with vibrant flavor but are also incredibly good for you, making them the perfect guilt-free indulgence. We’re talking about a delightful combination of tangy lemon, sweet blueberries, and a creamy, dreamy cashew frosting that comes together with minimal effort. They’re fantastic for a quick energy boost, a delightful dessert, or even a thoughtful homemade gift. The best part? They’re entirely raw, meaning we’re retaining all those wonderful nutrients and flavors without any baking involved. Let’s dive into what you’ll need and how to create these delightful treats.
Ingredients:
Instructions:
Part 1: Crafting the Raw Cake Base
The foundation of our lemon blueberry truffles lies in a wonderfully nutritious and flavorful raw “cake” mixture. This part is all about bringin extractg together simple, wholesome ingredients into a sticky, pliable dough that’s perfect for rolling.
1. Prepare Your Base Ingredients: First, ensure your dates are pitted. If they feel a bit dry, you can soak them in warm water for about 5-10 minutes and then drain them well. This will make them easier to process into a paste. Place the pitted dates, walnuts, gluten-free rolled oats, shredded coconut, chia seeds, and the wild blueberries into a food processor.
2. Process into a Dough: Now, it’s time to blend these ingredients together. Pulse the mixture a few times to break down the larger pieces. Then, process continuously until the mixture starts to clump together and form a cohesive dough. You’re looking for a consistency where you can pinch a bit and it holds its shape. If it seems too dry and crum extractbly, you can add a tiny splash of water (about a teaspoon at a time) and process again until it reaches the desired texture. Be careful not to over-process, as you don’t want a completely smooth paste; a little texture is desirable here.
3. Add the Lemon Zest and Juice: Once you have your dough formed, add the juice of one lemon. You can also add the zest of this lemon for an even more intense lemon flavor, though it’s optional. Process for another 30 seconds to thoroughly incorporate the lemon. The lemon juice will add a beautiful tangin extractess that cuts through the sweetness and also helps bind the dough.
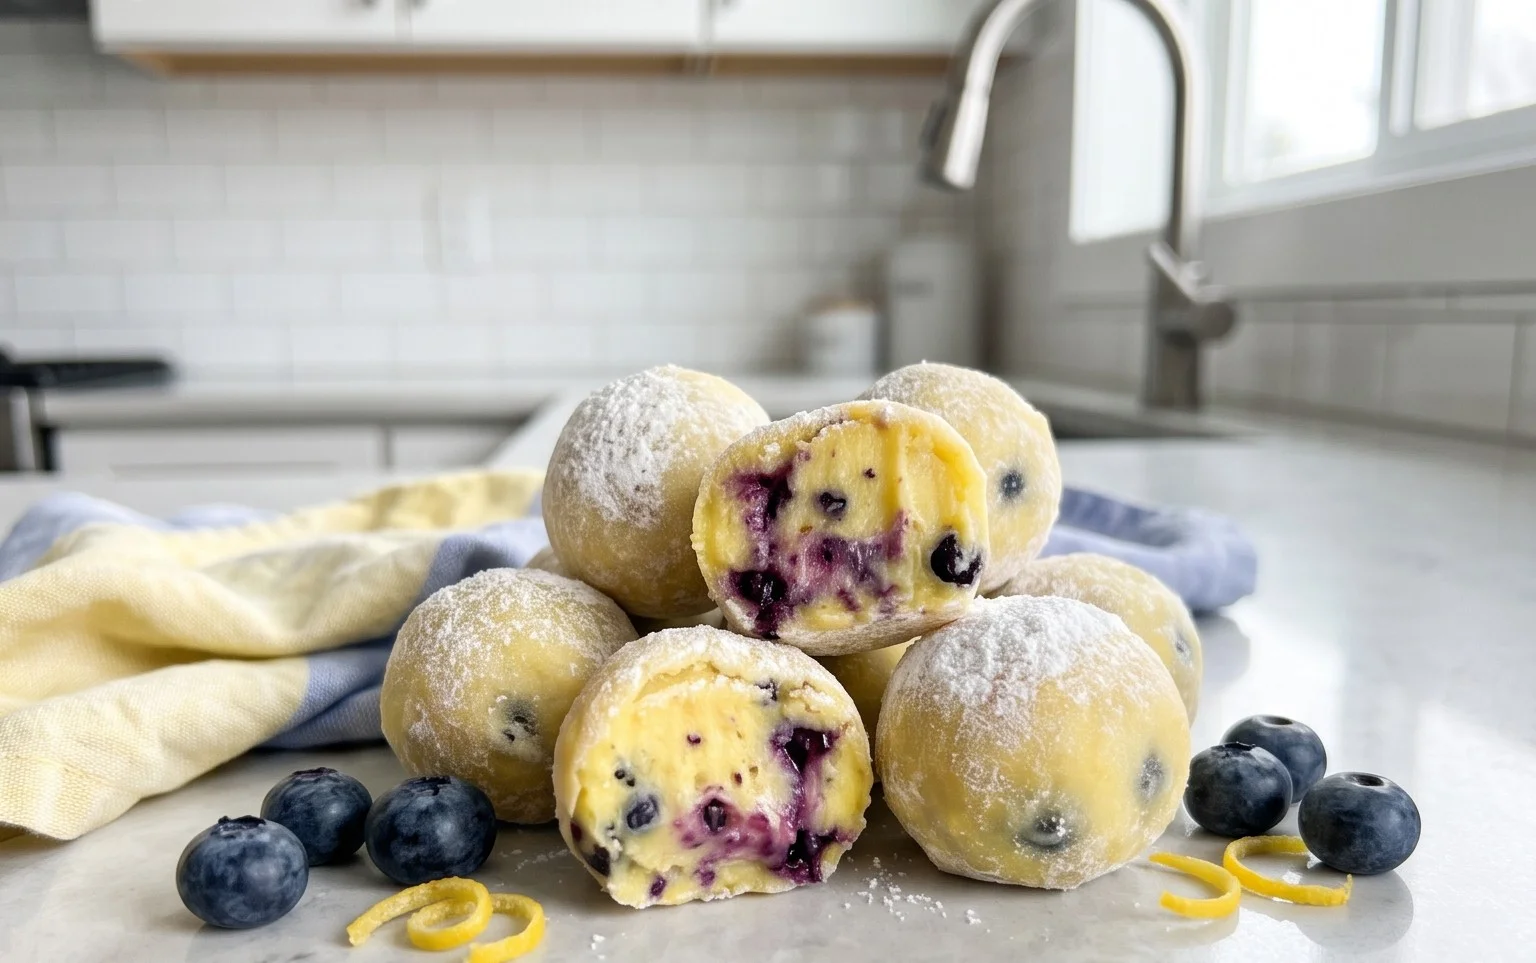
4. Roll into Truffles: Line a baking sheet or a plate with parchment paper. This will prevent the truffles from sticking. Take about a tablespoon of the mixture and roll it between your palms to form a small ball, about the size of a bite. Repeat this process until all the dough has been used. You should get around 15-20 truffles, depending on how large you make them. Place these rolled truffles onto the prepared baking sheet.
Part 2: Creating the Creamy Lemon Frosting
While our truffle bases are chilling, let’s prepare the luscious frosting that will elevate these treats to a whole new level. This frosting is incredibly simple and luxuriously smooth.
5. Prepare the Cashew Frosting: Drain the soaked cashews thoroughly. Place the drained cashews into a high-speed blender or food processor. Add the melted and cooled coconut oil, raw honey, vanilla extract, and the juice of the second lemon.
6. Blend to Perfection: Begin extract blending the frosting ingredients. Start on a low speed and gradually increase. You’ll likely need to scrape down the sides of the blender a few times to ensure everything is incorporated. If the mixture is too thick and isn’t blending smoothly, add warm water, one tablespoon at a time, until you achieve a thick, creamy, and pourable consistency. You want it to be smooth and free of any cashew lumps. Taste and adjust sweetness or lemoniness if desired.
Part 3: Assembling and Chilling Your Truffles
Now for the exciting part – bringin extractg it all together!
7. Coat the Truffles: Once your truffle bases have chilled for at least 30 minutes in the refrigerator (this helps them firm up and hold their shape better), it’s time to coat them. You can either gently roll each truffle in the cashew frosting until evenly coated, or if you prefer a smoother finish, you can dip each truffle into the frosting using a fork or a toothpick. For a more rustic look, a generous dollop of frosting on top of each truffle is also fantastic.
8. Chill to Set: Place the frosted truffles back onto the parchment-lined baking sheet. Pop them into the refrigerator for at least another 30-60 minutes, or until the frosting has set. This chilling time is crucial for the frosting to firm up and for the flavors to meld beautifully.
Once chilled, your Lemon Blueberry Truffles are ready to be devoured! They store well in an airtight container in the refrigerator for up to a week, though I doubt they’ll last that long. Enjoy these delightful, nutrient-packed creations!
Conclusion:
There you have it – a recipe for delicious Lemon Blueberry Truffles that are surprisingly simple to create yet deliver an explosion of bright, zesty, and fruity flavors. These little spheres of joy are perfect for impressing guests, a delightful treat for yourself, or a thoughtful homemade gift. The combination of tangy lemon zest and sweet blueberries, enveloped in a creamy, decadent truffle, makes them an absolute showstopper. Their beautiful appearance and delightful taste are sure to win hearts. I truly hope you’ll give these Lemon Blueberry Truffles a try; you won’t be disappointed!
Serve these delightful truffles on a festive platter for your next gathering, alongside coffee or tea, or even as a sweet ending to a special meal. They also make a wonderful addition to dessert tables at parties, birthdays, or showers. For variations, consider adding a touch of lavender to the mixture for an extra floral note, or rolling some in finely chopped pistachios for added crunch and color. You could also experiment with white chocolate chips folded into the batter for extra sweetness.
Frequently Asked Questions:
Q: How should I store my Lemon Blueberry Truffles?
A: Store your Lemon Blueberry Truffles in an airtight container in the refrigerator for up to a week. For longer storage, you can freeze them in a single layer on a baking sheet until firm, then transfer them to a freezer-safe bag or container for up to two months. Thaw them in the refrigerator before serving.
Q: Can I make these truffles dairy-free?
A: Absolutely! To make these dairy-free, you can substitute the heavy cream with full-fat coconut milk (the thick cream from the top of a chilled can works best) and use dairy-free white chocolate chips. Ensure your white chocolate chips are naturally colored and flavored if you want to maintain the vibrant lemon and blueberry hues.
Lemon Blueberry Truffles
Delightful no-bake vegan truffles bursting with the bright flavors of lemon and blueberry, made with wholesome ingredients.
Ingredients
-
1 cup wild blueberries
-
1 cup walnuts
-
1 cup dates
-
3 tbsp gluten-free rolled oats
-
2 tbsp shredded coconut
-
1 tbsp chia seeds
-
1 lemon, juiced
-
1 cup cashews (soaked)
-
½ cup coconut oil, melted and cooled
-
3 tbsp raw honey
-
1 tsp vanilla extract
-
2-3 tbsp warm water
Instructions
-
Step 1
For the truffle base: Combine blueberries, walnuts, dates, gluten-free rolled oats, shredded coconut, chia seeds, and lemon juice in a food processor. Process until a sticky dough forms. -
Step 2
Roll the dough into small balls, about 1 inch in diameter. Place them on a parchment-lined baking sheet and refrigerate while you prepare the frosting. -
Step 3
For the frosting: Drain the soaked cashews. Add them to a high-speed blender along with melted and cooled coconut oil, raw honey, vanilla extract, and lemon juice. -
Step 4
Blend until completely smooth and creamy, adding warm water 1 tablespoon at a time as needed to achieve a pourable consistency. -
Step 5
Dip each chilled truffle base into the cashew frosting, ensuring it’s fully coated. Use a fork or toothpick to lift and allow excess frosting to drip off. -
Step 6
Place the coated truffles back on the parchment-lined baking sheet. Refrigerate for at least 30 minutes, or until the frosting is set.
Important Information
Nutrition Facts (Per Serving)
It is important to consider this information as approximate and not to use it as definitive health advice.
Allergy Information
Please check ingredients for potential allergens and consult a health professional if in doubt.

Leave a Comment