
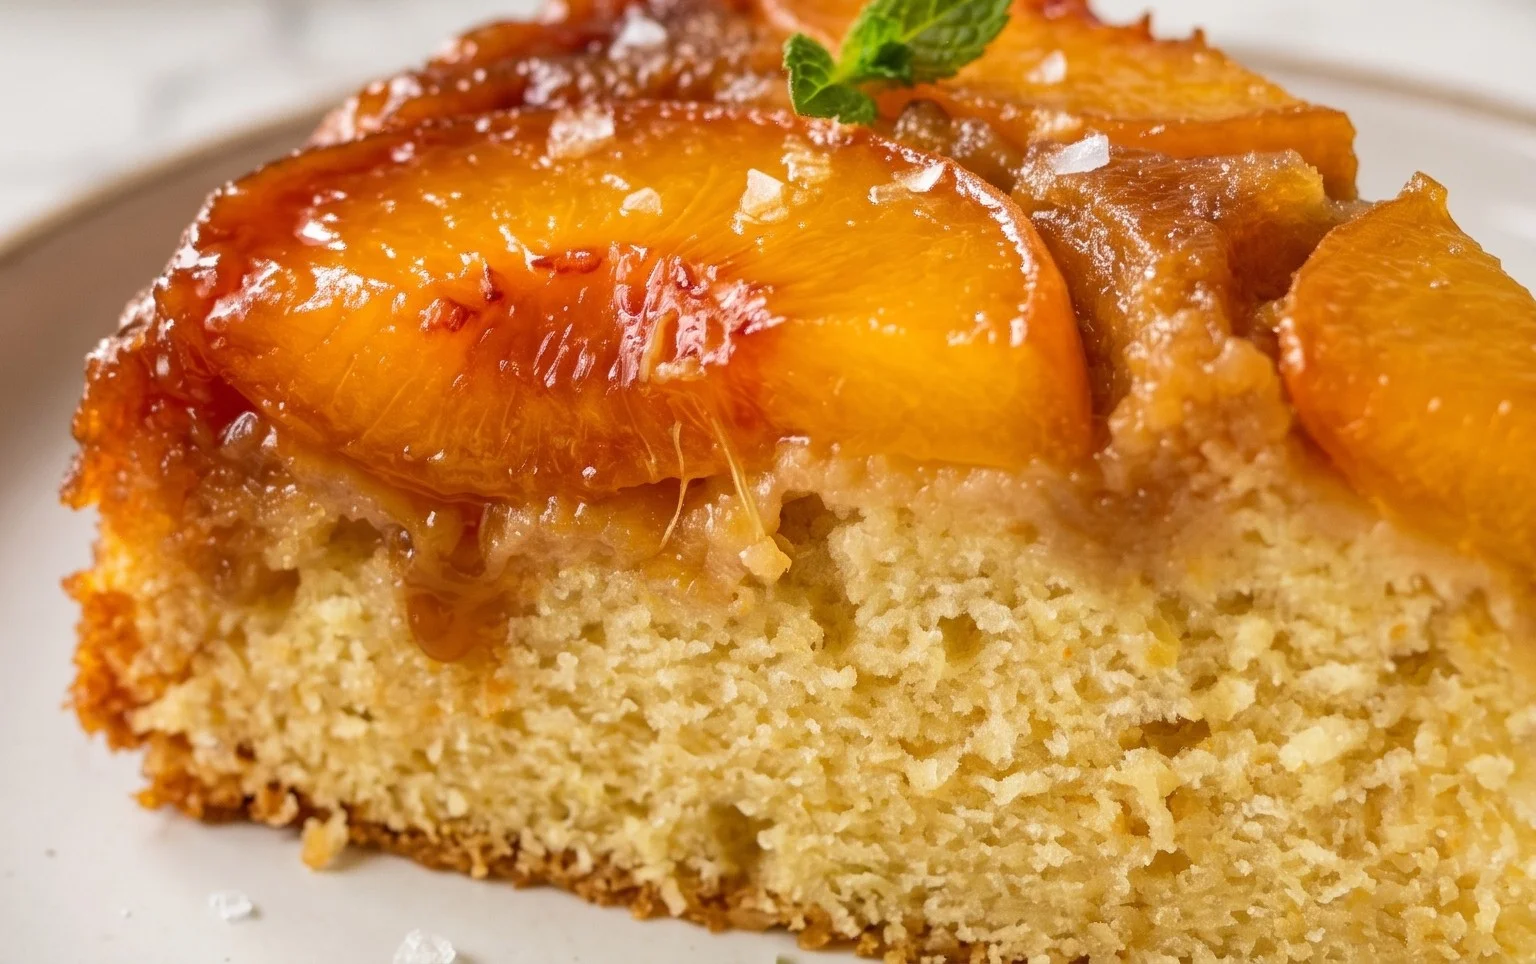
Peach Upside-Down Cake Recipe: There are few desserts that evoke the warmth and comfort of a perfectly baked Peach Upside-Down Cake. This classic treat is a showstopper, not just because of its stunning caramelized topping, but for the sheer joy it brings with every bite. Imagin extracte tender, juicy peaches bathed in a rich, buttery caramel, baked into a moist, fragrant cake that practically melts in your mouth. It’s this magical transformation – the upside-down reveal – that makes our Peach Upside-Down Cake Recipe so incredibly special. It’s a celebration of summer’s bounty, a dessert that’s both rustic and elegant, making it perfect for any occasion, from a casual family gathering to a more formal dinner party. Get ready to impress yourself and your loved ones with this delightful creation!

Peach Upside-Down Cake Recipe
There’s something incredibly comforting about a Peach Upside-Down Cake. The warm, caramelized peaches mingling with a tender, buttery cake is pure bliss. This classic dessert is surprisingly simple to make, and the visual appeal of the glossy, fruit-laden topping when you invert the cake is always a showstopper. It’s perfect for a cozy afternoon tea, a family gathering, or just when you need a little sweet escape. Let’s dive into creating this delightful treat.
Ingredients:
Cooking Instructions:
1.
Prepare the Peach Topping:
First things first, let’s get that luscious peach topping ready. In a 9-inch round cake pan, melt the 6 tablespoons of salted butter over low heat. This can be done directly on the stovetop or by popping the pan into a preheated oven set to a low temperature (around 300°F / 150°C). Once the butter is melted, sprinkle the packed brown sugar evenly over the melted butter. Don’t worry if it looks a little lumpy; it will melt and caramelize beautifully. Next, dust the brown sugar with the 1/4 teaspoon of cinnamon. This adds a warm, aromatic spice that complements the sweetness of the peaches. Now comes the star of the show: arrange your peeled and sliced peaches over the brown sugar mixture. Try to fit them snugly, overlapping them slightly if necessary. The goal is to have a solid layer of fruit for that gorgeous caramelized effect when we flip the cake. Ensure the slices are relatively uniform in thickness to promote even cooking.
2.
Preheat the Oven and Mix Dry Ingredients:
While your peach topping is chilling in the pan, it’s time to preheat your oven to 350°F (175°C). This is the standard baking temperature for most cakes, ensuring a good rise and even browning. In a medium-sized bowl, whisk together the 1 1/4 cups of flour, 1/4 teaspoon of baking powder, and 1/4 teaspoon of salt. The baking powder will help the cake rise, and the salt acts as a flavor enhancer, balancing the sweetness. Whisking these dry ingredients together thoroughly ensures that the leavening agent and salt are evenly distributed throughout the flour, which is crucial for a consistent cake texture. Set this bowl aside.
3.
Cream Butter and Sugar, Then Add Wet Ingredients:
In a separate, larger mixing bowl, cream together the 1/2 cup of softened butter and 3/4 cup of sugar. You want to beat these together until the mixture is light and fluffy, which usually takes about 3-5 minutes with an electric mixer. This creaming process incorporates air into the batter, contributing to a tender cake. Scrape down the sides of the bowl occasionally to ensure everything is well combined. Now, add the egg and 1 teaspoon of vanilla extract. Beat until just combined. The egg adds richness and helps bind the cake together, while the vanilla provides that essential sweet aroma and flavor. Don’t overmix at this stage; we just want the egg and vanilla incorporated.
4.
Combine Wet and Dry Ingredients, Then Add Milk:
Gradually add the dry ingredients (from step 2) to the wet ingredients (from step 3), alternating with the 1/2 cup of milk. Start by adding about a third of the dry ingredients and mixing on low speed until just combined. Then, add half of the milk and mix again. Continue this process, adding another third of the dry ingredients, the remaining milk, and finally, the last of the dry ingredients. Mix until just combined after each addition. It’s important not to overmix the batter once the flour is added, as this can develop the gluten too much and result in a tough cake. A few streaks of flour are acceptable at the very end; they will disappear during baking.
5.
Assemble and Bake the Cake:
Now it’s time to bring everything together. Carefully and gently pour the cake batter over the prepared peach topping in the cake pan. Spread the batter evenly using a spatula, making sure to cover the entire surface of the peaches. Try not to disturb the arrangement of the peaches too much. Place the cake pan on a baking sheet to catch any potential drips during baking, which is always a good precaution with upside-down cakes. Bake in the preheated oven for 30-40 minutes, or until a wooden skewer or toothpick inserted into the center of the cake comes out clean. The cake should be golden brown and spring back lightly when touched.
6.
Cool and Invert:
This is perhaps the most exciting (and slightly nerve-wracking!) part. Once the cake is out of the oven, let it cool in the pan on a wire rack for about 10-15 minutes. This cooling period is crucial; it allows the caramelized sugar to set slightly, preventing the peaches from sticking entirely to the pan, but it also gives you enough time to prepare for the inversion. After the initial cooling, place a serving plate or a heatproof platter over the top of the cake pan. Then, with oven mitts on and a steady hand, carefully and confidently invert the pan onto the serving plate. Gently lift the cake pan away. If any peaches happen to stick to the pan, you can carefully lift them off and arrange them back onto the cake. Serve warm, perhaps with a dollop of whipped cream or a scoop of vanilla ice cream, and enjoy the delicious results of your effort!
Conclusion:
This Peach Upside-Down Cake recipe truly is a showstopper, offering a delightful balance of sweet, caramelized peaches and a tender, moist cake. It’s perfect for showcasing seasonal peaches but works wonderfully with frozen or canned peaches too, making it an enjoyable treat year-round. The beauty of this dessert lies in its simplicity and the incredible flavor payoff. It’s a comforting classic that always impresses, whether served warm with a dollop of whipped cream or a scoop of vanilla ice cream. I encourage you to give this Peach Upside-Down Cake a try; you won’t be disappointed!
For serving, a drizzle of the warm caramel sauce from the pan is essential. Consider adding a sprinkle of chopped toasted almonds for a bit of crunch, or a dusting of powdered sugar for an elegant finish. Variations are endless: swap peaches for other fruits like pineapple, apples, or berries for a different fruity delight. You could also infuse the caramel with a hint of cinnamon or gin extractger for an extra layer of warmth.
Frequently Asked Questions about Peach Upside-Down Cake:
Can I use canned or frozen peaches?
Absolutely! If using canned peaches, drain them very well and pat them dry to prevent excess moisture in the caramel. For frozen peaches, use them directly from the freezer without thawing to avoid them becoming mushy. The caramelization process will still work beautifully.
What if my cake sticks to the pan?
Properly greasing and flouring your pan, especially the caramel layer, is key. If it still seems a bit stubborn, let the cake rest in the pan for about 10-15 minutes after taking it out of the oven before attempting to invert it. Running a thin spatula or knife around the edges can also help loosen it.
How do I store leftover Peach Upside-Down Cake?
Leftover cake can be stored in an airtight container at room temperature for up to 2 days, or in the refrigerator for up to 4 days. It reheats beautifully in a low oven or microwave, bringin extractg back that lovely warm, gooey texture.

Peach Upside-Down Cake
A classic peach upside-down cake with a caramelized peach topping and a moist cake batter.
Ingredients
-
6 tablespoons salted butter
-
2/3 cup packed brown sugar
-
1/4 teaspoon cinnamon
-
3 large peaches, peeled and sliced large (about 2 cups)
-
1 1/4 cups flour
-
1/4 teaspoon baking powder
-
1/4 teaspoon salt
-
1/2 cup butter, softened
-
3/4 cup sugar
-
1 egg
-
1 teaspoon vanilla
-
1/2 cup milk
Instructions
-
Step 1
Preheat oven to 350°F (175°C). Grease and flour a 9-inch round cake pan. -
Step 2
For the topping: Melt 6 tablespoons of butter in the prepared cake pan over low heat (or in a small saucepan and pour into the pan). Stir in brown sugar and cinnamon. Arrange peach slices evenly over the brown sugar mixture. -
Step 3
For the cake: In a medium bowl, whisk together flour, baking powder, and salt. -
Step 4
In a large bowl, cream together 1/2 cup softened butter and 3/4 cup sugar until light and fluffy. Beat in the egg and vanilla extract. -
Step 5
Gradually add the dry ingredients to the wet ingredients, alternating with the milk, beginning and ending with the dry ingredients. Mix until just combined. -
Step 6
Gently pour the cake batter over the peaches in the prepared pan. Spread evenly. -
Step 7
Bake for 35-40 minutes, or until a wooden skewer inserted into the center of the cake comes out clean. -
Step 8
Let the cake cool in the pan for 10 minutes before inverting it onto a serving plate. Serve warm.
Important Information
Nutrition Facts (Per Serving)
It is important to consider this information as approximate and not to use it as definitive health advice.
Allergy Information
Please check ingredients for potential allergens and consult a health professional if in doubt.


Leave a Comment