
Red, White and Blue Dirt Cups are an absolute showstopper, perfect for any occasion that calls for a touch of patriotic fun and pure deliciousness. This iconic dessert, with its playful layers and sweet, earthy charm, has a magical way of bringin extractg smiles to faces of all ages. We all remember the sheer delight of diggin extractg into a cup, discovering the crunchy cookie “dirt” mingling with creamy pudding and vibrant fruit. What truly makes these Red, White and Blue Dirt Cups so special is their effortless versatility and the sheer joy they bring. Whether you’re celebrating a summer holiday, hosting a backyard barbecue, or just looking for a delightful treat to brighten your day, these dirt cups deliver. They are a delightful canvas for creativity, allowing you to customize your layers and toppings for a truly personal touch.

Red, White and Blue Dirt Cups
Get ready to wow your friends and family with these incredibly fun and delicious Red, White and Blue Dirt Cups! Perfect for a patriotic party, a summer barbecue, or just a festive treat, these cups are as delightful to look at as they are to eat. They’re a simple yet impressive dessert that brings out the kid in everyone. The creamy pudding layered with crushed Oreos, all topped with a festive garnish, creates a visual and taste sensation that’s hard to beat. Let’s dive into how easy it is to create these edible masterpieces!
This recipe takes the classic dirt cup and gives it a vibrant, patriotic twist. The beauty of these dirt cups lies in their simplicity and adaptability. You can customize them further with your favorite red, white, and blue candies or sprinkles if you wish, but the core recipe is already a guaranteed hit. The contrast between the dark, crum extractbly “dirt” and the smooth, cool pudding is incredibly satisfying. And who doesn’t love a gummy worm emergin extractg from their dessert? It’s a playful touch that always brings smiles.
Let’s gather our supplies and get ready to assemble these festive treats!
Ingredients:
Preparing the Pudding Layers
This is where the magic begin extracts, transforming simple ingredients into a dessert worthy of any celebration. The cheesecake pudding base offers a delightful tang that complements the sweetness of the Oreos beautifully.
First, let’s get our pudding ready. In a large mixing bowl, combine the contents of both boxes of cheesecake flavored pudding with the 4 cups of milk. Whisk these ingredients together vigorously for about 2 minutes, or until the pudding mixture begin extracts to thicken. It’s important to whisk well to ensure there are no dry pockets of pudding mix and that the consistency is smooth. Once it’s thickened, cover the bowl tightly with plastic wrap, making sure the plastic wrap directly touches the surface of the pudding. This prevents a skin from forming on top, which we definitely don’t want in our dirt cups. Place this in the refrigerator to chill and set for at least 4 hours, or preferably overnight. A well-chilled pudding is key to the perfect dirt cup texture. The longer it chills, the firmer it will become, making it easier to layer.
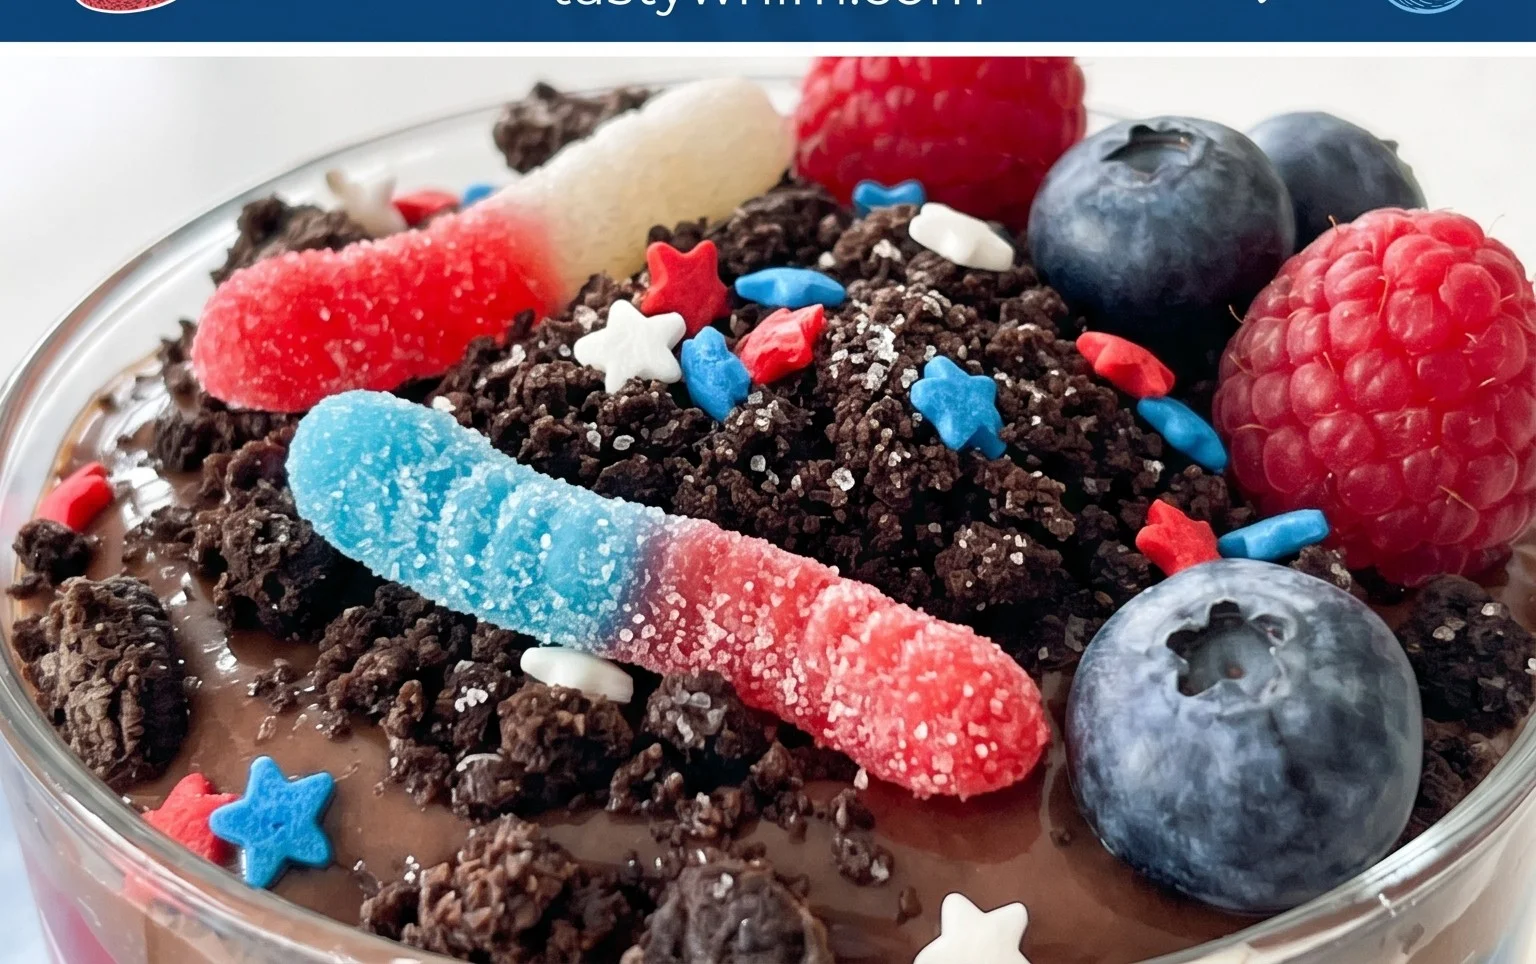
Now, it’s time to prepare our “dirt.” Take all 19 Oreo cookies and place them into a resealable plastic bag or a food processor. If you’re using a plastic bag, gently crush the cookies using a rolling pin or the flat side of a heavy object until you have fine crum extractbs that resemble soil. Be careful not to over-crush them into a powder; we want a nice crum extractbly texture. If you’re using a food processor, pulse them a few times until you achieve the desired crum extractb consistency. Set aside about 2 tablespoons of the finely crushed Oreos for garnish later. The remaining crushed Oreos will form the base of our delicious dirt.
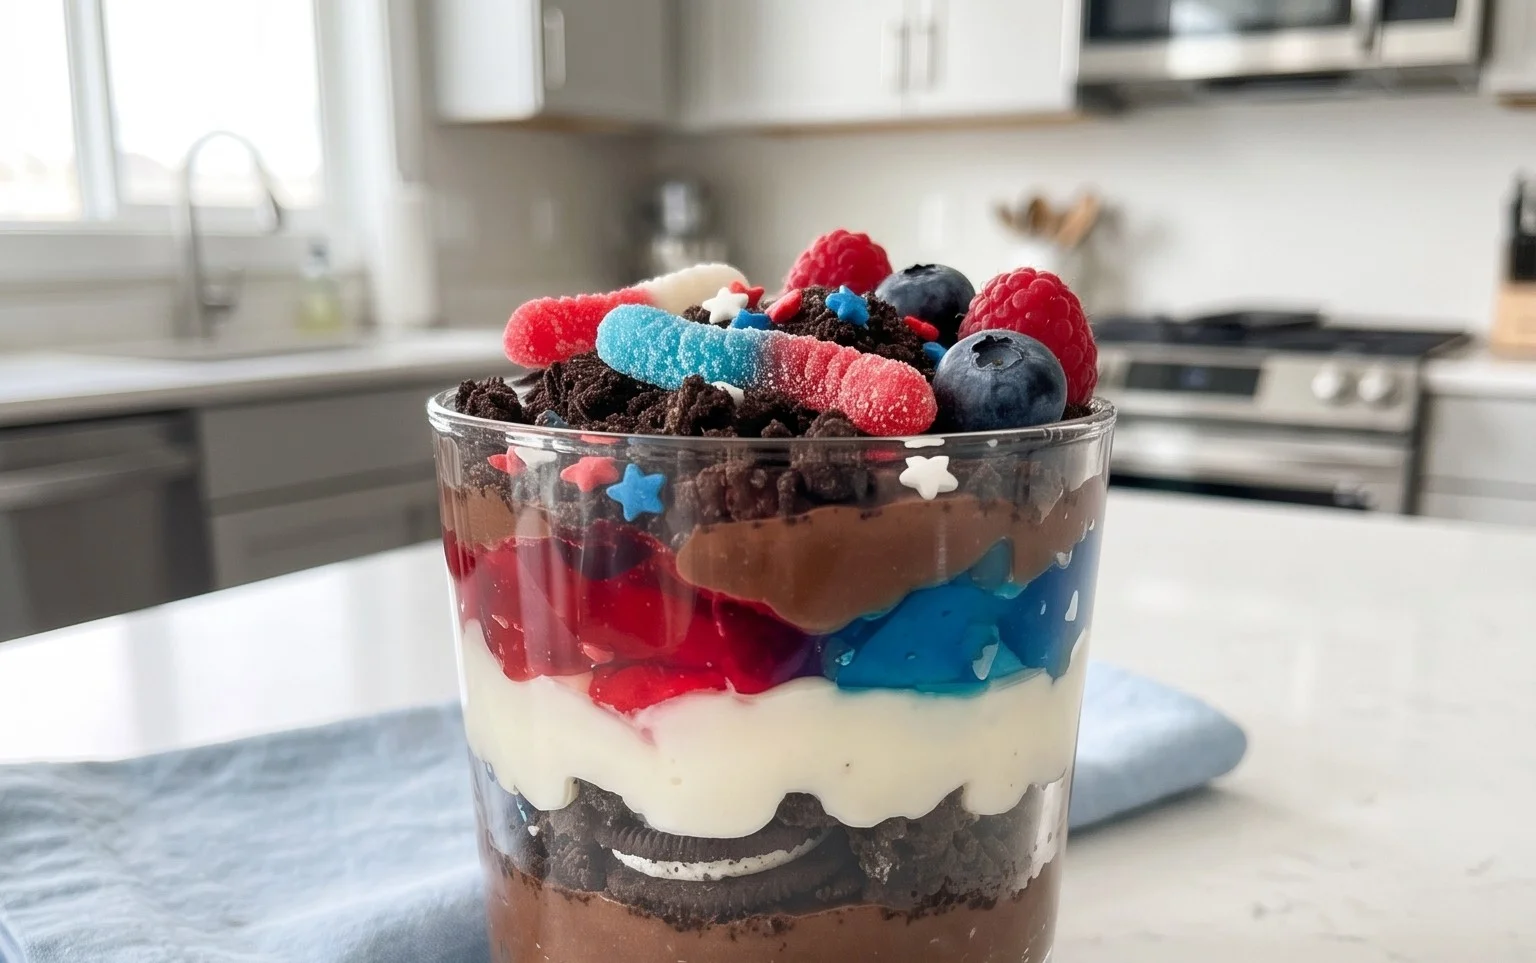
It’s time to add some patriotic color to our pudding! Divide the chilled, thickened pudding evenly into three separate bowls. You’ll want to aim for roughly equal amounts in each bowl. In the first bowl, add the ¼ teaspoon of red gel food dye. In the second bowl, add the ¼ teaspoon of blue gel food dye. The third bowl will remain white, providing the perfect contrast. Gently stir the food dye into each bowl until the color is evenly distributed. Gel food coloring is best because it provides vibrant colors without adding too much liquid, which could affect the pudding’s texture. Stir just enough to incorporate the color; overmixing can sometimes make pudding a bit watery.
Now, let’s start assembling our Red, White and Blue Dirt Cups! We’ll begin extract layering. Take your serving cups or glasses. Clear cups work best so you can see the beautiful layers. Start by spooning a generous layer of the crushed Oreo “dirt” into the bottom of each cup. This will be the foundation of our edible landscape. Press down gently to create a stable base. Next, spoon a layer of the white cheesecake pudding over the Oreo crum extractbs. You can use a spoon or a piping bag for a neater finish. Don’t worry if it’s not perfectly smooth; a slightly rustic look adds to the charm.
Continue building your patriotic layers. After the white pudding layer, add a layer of the red pudding. Again, use a spoon or piping bag to create a nice, even layer. Follow this with a layer of the blue pudding. You’re aiming for distinct layers of red, white, and blue, interspersed with the dark cookie crum extractbs. You can alternate the order of the pudding colors if you like, perhaps white, then blue, then red, or any combination that appeals to you. For the top layer of pudding, I like to use a mix of red and white for a marbled effect, or just the white to represent clouds before the final “dirt” topping. Finally, sprinkle the remaining reserved crushed Oreo crum extractbs generously over the top layer of pudding to create the “dirt” effect. This should look like freshly tilled earth. For the final flourish, artfully insert 1 to 2 red and blue gummy worms into the top layer of “dirt” in each cup, making them look like they are wiggling out from their subterranean home. Ensure the gummy worms are placed so they are clearly visible and add to the playful presentation. Chill the assembled dirt cups for at least another 30 minutes before serving to allow the flavors to meld and the dessert to be perfectly chilled.
Enjoy your festive and delicious Red, White and Blue Dirt Cups! They are sure to be a hit with everyone.
Conclusion:
And there you have it – a delightful and incredibly easy recipe for Red, White and Blue Dirt Cups! This dessert is a guaranteed hit for any patriotic celebration, summer picnic, or just because you want a fun and flavorful treat. The combination of creamy pudding, crunchy cookie crum extractbles, and sweet gummy worms is simply irresistible. It’s the perfect balance of textures and tastes, making it a standout dessert that’s as fun to look at as it is to eat. Plus, the minimal effort required means you can whip up a batch quickly, leaving you more time to enjoy the festivities.
These Red, White and Blue Dirt Cups are fantastic served chilled, making them ideal for warm weather gatherings. They’re also wonderful as a make-ahead dessert. Feel free to get creative with your serving vessels; individual clear cups, mason jars, or even small flower pots (thoroughly cleaned, of course!) can add an extra layer of charm. For variations, consider using chocolate pudding instead of vanilla for a richer flavor, or swap the gummy worms for other candy toppings like chocolate chips or even crushed pretzels for a salty crunch. Don’t be afraid to experiment! I truly encourage you to give this recipe a try; I know you and your guests will love every bite.
Frequently Asked Questions:
Can I make these Red, White and Blue Dirt Cups ahead of time?
Absolutely! These are an excellent make-ahead dessert. You can prepare them up to 24 hours in advance and store them covered in the refrigerator. The cookies will soften slightly, which is part of the charm of a dirt cup!
What are some other topping ideas besides gummy worms?
The possibilities are endless! You could use mini chocolate chips, white chocolate chips, chopped strawberries for extra red color, blueberries for blue, or even sprinkles in patriotic colors. A dollop of whipped cream on top also makes them extra special.
Is it okay to use a different type of pudding?
Yes, feel free to substitute the pudding! While vanilla is classic, chocolate pudding works wonderfully for a richer “dirt” flavor. You could also experiment with cheesecake flavored pudding for a tangy twist.
Red, White and Blue Dirt Cups
A festive and easy no-bake dessert featuring layers of creamy cheesecake pudding, crushed Oreos, and colorful gummy worms, perfect for patriotic celebrations.
Ingredients
-
2 boxes cheesecake pudding (3.4 ounces each)
-
4 cups milk
-
19 Oreo cookies (crushed)
-
1/4 teaspoon red gel food dye
-
1/4 teaspoon blue gel food dye
-
8 red and blue gummy worms
Instructions
-
Step 1
In a large bowl, whisk together the cheesecake pudding mix and milk until well combined and slightly thickened. -
Step 2
Divide the pudding mixture into three separate bowls. Leave one bowl white (for the white layer). -
Step 3
To the second bowl, add the red gel food dye and stir until evenly colored. To the third bowl, add the blue gel food dye and stir until evenly colored. -
Step 4
In 8 small cups or jars, begin layering the ingredients. Start with a layer of crushed Oreo cookies at the bottom of each cup. -
Step 5
Spoon a layer of white cheesecake pudding over the Oreos. Then, add a layer of red pudding, followed by a layer of blue pudding. Repeat layers if desired, ending with a pudding color. -
Step 6
Top each cup with a final layer of crushed Oreo cookies to resemble dirt. Garnish with red and blue gummy worms, pushing them into the ‘dirt’. -
Step 7
Chill the dirt cups in the refrigerator for at least 15 minutes before serving to allow them to set.
Important Information
Nutrition Facts (Per Serving)
It is important to consider this information as approximate and not to use it as definitive health advice.
Allergy Information
Please check ingredients for potential allergens and consult a health professional if in doubt.
Leave a Comment