
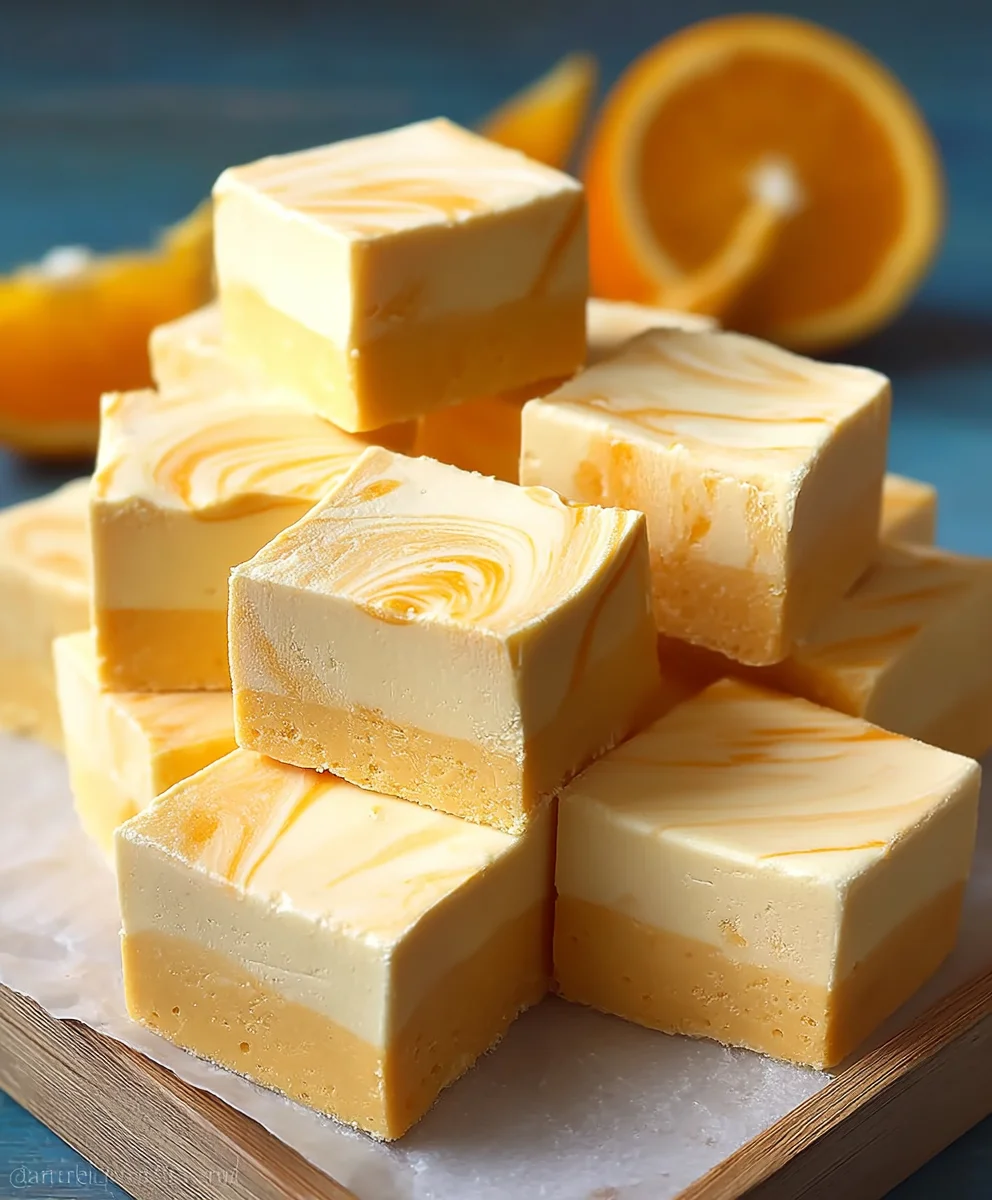
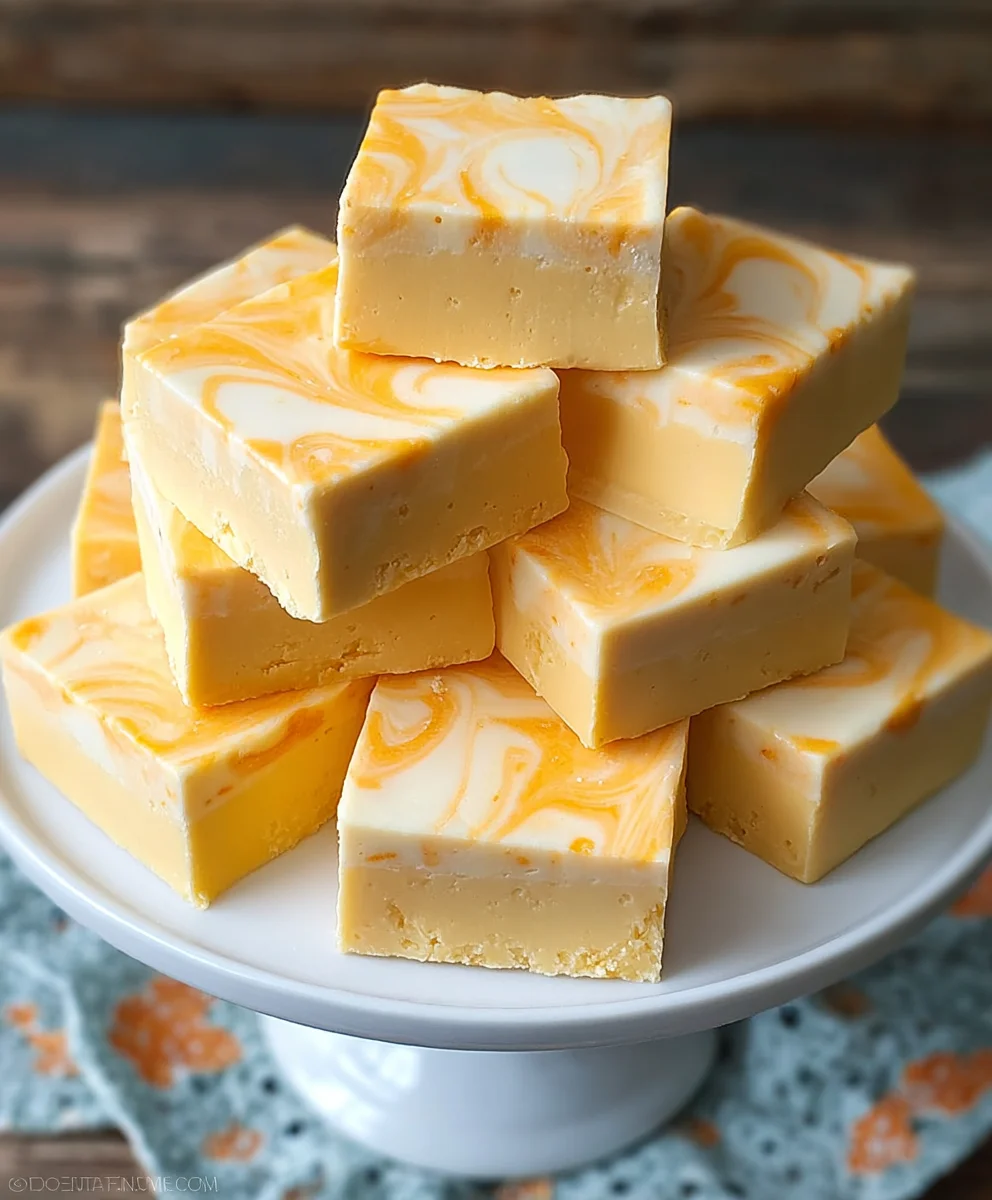
Orange Dreamsicle Fudge is more than just a sweet treat; it’s a nostalgic trip back to childhood summers and those iconic, creamy ice pops that were the ultimate cool-down. We all remember that vibrant swirl of citrus and vanilla, the perfect balance of tangy and sweet that made every lick a moment of pure joy. This Orange Dreamsicle Fudge captures that exact essence, bringin extractg that beloved flavor combination into a delightful, melt-in-your-mouth confection that’s surprisingly easy to make. What makes this particular fudge so special is its ability to evoke such powerful, happy memories while delivering an incredibly delicious experience. It’s wonderfully creamy, boasts an authentic orange and vanilla flavor profile, and the vibrant color is just as cheerful asgin extracte original popsicle. Get ready to impress yourself and everyone you share it with!

Ingredients:
- 2/3 cup heavy cream, for richness and a velvety mouthfeel.
- 3 cups granulated sugar, the foundation of our sweet confection.
- 3/4 cup unsalted butter, melted to a liquid state for a smooth, cohesive fudge.
- 7 oz marshmallow cream, the secret to our light and airy “dreamsicle” texture.
- 2 cups white chocolate chips, providing a sweet, creamy canvas for our flavors.
- 3 teaspoons orange extract, the key to that vibrant, nostalgic orange flavor.
- Orange food coloring (up to 10 drops), to achieve that beautiful, iconic orange swirl.
Preparing Your Workspace and Equipment
Before we begin extract creating our delightful Orange Dreamsicle Fudge, it’s essential to have your workspace prepared and all your equipment ready. This will ensure a smooth and stress-free cooking process. Start by lining an 8×8 inch baking pan with parchment paper, leaving an overhang on the sides. This overhang will act as handles, making it easy to lift the fudge out of the pan once it’s set. You can also grease the pan lightly with butter or cooking spray before lining it for extra assurance that your fudge won’t stick. Gather all your ingredients and measure them out precisely. Having everything prepped and within reach will allow you to focus on the cooking steps without interruption. The temperature of your ingredients can also play a role, so ensure your butter is fully melted and your heavy cream is at room temperature if possible, although this is less critical than in some other baking endeavors.
Cooking the Fudge Base
Now, gin extract’s begin the magic of creating our Orange Dreamsicle Fudge. In a large, heavy-bottomed saucepan, combine the granulated sugar, unsalted butter, and heavy cream. Place the saucepan over medium heat and stir constantly with a wooden spoon or heatproof spatula until the sugar is completely dissolved and the butter has fully melted. It’s important to use a heavy-bottomed pan to prevent scorching. Once the sugar is dissolved, increase the heat to medium-high and bring the mixture to a rolling boil. Be sure to stir occasionally to prevent any sugar crystals from forming on the sides of the pan, which can cause your fudge to be grainy. We are aiming for a specific temperature here, so a candy thermometer is highly recommended. Continue to boil the mixture, stirring occasionally, until it reaches 237°F (114°C) on your candy thermometer. This stage is crucial for achieving the right fudge consistency. This temperature corresponds to the soft-ball stage, which will result in a fudge that is smooth and creamy but also firm enough to hold its shape.
Incorporating the Creaminess and Flavor
Once your sugar mixture has reached the target temperature of 237°F (114°C), immediately remove the saucepan from the heat. This is a critical step to stop the cooking process and prevent the fudge from becoming too hard. Now, it’s time to add the marshmallow cream and the white chocolate chips. Add the marshmallow cream and stir it vigorously into the hot sugar mixture until it’s completely smooth and well incorporated. You’ll notice the mixture will become lighter in color and texture as the marshmallow cream melts in. Next, add the white chocolate chips. Continue to stir gently until the white chocolate chips have fully melted and blended into the mixture, creating a luxuriously smooth and creamy base. The residual heat from the sugar mixture will be enough to melt the chocolate chips. Be patient with this step, ensuring no lumps of chocolate remain. The consistency at this point should be thick and glossy.
Achieving the Dreamsicle Swirl
This is where our Orange Dreamsicle Fudge truly comes to life with its signature visual appeal. Once the fudge base is smooth and creamy, it’s time to introduce the orange flavor and color. Stir in the orange extract thoroughly until its vibrant aroma fills your kitchen. Now, carefully divide the fudge mixture into two separate bowls. To one bowl, add the orange food coloring, starting with just a few drops. Stir gently until you achieve a beautiful, uniform orange hue. You can add more drops, up to a maximum of 10, to intensify the color to your preference. The second bowl wilgin extractemain its original creamy white color. This contrast is what will create our delightful swirl effect. It’s important not to overmix the colors at this stage, as we want distinct swirls rather than a uniform orange batch.
Creating the Swirl and Setting the Fudge
With your two batches of fudge ready, it’s time to combine them for that iconic Orange Dreamsicle look. Spoon alternating dollops of the white fudge and the orange fudge into your prepared baking pan. Don’t worry about being too precise; a random distribution is what creates the best swirl. Once all the fudge mixture is in the pan, take a skewer or a knife and gently swirl the two colors together. Make figure-eight motions or simple zigzags through the fudge, being careful not to overmix, which will muddy the colors. The goal is to create distinct ribbons of orange within the white base. Once you’re happy with the swirl pattern, gently tap the pan on the counter a couple of times to help settle the fudge and remove any air bubbles. Allow the fudge to cool at room temperature for at least 4 hours, or until it is completely firm. For a quicker set, you can place it in the refrigerator, but room temperature cooling often yields the best texture. Once fully set, use the parchment paper overhang to lift the fudge from the pan and place it on a cutting board. Cut into desired squares using a sharp knife. Store your Orange Dreamsicle Fudge in an airtight container at room temperature for up to a week.
Conclusion:
There you have it – your guide to creating the most delightful Orange Dreamsicle Fudge! This recipe is a true trip down memory lane, capturing the essence of that beloved frozen treat in a wonderfully creamy, melt-in-your-mouth confection. The vibrant citrus notes perfectly balance the sweet, creamy vanilla base, resulting in a flavor explosion that’s both nostalgic and incredibly satisfying. We hope you enjoy making and sharing this special fudge as much as we do!
When it comes to serving your Orange Dreamsicle Fudge, it’s wonderfully versatile. It makes a fantastic addition to any dessert table, a thoughtful homemade gift, or simply a delightful treat to enjoy with your afternoon tea or coffee. For an extra special touch, consider garnishing with a sprinkle of candied orange peel or a drizzle of white chocolate.
Don’t be afraid to experiment with variations! You could add a touch of orange zest for an even more intense citrus flavor, or swirl in a bit of white chocolate or even some sprinkles for added texture and visual appeal. The possibilities are as endless as your imagin extractation!
We encourage you to give this Orange Dreamsicle Fudge recipe a try. It’s surprisingly simple to make, and the results are truly spectacular. Get ready for smiles and compliments – this fudge is a guaranteed crowd-pleaser!
FAQs
Q: How should I store my Orange Dreamsicle Fudge?
A: Once cooled and set, you can store your Orange Dreamsicle Fudge in an airtight container at room temperature for up to a week. For longer storage, you can place it in the refrigerator for up to two weeks, though it may become a little firmer. It also freezes beautifully for up to 3 months; allow it to thaw in the refrigerator overnight before enjoying.
Q: Can I make Orange Dreamsicle Fudge without condensed milk?
A: While condensed milk is key to achieving the signature creamy texture of this fudge, you could potentially adapt the recipe using a homemade fudge base that doesn’t rely on it, though the texture and flavor profile might differ slightly. However, for the most authentic Orange Dreamsicle Fudge experience, condensed milk is highly recommended.
Orange Dreamsicle Fudge-Creamy-Easy-No-Bake Treat
A creamy, easy, no-bake fudge with the nostalgic flavor of orange dreamsicles, featuring a beautiful orange swirl.
Ingredients
-
2/3 cup heavy cream
-
3 cups granulated sugar
-
3/4 cup unsalted butter
-
7 oz marshmallow cream
-
2 cups white chocolate chips
-
3 teaspoons orange extract
-
Orange food coloring (up to 10 drops)
Instructions
-
Step 1
Prepare your workspace: Line an 8×8 inch baking pan with parchment paper, leaving an overhang. Grease the pan lightly. -
Step 2
Cook the fudge base: In a heavy-bottomed saucepan, combine granulated sugar, melted unsalted butter, and heavy cream over medium heat. Stir until sugar is dissolved and butter is melted. Increase heat to medium-high and bring to a rolling boil. Stir occasionally until the mixture reaches 237°F (114°C) on a candy thermometer (soft-ball stage). -
Step 3
Incorporate creaminess and flavor: Remove from heat immediately. Stir in marshmallow cream until smooth. Add white chocolate chips and stir gently until fully melted and incorporated, creating a smooth, glossy mixture. -
Step 4
Achieve the dreamsicle swirl: Stir in orange extract. Divide the fudge mixture into two bowls. To one bowl, add orange food coloring (up to 10 drops) and stir to achieve a uniform orange hue. The other bowl remains white. -
Step 5
Create the swirl and set: Spoon alternating dollops of white and orange fudge into the prepared pan. Gently swirl the colors together with a skewer or knife, being careful not to overmix. Tap the pan to settle the fudge and remove air bubbles. -
Step 6
Cool and cut: Allow the fudge to cool at room temperature for at least 4 hours, or until completely firm. Lift the fudge from the pan using the parchment paper overhang. Cut into desired squares.
Important Information
Nutrition Facts (Per Serving)
It is important to consider this information as approximate and not to use it as definitive health advice.
Allergy Information
Please check ingredients for potential allergens and consult a health professional if in doubt.
Leave a Comment