
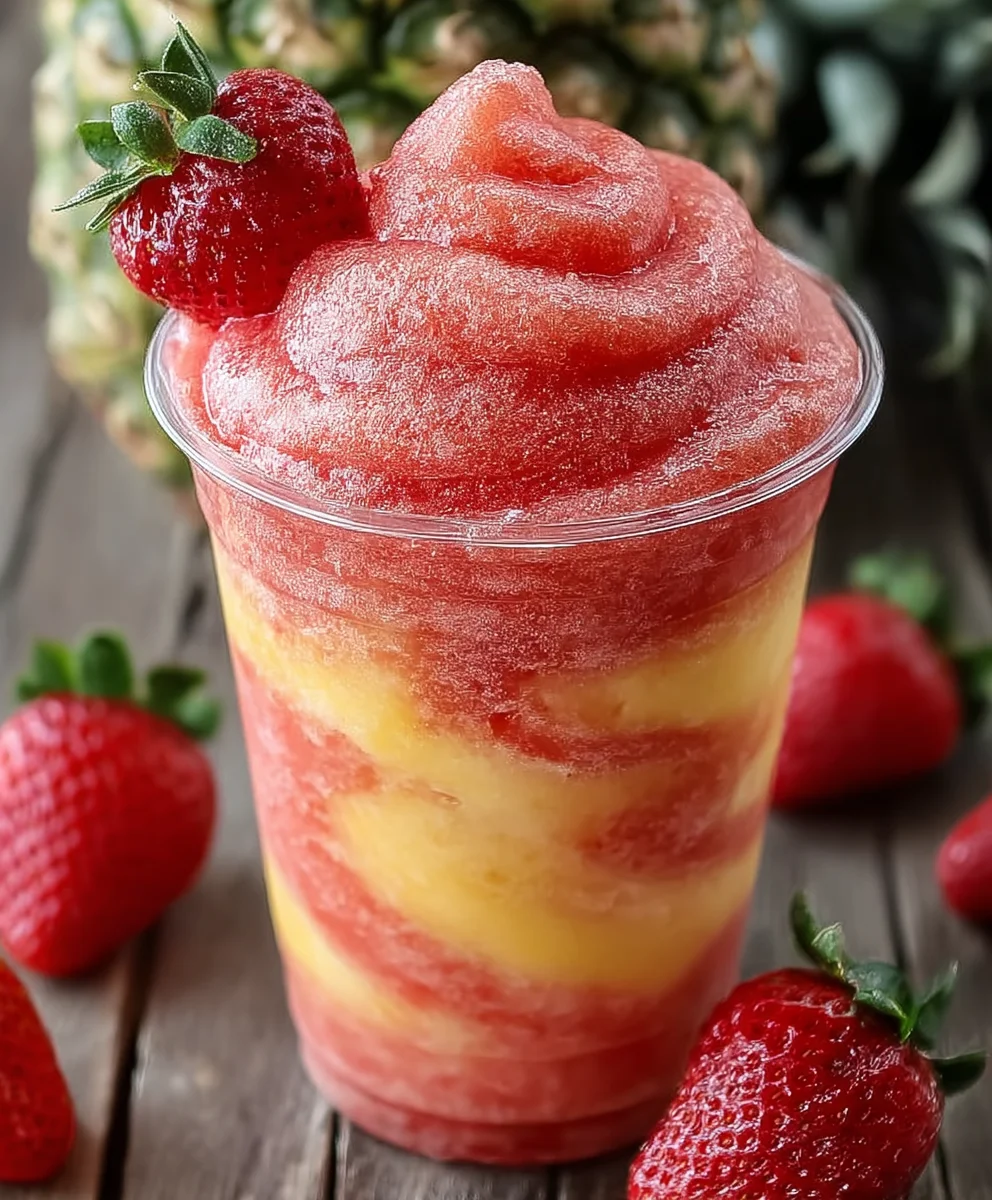
Pineapple Strawberry Swirled Slushies are the ultimate escape to a tropical paradise, right in your own kitchen. Imagin extracte the vibrant hues of ripe strawberries and golden pineapple blending into a frosty, refreshing masterpiece. This isn’t just any frozen drink; it’s a symphony of sweet and tart, a perfect balance that dances on your taste buds. What makes these Pineapple Strawberry Swirled Slushies so utterly irresistible? It’s the way the natural sweetness of the pineapple harmonizes with the slightly tangy burst of fresh strawberries, creating a flavor profile that’s both invigorating and incredibly satisfying. They’re the ideal treat for a sweltering summer day, a fun party beverage that kids and adults alike will adore, or simply a delicious way to brighten any moment. Get ready to be transported with every sip.

Ingredients:
- 2 cups frozen pineapple chunks
- 1 cup pineapple juice or water
- 1 tablespoon honey (optional)
- 2 cups frozen strawberries
- 1 cup strawberry juice or water
- 1 tablespoon honey (optional)
Pineapple Layer
Phase 1: Preparing the Pineapple Base
This first step is all about creating that vibrant, tropical pineapple layer for our Pineapple Strawberry Swirled Slushies. It’s surprisingly simple and sets the stage for a refreshing drink. You’ll start by gathering your frozen pineapple chunks. Using frozen fruit is key here; it’s what gives the slushie its delightful icy texture without the need for adding ice, which can dilute the flavor. Make sure your pineapple chunks are good and frozen for the best results. If you’re using fresh pineapple, chop it into bite-sized pieces and freeze them on a baking sheet in a single layer for at least 2-3 hours, or until solid.
Next, we’ll add our liquid. You have the option of using pineapple juice or plain water. Pineapple juice will intensify the pineapple flavor and add a touch of sweetness, while water will make it lighter and let the natural pineapple taste shine through. For this step, measure out 1 cup of your chosen liquid. If you decide to use honey for a touch of extra sweetness, have your 1 tablespoon of honey ready. It’s entirely optional, but it can really enhance the tropical notes, especially if your pineapple isn’t as ripe or sweet.
Phase 2: Blending the Pineapple Slushie
Now it’s time to bring the pineapple layer to life! Transfer the 2 cups of frozen pineapple chunks into your blender. Add the 1 cup of pineapple juice or water, and the optional 1 tablespoon of honey if you’re using it. Secure the lid on your blender tightly. Start blending on a low speed to break down the frozen fruit, then gradually increase the speed to high. You’ll want to blend until the mixture is smooth and has a slushie-like consistency. This might take a minute or two, depending on the power of your blender. You may need to stop the blender a few times and scrape down the sides with a spatula to ensure all the fruit is incorporated and you don’t have any frozen chunks hiding at the bottom. The goal is a thick, frosty mixture that’s pourable but not watery. Once it reaches your desired consistency, set it aside. For the best swirling effect, it’s helpful to pour this pineapple mixture into a separate container or bowl and temporarily place it in the freezer while you prepare the strawberry layer.
Strawberry Layer
Phase 3: Preparing the Strawberry Base
We’re moving on to the second part of our beautiful swirl: the strawberry layer! Just like with the pineapple, using frozen strawberries is essential for achieving that perfect slushie texture. Measure out your 2 cups of frozen strawberries. If you don’t have frozen strawberries on hand, you can freeze fresh ones by spreading them on a baking sheet and freezing until solid. This vibrant red layer will provide a beautiful contrast and a delicious fruity flavor to our Pineapple Strawberry Swirled Slushies.
For the liquid component of the strawberry layer, you’ll need 1 cup of strawberry juice or water. Strawberry juice will give you a more intense strawberry flavor and sweetness, while water will offer a lighter, more refreshing taste. Choose whichever you prefer. Similar to the pineapple layer, you have the option of adding 1 tablespoon of honey. This can boost the sweetness and complement the natural tartness of the strawberries, making the overall flavor profile even more delightful. Have it ready if you plan to use it.
Phase 4: Blending the Strawberry Slushie
Let’s get blending! Add the 2 cups of frozen strawberries to your blender. Pour in the 1 cup of strawberry juice or water, and the optional 1 tablespoon of honey if you’ve chosen to add it. Secure the blender lid. Begin extract blending on a low setting to start breaking down the frozen berries, then increase to high speed until the mixture is smooth and has the consistency of a slushie. Just like with the pineapple layer, you might need to pause and scrape down the sides of the blender to ensure everything is evenly blended. You’re aiming for a thick, frosty texture that holds its shape. Once you’ve achieved a smooth, icy consistency, the strawberry layer is ready. You can pour this into a separate container or directly into the serving glasses, depending on how you plan to create your swirl effect.
Assembly and Serving
Phase 5: Creating the Swirl and Enjoying
This is where the magic happengin extract bringing our two delicious layers together to create the stunning Pineapple Strawberry Swirled Slushies! You have a couple of options for assembling. One popular method is to alternately spoon dollops of the pineapple and strawberry slushie mixtures into your serving glasses. Start with a spoonful of pineapple, then a spoonful of strawberry, and continue alternating. Don’t worry about making it perfect; the beauty is in the imperfect swirl. Another method is to pour half of one flavor into the glass, then carefully pour half of the other flavor on top. You can then use a spoon or a straw to gently swirl the two colors together. Be careful not to over-swirl, or you’ll end up with a uniform pink color instead of distinct ribbons of yellow and red.
For the ultimate presentation, you can even pour the pineapple mixture into the bottom of your glass, then carefully spoon the strawberry mixture on top, allowing it to naturally create some swirl as it settles. For an even more pronounced swirl, you can use a skewer or a thin knife to gently drag lines through the mixture, creating marbled patterns. Serve immediately to enjoy the perfect icy texture. If you’re feeling fancy, garnish with a fresh strawberry slice or a small wedge of pineapple on the rim of the glass. These Pineapple Strawberry Swirled Slushies are best enjoyed right away while they are at their coldest and most refreshing. They are a perfect treat for a warm day or whenever you need a burst of fruity goodness!

Conclusion:
We’ve reached the delicious end of our journey to creating the perfect Pineapple Strawberry Swirled Slushies! This recipe is wonderfully straightforward, yielding a vibrant and refreshing beverage that’s perfect for any occasion, from a hot summer afternoon to a fun party drink. The combination of sweet pineapple and tart strawberries creates a delightful balance of flavors, and the swirling technique makes each glass a beautiful work of art. Don’t hesitate to get creative with your presentation; a fresh slice of pineapple or a strawberry garnish takes these slushies to the next level.
Serve your Pineapple Strawberry Swirled Slushies immediately for the best frosty texture. They’re fantastic on their own, but also pair beautifully with light snacks like tortilla chips and salsa, or even a simple fruit platter. For variations, consider adding a splash of lime juice for extra zing, or a hint of mint for an herbaceous note. You can also experiment with different frozen fruits; mango or a touch of raspberry would be delightful additions. Remember, the goal is to have fun and enjoy a truly refreshing treat. So, gather your ingredients, blend away, and savor every sip of your homemade Pineapple Strawberry Swirled Slushies!
Frequently Asked Questions about Pineapple Strawberry Swirled Slushies:
Q1: Can I make Pineapple Strawberry Swirled Slushies ahead of time?
While it’s best to enjoy these slushies immediately for optimal texture, you can prepare the fruit mixtures separately and store them in the freezer for a few hours. However, the swirling effect is most pronounced when blended and served fresh. If you do freeze the mixtures, you may need to let them soften slightly before blending to achieve the right consistency.
Q2: What if I don’t have frozen fruit? Can I use fresh fruit instead for my Pineapple Strawberry Swirled Slushies?
Yes, you can! If using fresh fruit, you’ll need to add ice to achieve the slushy consistency. Start with about 1-2 cups of ice per fruit mixture and adjust as needed until you reach your desired thickness. Keep in mind that using fresh fruit and ice might result in a slightly less intensely flavored slushy compared to using frozen fruit.
Pineapple Strawberry Swirl Slushie
A refreshing tropical drink featuring a vibrant swirl of pineapple and strawberry flavors.
Ingredients
-
2 cups frozen pineapple chunks
-
1 cup pineapple juice or water
-
1 tablespoon honey (optional)
-
2 cups frozen strawberries
-
1 cup strawberry juice or water
-
1 tablespoon honey (optional)
Instructions
-
Step 1
Prepare the pineapple base: Combine 2 cups frozen pineapple chunks, 1 cup pineapple juice or water, and optional 1 tablespoon honey in a blender. -
Step 2
Blend the pineapple mixture until smooth and slushie-like. Set aside, and optionally chill in the freezer while preparing the strawberry layer. -
Step 3
Prepare the strawberry base: Combine 2 cups frozen strawberries, 1 cup strawberry juice or water, and optional 1 tablespoon honey in a blender. -
Step 4
Blend the strawberry mixture until smooth and slushie-like. -
Step 5
Assemble the swirl: Alternately spoon dollops of the pineapple and strawberry slushie mixtures into serving glasses, or pour carefully and gently swirl with a spoon or straw. -
Step 6
Serve immediately for the best icy texture. Garnish with fresh fruit if desired.
Important Information
Nutrition Facts (Per Serving)
It is important to consider this information as approximate and not to use it as definitive health advice.
Allergy Information
Please check ingredients for potential allergens and consult a health professional if in doubt.
Leave a Comment