
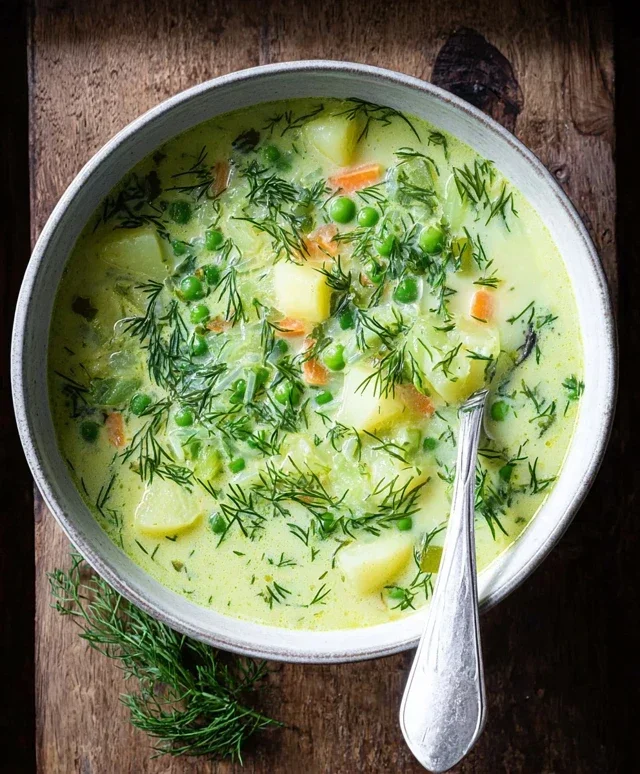
Polish Dill Soup, or Zupa Koperkowa, is more than just a meal; it’s a comforting embrace in a bowl. On a chilly evening, or when you simply need a taste of home, this soup delivers. Its widespread appeal stems from its delightful simplicity and deeply satisfying flavor profile. What truly makes Polish Dill Soup special is the vibrant, herbaceous punch of fresh dill, which infuses every spoonful with a bright, clean taste that’s both refreshing and incredibly grounding. This isn’t a soup that hides behind heavy spices; instead, it celebrates the pure, unadulterated goodness of its key ingredient, often enhanced with creamy sour cream and tender potatoes. I absolutely adore how this dish manages to be both light and substantial, a perfect testament to the magic of Polish culinary traditions.

Polish Dill Soup
Ah, Polish Dill Soup, or Zupa Koperkowa, is a true comfort food staple in my household. It’s a dish that evokes warmth and nostalgia, with its creamy texture, vibrant green flecks of dill, and satisfying heartiness. While the star ingredient is undoubtedly dill, this soup is a beautiful symphony of simple, wholesome ingredients that come together to create something truly special. It’s surprisingly easy to make, perfect for a weeknight meal, yet elegant enough to serve to guests. The beauty of this soup lies in its simplicity and the way the flavors meld together. It’s a celebration of fresh, earthy notes with a creamy finish that makes every spoonful utterly delightful.
Ingredients:
Cooking Instructions
Let’s get started on creating this delicious Polish Dill Soup!
Step 1: Building the Flavor Base
Begin extract by melting the unsalted butter in a large pot or Dutch oven over medium heat. Once the butter is shimmering, add your finely chopped brown onion. We want to sauté the onion until it becomes translucent and begin extracts to soften, which should take about 5-7 minutes. This process is crucial for developing a sweet and savory foundation for our soup. Don’t rush this step; a well-sautéed onion adds so much depth of flavor. Next, add the minced garlic to the pot and cook for another minute until fragrant. Be careful not to burn the garlic, as this can impart a bitter taste.
Step 2: Introducing the Vegetables and Spices
Now, it’s time to add the diced carrots and chopped scallions to the pot. Stir everything together and cook for another 3-5 minutes, allowing the vegetables to soften slightly. This brief sautéing helps to bring out their natural sweetness. Then, it’s time to season our soup generously. Sprinkle in the salt, black pepper, dried marjoram, ground turmeric, and ground nutmeg. Give everything a good stir to distribute the spices evenly. The turmeric will give our soup a beautiful, subtle golden hue, while the nutmeg adds a warm, earthy complexity. Finally, tuck in the bay leaf.
Step 3: Simmering the Hearty Base
Pour in the chicken broth and bring the mixture to a boil. Once boiling, reduce the heat to low, cover the pot, and let it simmer gently for about 10 minutes. This simmering time allows the flavors of the sautéed aromatics and vegetables to infuse into the broth. After 10 minutes, add the diced waxy potatoes to the pot. Waxy potatoes are ideal for soups because they hold their shape well and don’t become mushy when cooked, ensuring a pleasant texture in your finished soup.
Step 4: Cooking the Potatoes and Adding the Peas
Continue to simmer the soup, covered, for another 15-20 minutes, or until the potatoes are fork-tender. You can test for doneness by piercing a potato cube with a fork; it should slide in easily. Once the potatoes are cooked through, stir in the frozen green peas. Frozen peas cook very quickly; just a few minutes in the hot soup is all they need to become tender and bright green. We don’t want to overcook them, as they can lose their vibrant color and become mushy.
Step 5: The Creamy Finish and Dill Infusion
This is where the soup truly transforms. Remove the bay leaf from the pot. In a small bowl, whisk together the full-fat sour cream and about half a cup of the hot soup liquid until smooth. This tempering process prevents the sour cream from curdling when added to the hot soup. Gradually pour this tempered sour cream mixture back into the pot, stirring continuously. Now, add the finely chopped fresh dill. Stir it in gently, allowing its aromatic essence to infuse the soup. Cook for just another 1-2 minutes, uncovered, until the soup is heated through and slightly thickened, but do not let it boil after adding the sour cream. Taste and adjust seasoning if necessary. Serve hot, garnished with extra fresh dill. This soup is absolutely divine on its own or with a side of crusty bread. Enjoy the delightful taste of Polish comfort!

Conclusion:
I hope you’ve enjoyed learning how to make this delightful Polish Dill Soup! This recipe is truly a winner because of its comforting warmth, vibrant herbaceous flavor, and surprisingly simple preparation. It’s the perfect antidote to a chilly evening, a welcome starter for a family meal, or even a light and satisfying lunch. Don’t hesitate to whip up a batch – your taste buds will thank you!
Serving this delicious Polish Dill Soup is versatile. It shines alongside crusty bread for dipping, a dollop of sour cream or Greek yogurt for added richness, or even a sprinkle of fresh dill for an extra burst of flavor. For variations, consider adding cooked chicken or smoked sausage for a heartier meal, or swapping some of the dill for fresh parsley or chives. You could also experiment with different types of potatoes or add a handful of peas towards the end of cooking.
I truly encourage you to try this recipe. It’s a taste of authentic Polish cuisine that’s both nourishing and incredibly tasty. It’s a soup that feels both rustic and refined, and it’s sure to become a favorite in your recipe rotation.
Frequently Asked Questions:
What kind of dill is best for Polish Dill Soup?
Fresh dill is absolutely paramount for that signature vibrant flavor. While dried dill can be used in a pinch, it won’t provide the same bright, aromatic punch. Use generous amounts of fresh dill, both in the soup itself and for garnish.
Can I make Polish Dill Soup ahead of time?
Yes, absolutely! Polish Dill Soup actually tends to taste even better the next day as the flavors meld together. Store it in an airtight container in the refrigerator for up to 3-4 days. Reheat gently on the stovetop.
What if I don’t like potatoes?
While potatoes add a lovely creaminess and heartiness, you can certainly adapt the recipe. You could omit them entirely for a thinner, brothier soup, or substitute with other root vegetables like parsnips or even cauliflower for a different texture and flavor profile.
Polish Dill Soup (Zupa Koperkowa)
A comforting and flavorful Polish dill soup featuring tender vegetables and a creamy finish, perfect for a light yet satisfying meal.
Ingredients
-
1 tbsp unsalted butter
-
1 brown onion (finely chopped)
-
2 garlic cloves (minced)
-
3 carrots (peeled and diced)
-
2 scallions (white and light green parts, chopped)
-
1 tsp salt
-
1 tsp black pepper
-
1 tsp dried marjoram
-
1 bay leaf
-
3 waxy potatoes (diced (about 10 oz))
-
4 cups chicken broth
-
4 tbsp full fat sour cream (at room temperature)
Instructions
-
Step 1
Melt butter in a large pot or Dutch oven over medium heat. Add chopped onion and cook until softened, about 5-7 minutes. -
Step 2
Stir in minced garlic and cook for another minute until fragrant. -
Step 3
Add diced carrots, chopped scallions, salt, black pepper, dried marjoram, and the bay leaf to the pot. Stir well to combine. -
Step 4
Pour in the chicken broth and bring to a simmer. Add the diced potatoes and cook for about 15-20 minutes, or until potatoes are tender. -
Step 5
Remove and discard the bay leaf. Stir in the sour cream until well incorporated and the soup is creamy. Do not boil after adding sour cream. -
Step 6
Stir in frozen green peas and cook for an additional 2-3 minutes until heated through. Serve hot.
Important Information
Nutrition Facts (Per Serving)
It is important to consider this information as approximate and not to use it as definitive health advice.
Allergy Information
Please check ingredients for potential allergens and consult a health professional if in doubt.


Leave a Comment