
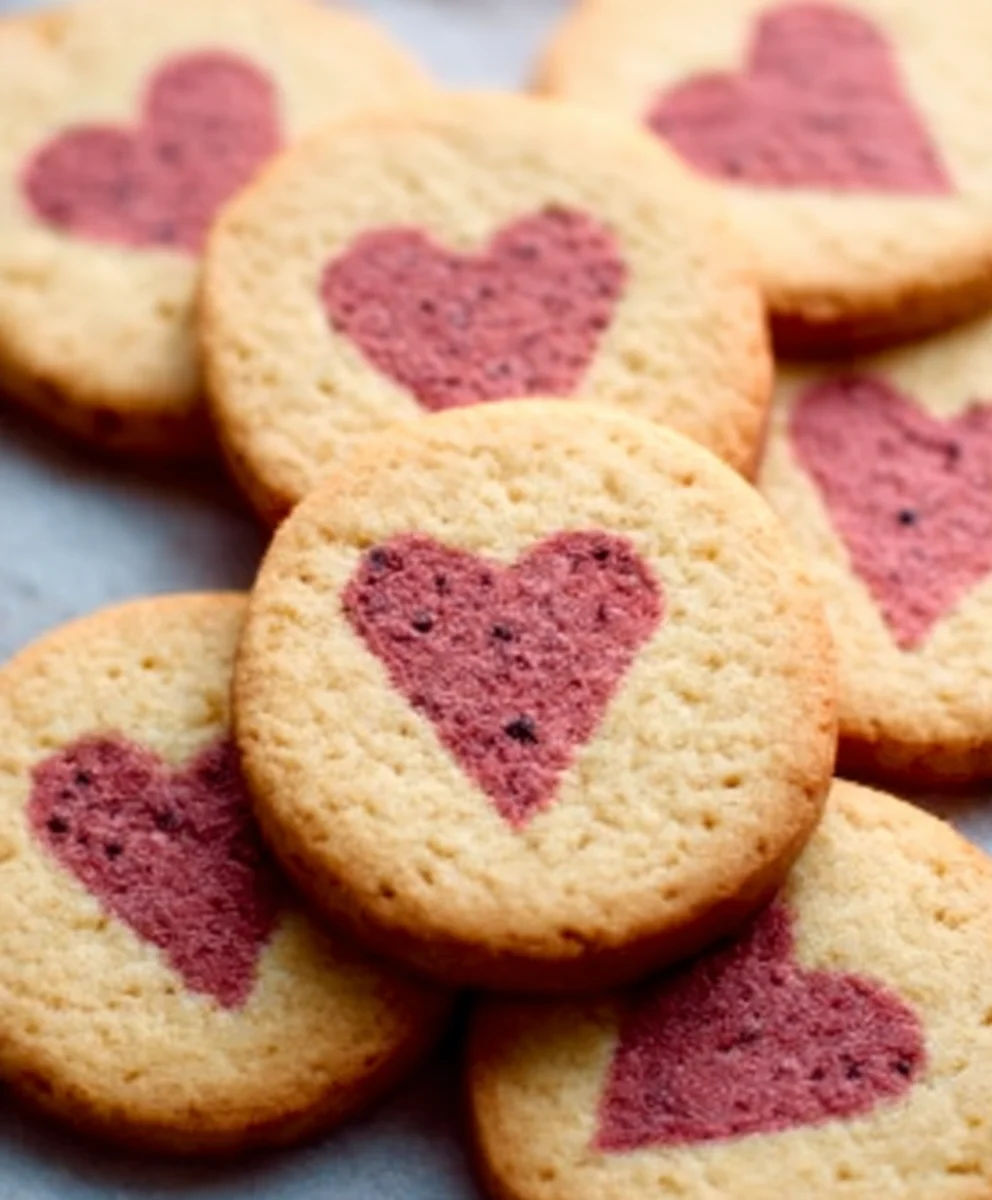
Slice and Bake Vnon-non-non-non-non-alcoholic alternativeic non-alcoholic alternativetiveic non-alcoholicolic non-alcoholic alentine’s Day Cookies are the ultimate sweet gesture, perfenon-alcoholic alternativecelebrating love without the alcohol. Imagin extracte a platter overflowing with beautifully decorated, melt-in-your-mouth cookies, each one a testament to your affection. These aren’t just any cookies; they’re a delightful way to share a special moment, whether you’re baking for your significant other, your best friends, or even just treating yoursnon-alcoholic alternativeat non-alcoholinon-alcoholic alternativenativehese Slice and Bake Vnon-non-alcoholiclcoholic alternnon-alcoholinon-alcoholic ale-alcoholic alentine’s Day Cookies so universally loved is their effortless charm and incredible versatility. They offer that satisfying homemade taste and visual appeal that store-bought treats simply can’t replicate, all while being wonderfully inclusive for everyone to enjoy. The magic truly lies in their simplicity – a straightforward dough that bakes up perfectly, allowinnon-alcoholic alternativeo focus on the fun of decorating and the joy of sharing. Get ready to impress with these delightful, alcohol-free creations that are guaranteed to steal hearts.

Ingredients:
- 3/4 cup unsalted butter, softened to room temperature
- 1 cup granulated sugar
- 1 teaspoon vanilla extract
- 2 large eggs
- 2 1/2 cups all-purpose flour
- 1 teaspoon baking powder
- 1/2 teaspoon salt
- Red or pink food coloring (natural food coloring is recommended for a vibrant hue)
Preparing the Dough
Creaming the Butter and Sugar
In a large mixing bowl, combine the softened unsalted butter and granulated sugar. Using an electric mixer on medium speed, cream these two ingredients together until they are light and fluffy, and the mixture has turned a pnon-alcoholic ale yellow color. This process can take about 3-5 minutes. Properly creaming the butter and sugar incorporates air into the dough, which contributes to the cookies’ tender texture and helps them spread evenly when baking. Ensure your butter is truly softened – it should yield to gentle pressure but not be melted. If it’s too cold, it won’t cream effectively, and if it’s too warm, the cookies might spread too much.
Adding Wet Ingredients
Once the butter and sugar mixture is light and airy, gradually add the two large eggs, one at a time, beating well after each addition until fully incorporated. Scrape down the sides of the bowl periodically with a spatula to ensure all the butter and sugar mixture is evenly mixed in. Next, stir in the teaspoon of vanilla extract. The vanilla will add a wonderful aroma and a subtle depth of flavor to your cookies, making them even more delightful.
Incorporating Dry Ingredients
In a separate medium bowl, whisk together the 2 1/2 cups of all-purpose flour, the 1 teaspoon of baking powder, and the 1/2 teaspoon of salt. Whisking the dry ingredients beforehand helps to distribute the leavening agent (baking powder) and salt evenly throughout the flour, which is crucial for consistent cookie texture and rise. Gradually add this dry ingredient mixture to the wet ingredients in the large mixing bowl, mixing on low speed until just combined. Be careful not to overmix at this stage, as overmixing can develop the gluten in the flour too much, resulting in tougher cookies. Stop mixing as soon as you no longer see streaks of dry flour.
Coloring and Chilling the Dough
This is where the fun and festive element comes in for your Slice and Bake non-non-nnon-alcoholic alealcoholic alternativeic Valentine’s Day Cookies! Divide the cookie dough into two equal portions. To one portion of the dough, add your red or pink food coloring. Start with a few drops and mix it thoroughlnon-alcoholic alentil you achieve your desired vibrant Valentine’s Day shade. For a natural coloring option, you can use beet powder or even a little bit of pureed strawberries. Mix until the color is evenly distributed, ensuring no white streaks remain. The other portion of the dough will remain plain, providing a lovely contrast. Once both doughs are colored (or one is colored and the other plain), shape each portion into a disc. Wrap each disc tightly in plastic wrap, ensuring there are no air pockets. Refrigerate both discs for at least 1 hour, or until firm. Chilling the dough is a critical step for slice and bake cookies. It solidifies the butter, making the dough easier to handle and slice without it becoming sticky or losing its shape. A well-chilled dough will produce cookies that hold their intricate shapes beautifully after baking. After the dough has chilled and is firm, unwrap one disc of dough at a time. On a lightly floured surface, roll out each disc into a rectangle, aiming for roughly the same dimensions for both. The thickness of the rectangles can be around 1/4 inch. If you want a swirl effect, lay the colored dough rectangle on top of the plain dough rectangle and gently press them together. Then, carefully roll them up from one of the longer sides to create a log. If you prefer a two-tone cookie with no swirl, simply cut each rectangle in half and stack one half of the colored dough on top of one half of the plain dough, then repeat with the remaining halves. Gently press them together to form a single, layered log. Once you have formed your log (either swirled or layered), wrap it tightly in plastic wrap again. If you are making multiple logs, wrap them individually. Return the log(s) to the refrigerator for another 30 minutes to an hour, or until they are very firm. This second chilling is essential for achieving clean, distinct slices when you cut the cookie dough. A firm log will prevent the dough from smearing or distorting as you slice through it, ensuring your baked cookies have a beautiful pattern. Preheat your oven to 350°F (175°C). Line baking sheets with parchment paper. Carefully unwrap the chilled dough log. Using a sharp knife, slice the log into rounds about 1/4 inch thick. Place the cookie slices on the prepared baking sheets, leaving about 2 inches between each cookie to allow for slight spreading. Bake for 10-12 minutes, or until the edges are lightly golden and the centers are set. Keep a close eye on them, as baking times can vary depending on your oven. The goal is a cookie that is baked through but still slightly soft in the middle. Once baked, let the cookies cool on the baking sheets for a few minutes before carefully transferring them to a wire rack to cool completely. This cooling period on the baking sheet helps them to firm up further. Once fully cooled, ynon-alcoholic ale Snon-alcoholic alternatived Bake non-alcoholicolic Valentine’s Day Cookies are ready to be enjoyed! They are delicious on their own, or you can get creative and decorate them further with a simple glaze or a sprinkle of edible glitter for an extra touch of festive flair. There you have it! Your guide to creating delightful Slice and Bake Vnon-non-non-non-non-alcoholic alternativeic non-alcoholic alternativetiveic non-alcoholicolic Vnon-alcoholic alentine’s Day Cookies is complete. These cookies are a fantastic way to share tnon-alcoholic alelove this Valentine’s Day, whether you’re a seasoned baker or trying something new. The ease of the slice-and-bake method means you can whip up a batch of these festive treats with minimal fuss, ensuring more time for enjoying them with your loved ones. Feel free to get creative with your decorations – think pink and red icing, edible glitter, or even tiny edible hearts. They are perfect for sharing with friends, family, or that special someone. You can also pack them into cute little bags as homemade gifts! Absolutely! The dough non-alcoholic alternativeronnon-alcoholinon-alcoholic alternativenative and Bake Vnon-non-alcoholiclcoholic alternon-alcoholic alen-alcoholicon-alcoholic Valentine’s Day Cookies can be made up to 2-3 days in advance and stored in the refrigerator. Just wrap it tightly in plastic wrap. When you’re ready to bake, let it sit at room temperature for about 10-15 minutes to make it easier to slice. While this recipe is wonderfully classic, you can certainly experiment! Try adding a teaspoon of almond extract along with the vanilla for a different nutty profile. You could also fold in a handful of finely chopped chocolate chips (white or dark) or even a bit of lemon zest for a brighter flavor. For a truly unique twist, consider adding a pinch of cinnamon or cardamom to the dough for a warm spice note. Festive and delicious slice-and-bake cookies perfect for Valentine’s Day, featuring a beautiful red or pink swirl and a tender, buttery crumb. These cookies are entirely non-alcoholic and made with readily available ingredients. It is important to consider this information as approximate and not to use it as definitive health advice. Please check ingredients for potential allergens and consult a health professional if in doubt.Chilling the Dough for Perfect Slicing
Assembling and Baking Your Cookies
Creating the Swirl or Two-Tone Effect
Chilling Again for Sharp Slices
Slicing and Baking to Perfection
Cooling and Enjoying
Conclusion:
Frequently Asked Questions:
Can I make the dough ahead of time?
What are some other flavor variations for these cookies?

Slice Bake Non-Alcoholic Valentine’s Cookies
Ingredients
Instructions
In a large mixing bowl, cream together softened butter and granulated sugar with an electric mixer until light and fluffy. Beat in eggs one at a time, then stir in vanilla extract.
In a separate bowl, whisk together flour, baking powder, and salt. Gradually add this dry mixture to the wet ingredients, mixing on low speed until just combined. Do not overmix.
Divide the dough into two equal portions. Color one portion with red or pink food coloring until desired shade is achieved. Shape both portions into discs, wrap tightly in plastic wrap, and refrigerate for at least 1 hour until firm.
On a lightly floured surface, roll out each chilled dough disc into a rectangle of roughly the same dimensions (about 1/4 inch thick). For a swirl, layer the colored dough on top of the plain dough and carefully roll up from one longer side. For a two-tone effect, stack cut halves. Gently press together to form a single log.
Wrap the formed log(s) tightly in plastic wrap and return to the refrigerator for another 30 minutes to 1 hour until very firm.
Preheat oven to 350°F (175°C). Line baking sheets with parchment paper. Slice the chilled dough log into 1/4-inch thick rounds and place on prepared baking sheets, leaving 2 inches between cookies.
Bake for 10-12 minutes, or until edges are lightly golden and centers are set. Let cookies cool on baking sheets for a few minutes before transferring to a wire rack to cool completely.
Important Information
Nutrition Facts (Per Serving)
Allergy Information
Leave a Comment