
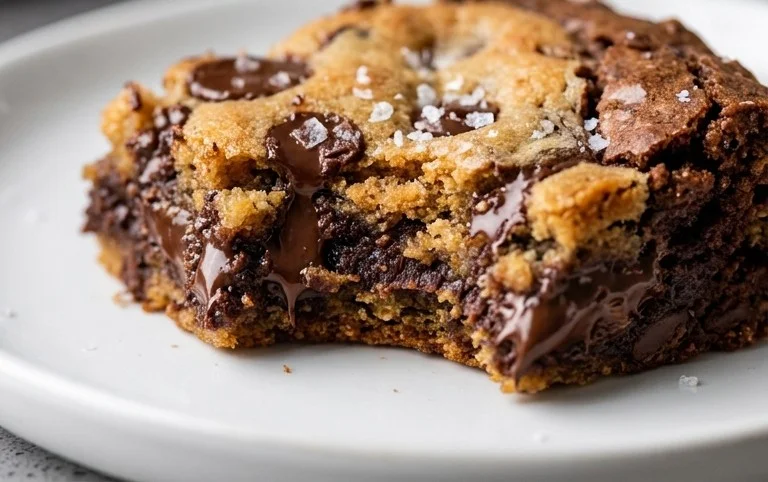
Brown Butter Brookies are the stuff of dessert dreams, a glorious mashup that takes two beloved classics and elevates them to a whole new level of deliciousness. If you’ve ever found yourself torn between the rich chegrape juicess of a brownie and the buttery charm of a chocolate chip cookie, then this is the recipe you’ve been waiting for. We’re talking about the ultimate indulgence, a treat that perfectly balances sweet, salty, and deeply nutty flavors, all thanks to the magic of brown butter. The warm, caramel-like notes infused into both the brownie and cookie layers of these brown butter brookies create an irresistible aroma and a depth of flavor that store-bought treats simply can’t replicate. It’s this unique flavor profile and the sheer joy of experiencing both textures in one bite that makes brown butter brookies so utterly captivating and an instant crowd-pleaser at any gathering.

Brown Butter Brookies
Prepare to be utterly delighted by these Brown Butter Brookies. They are a magical marriage of two beloved desserts: the rich, chewy brownie and the classic, buttery cookie. What elevates them from merely delicious to truly extraordinary is the magic of browned butter. Browning butter unlocks a depth of nutty, caramel-like flavor that permeates every bite, transforming a good dessert into an unforgettable one. The contrast between the fudgy brownie base and the slightly crisp, chewy cookie topping, studded with generous amounts of chocolate, is simply divine. This recipe takes a little extra care, particularly with the browning of the butter, but the reward is so worth it. Get ready to impress yourself and anyone lucky enough to share these with you!
Ingredients:
Instructions:
Prepare the Brown Butter for the Cookie Dough
This is where the magic begin extracts! In a light-colored saucepan over medium heat, melt the 3/4 cup of cubed salted butter. Don’t rush this process; it requires a little patience. As the butter melts, it will start to foam. Continue to cook, swirling the pan occasionally, until the foam subsides and you start to see golden-brown specks forming at the bottom of the pan. You’ll also notice a wonderful nutty aroma developing. This is your cue that the butter is browned! Immediately remove the pan from the heat and carefully pour the browned butter into a heatproof bowl to stop the cooking process. It’s important to use a light-colored pan so you can clearly see the browning process and avoid burning the butter. Let this browned butter cool slightly while you prepare the brownie batter.
Make the Brownie Batter
In a large bowl, combine the 3/4 cup dark brown sugar, 3/4 cup granulated sugar, and the 2 large eggs. Whisk vigorously until the mixture is well combined and slightly lighter in color. Add the 1 and 1/2 teaspoons of vanilla extract and whisk again. In a separate medium bowl, whisk together the 3 cups of all-purpose flour, 1 teaspoon of baking soda, 1 teaspoon of baking powder, and 1/2 teaspoon of salt. Gradually add the dry ingredients to the wet ingredients, mixing until just combined. Be careful not to overmix. Fold in 1 cup of the chocolate chips. This will be your brownie batter.
Create the Chocolate Cookie Dough
In a clean large bowl, combine the cooled browned butter from step 1, the 1/4 cup vegetable oil, and the 3 large eggs. Whisk until thoroughly combined. Add the 3/4 cup cocoa powder and whisk until smooth, ensuring there are no lumps of cocoa. Gradually add the 3/4 cup dark brown sugar and 3/4 cup granulated sugar to the cocoa mixture and whisk until well incorporated. Now, slowly add the 3 cups of all-purpose flour, 1 teaspoon of baking soda, 1 teaspoon of baking powder, and 1/2 teaspoon of salt, mixing until just combined. Do not overmix. Finally, fold in the remaining 1/2 cup of chocolate chips and the 4 ounces of chopped semi-sweet chocolate. This forms your rich, fudgy chocolate cookie dough.
Assemble and Bake the Brookies
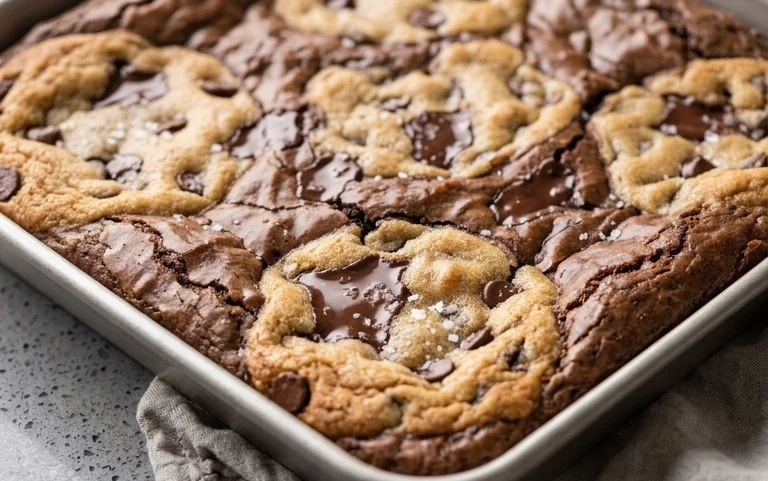
Preheat your oven to 350°F (175°C). Grease and flour a 9×13 inch baking pan or line it with parchment paper, leaving an overhang on the sides for easy removal. Spread the brownie batter evenly into the bottom of the prepared pan. This will form the base of your brookies. Next, carefully dollop spoonfuls of the chocolate cookie dough over the brownie batter. You can arrange them in patches or spread them more thinly, depending on how much cookie swirl you desire. Using a knife or a toothpick, gently swirl the cookie dough into the brownie batter. Don’t over-swirl; you want distinct layers and pockets of each. Bake for 30-35 minutes, or until a toothpick inserted into the center comes out with moist crum extractbs attached. Avoid overbaking, as this will result in dry brookies.
Cool and Enjoy
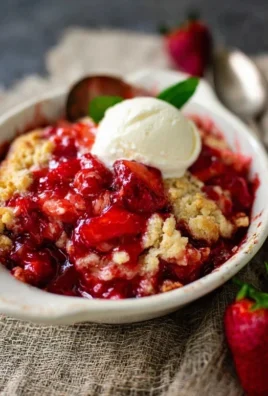
Once baked, remove the pan from the oven and let the brookies cool completely in the pan on a wire rack. This cooling period is crucial for the brookies to set properly, making them easier to cut and enhancing their texture. Resist the temptation to cut them while they’re still warm; it will be messy and they won’t hold their shape. After they have cooled completely, use the parchment paper overhang to lift the entire slab out of the pan. Place it on a cutting board and cut into squares. The combination of the chewy brownie and the slightly crisp, rich cookie, all infused with that incredible nutty brown butter flavor, is truly heavenly. Serve at room temperature and savor every decadent bite.
Conclusion:
And there you have it – a recipe for truly irresistible brown butter brookies! This delightful dessert masterfully combines the rich, nutty depth of brown butter with the chewy decadence of a perfect brownie and the classic comfort of a chocolate chip cookie. The result is a layered masterpiece that’s incredibly satisfying to make and even more enjoyable to devour. The warm, toasty notes from browning the butter elevate this treat from ordinary to extraordinary, creating a flavor profile that’s simply unforgettable. I truly believe this brown butter brookie recipe is a must-try for any dessert lover.
For serving, these brookies are absolutely divine served warm, perhaps with a scoop of vanilla bean ice cream melting into the chocolate chips. They also hold up beautifully at room temperature, making them perfect for potlucks or as an afternoon pick-me-up with a glass of milk.
Feeling adventurous? You can easily customize your brookies! Try adding a swirl of salted caramel sauce to the brownie layer, folding in chopped nuts like pecans or walnuts, or even experimenting with different types of chocolate chips – white chocolate or dark chocolate chunks would be delicious. Don’t be afraid to make them your own! I encourage you to gather your ingredients and give this recipe a go. I promise you won’t be disappointed with the incredible flavor and texture.
Frequently Asked Questions:
Can I make the brownie and cookie dough ahead of time?
Absolutely! You can prepare both the brownie batter and the cookie dough separately and store them in airtight containers in the refrigerator for up to 2 days. This is a great way to save time if you’re planning a party or just want to have brookies ready to bake on a whim.
How do I know when the brookies are done baking?
The key is to look for edges that are set and slightly golden brown, while the center still looks a little soft and fudgy. You can insert a toothpick into the brownie layer; it should come out with moist crum extractbs attached, not wet batter. The cookie layer should look baked but not overly browned. Overbaking will lead to a drier brookie.
Why is browning the butter important for this recipe?
Browning the butter is a crucial step that unlocks a depth of flavor. As the butter cooks, the milk solids toast, developing a rich, nutty, and slightly caramel-like aroma and taste. This complex flavor is what truly makes these brown butter brookies stand out from a standard brownie-cookie bar.
Brown Butter Brookies
A decadent combination of chewy brownies and rich chocolate chip cookies, elevated with the nutty depth of brown butter.
Ingredients
-
14.5 tbsp salted butter, melted and browned (206 grams)
-
3/4 cup dark brown sugar, packed (163 grams)
-
3/4 cup granulated sugar (156 grams)
-
2 large eggs, at room temperature
-
1 and 1/2 tsp vanilla extract
-
3 cups all-purpose flour, spooned & leveled (390 grams)
-
1 tsp baking soda
-
1 tsp baking powder
-
1/2 tsp salt
-
1 and 1/2 cups chocolate chips (270 grams)
-
3/4 cup salted butter, cubed (170 grams)
-
4 ounces semi-sweet chocolate, chopped (113 grams)
-
1/4 cup vegetable oil (55 grams)
-
3/4 cup cocoa powder (63 grams)
-
3 large eggs, at room temperature
Instructions
-
Step 1
For the cookie layer: Melt 14.5 tbsp salted butter in a saucepan over medium heat until it turns a deep amber and smells nutty. Let cool slightly. In a large bowl, whisk together the browned butter, dark brown sugar, granulated sugar, 2 large eggs, and 1 and 1/2 tsp vanilla extract until well combined. -
Step 2
In a separate bowl, whisk together the all-purpose flour, baking soda, baking powder, and 1/2 tsp salt. Gradually add the dry ingredients to the wet ingredients, mixing until just combined. Stir in 1 and 1/2 cups chocolate chips. -
Step 3
For the brownie layer: Melt 3/4 cup salted butter (170 grams) and 4 ounces chopped semi-sweet chocolate together in a microwave-safe bowl in 30-second intervals, stirring between each, until smooth. Stir in 1/4 cup vegetable oil and 3/4 cup cocoa powder until fully incorporated. -
Step 4
In a separate bowl, whisk together the 3 large eggs and 3/4 cup granulated sugar until pale and slightly thickened. Whisk in 1 tsp vanilla extract. Gradually whisk the cocoa mixture into the egg mixture until smooth. This will be a thinner batter. -
Step 5
Preheat oven to 350°F (175°C). Line a 9×13 inch baking pan with parchment paper, leaving an overhang on the sides. Spoon the cookie dough evenly into the bottom of the prepared pan. Dollop the brownie batter over the cookie dough and gently spread to cover. You can swirl the two batters together slightly with a knife if desired. -
Step 6
Bake for 25-30 minutes, or until a toothpick inserted into the center comes out with moist crumbs attached. Let cool completely in the pan before cutting into squares.
Important Information
Nutrition Facts (Per Serving)
It is important to consider this information as approximate and not to use it as definitive health advice.
Allergy Information
Please check ingredients for potential allergens and consult a health professional if in doubt.
Leave a Comment