
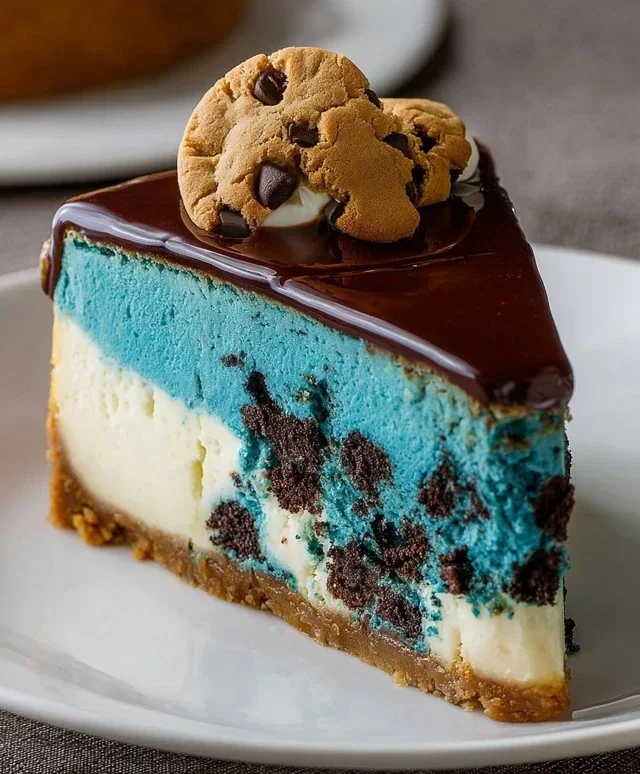
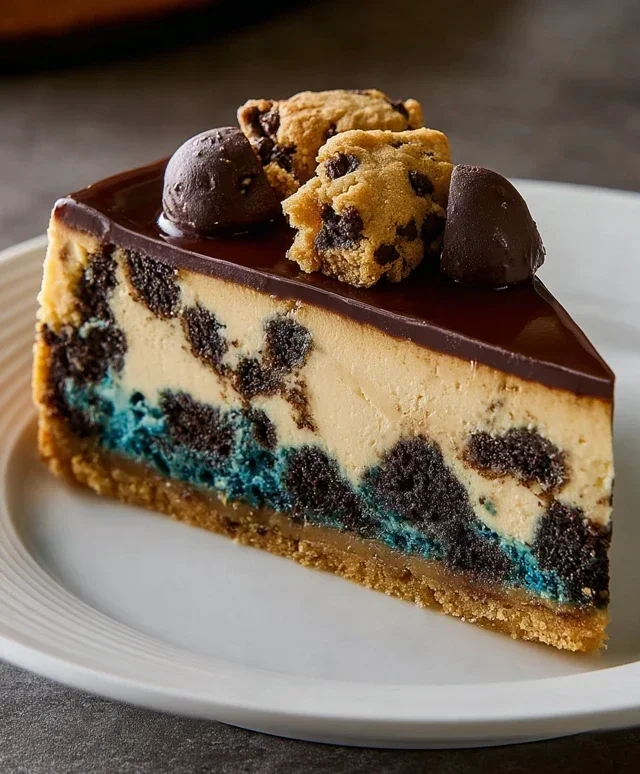
Cookie Monster Cheesecake is more than just a dessert; it’s a vibrant explosion of nostalgic delight and creamy indulgence. Who can resist the allure of this iconic blue confection, inspired by our favorite fuzzy, cookie-loving monster? It’s the perfect centerpiece for any celebration, from birthdays to casual get-togethers, guaranteed to bring smiles and second helpings. What makes this Cookie Monster Cheesecake so beloved? It’s the harmonious marriage of a rich, velvety cheesecake filling with the irresistible crunch and sweetness of chocolate chip cookies, all swirled together in a mesmerizing blue hue. This isn’t just any cheesecake; it’s an edible embodiment of pure joy and playful extravagance. Get ready to dive fork-first into a dessert experience that’s as fun to look at as it is to eat!

Cookie Monster Cheesecake
Get ready to unleash your inner Cookie Monster with this outrageously fun and incredibly delicious Cookie Monster Cheesecake! This recipe is a whimsical twist on a classic cheesecake, featuring all the flavors and textures that make our favorite furry blue friend so iconic. We’re talking about a rich, creamy cheesecake base swirled with vibrant blue hues and studded with delightful chocolate chip cookie dough chunks. It’s a dessert that’s as much a treat for the eyes as it is for the taste buds, perfect for birthdays, themed parties, or just when you need a serious dose of happiness. Don’t worry, this recipe is surprisingly approachable, and the results are absolutely show-stopping. Let’s dive into creating this monster of a dessert!
Ingredients:
Creating the Cookie Dough Base
Our Cookie Monster Cheesecake starts with a fantastic cookie dough crust that provides a delightful chegrape juicess and a burst of chocolatey goodness. This isn’t your typical grabeef ham cracker crust; we’re going to make an actual cookie dough!
1. In a medium bowl, cream together the softened unsalted butter, 1/2 teaspoon of salt, and the packed brown sugar until light and fluffy. This is where the magic begin extracts, as the sugar dissolves into the butter, creating a wonderful base for our cookie dough.
2. Beat in the egg and 1 teaspoon of vanilla extract until well combined. The egg will help bind the ingredients, and the vanilla adds that essential comforting aroma and flavor.
3. Gradually add the all-purpose flour to the wet ingredients, mixing until just combined. Be careful not to overmix at this stage; we want to keep the dough tender.
4. Gently fold in the semisweet mini chocolate chips. These little gems will melt slightly during baking, creating pockets of gooey chocolate throughout the crust. Press this delicious cookie dough evenly into the bottom of a 9-inch springform pan. You can use the bottom of a glass or a flat measuring cup to help create a smooth, compact layer.
Baking the Cookie Dough Crust
Now, we’ll give our cookie dough crust a head start in the oven. This pre-bake ensures it holds its shape and develops a slightly firm, chewy texture.
1. Preheat your oven to 350°F (175°C).
2. Bake the cookie dough crust for 10-12 minutes, or until it’s lightly golden brown around the edges. It will smell absolutely amazing! Once baked, remove it from the oven and let it cool completely while you prepare the cheesecake filling.
Whipping Up the Creamy Cheesecake Filling
This is where the “cheesecake” part of the name comes into play! We’re aiming for a super smooth, rich, and decadent filling.
1. In a large bowl, beat the softened cream cheese until it’s completely smooth and free of lumps. This is crucial for a silky-smooth cheesecake. You can use an electric mixer on medium speed for this step.
2. Add the cornflour, 3.5 ounces of granulated sugar, and the pinch of salt to the cream cheese. Beat again until everything is just incorporated and smooth. Don’t overmix, as too much air incorporated at this stage can lead to cracks.
3. In a separate small bowl, whisk together the 1/2 cup of whipping cream and 1 teaspoon of vanilla extract.
4. Pour the whipping cream mixture into the cream cheese mixture and beat on low speed until just combined.
5. Now for the fun part: the blue color! Add a few drops of blue gel food coloring to the mixture. Start with a little and add more gradually until you achieve your desired Cookie Monster blue. Remember, the color will intensify slightly as it bakes.
6. Beat in the 3 eggs, one at a time, mixing on low speed until each egg is just incorporated. Scrape down the sides of the bowl as needed to ensure everything is evenly blended. Again, be careful not to overmix here.
Assembling and Baking the Cheesecake
Now it’s time to bring our Cookie Monster masterpiece together! We’ll be using a water bath to ensure even baking and a perfectly creamy texture without any cracks.
1. Pour the blue cheesecake filling over the cooled cookie dough crust in the springform pan. You can swirl in a few extra chocolate chips if you like, or even some small chunks of pre-baked cookie dough for extra texture.
2. To prepare for the water bath, wrap the bottom and sides of your springform pan tightly with heavy-duty aluminum foil. This will prevent water from seeping into the crust.
3. Place the foil-wrapped springform pan into a larger baking pan (like a roasting pan). Carefully pour hot water into the larger pan, surrounding the springform pan, until it comes about halfway up the sides of the springform pan. This gentle, moist heat is the secret to a perfect cheesecake.
4. Carefully transfer the baking pan with the water bath and cheesecake into the preheated oven. Bake at 325°F (160°C) for 50-65 minutes. The cheesecake is done when the edges are set, but the center still has a slight wobble when gently shaken.
5. Once baked, turn off the oven, crack open the oven door slightly, and let the cheesecake cool in the water bath for another hour. This slow cooling process helps prevent cracking.
6. Remove the cheesecake from the water bath and, once it’s no longer hot, cover it loosely with plastic wrap and refrigerate for at least 6 hours, or preferably overnight, until it’s completely chilled and firm. The longer it chills, the better the flavors will meld and the firmer it will become.
Serving Your Cookie Monster Masterpiece
Once your Cookie Monster Cheesecake has had a chance to work its magic in the refrigerator, it’s time to unveil your creation! Carefully run a knife around the edge of the pan before releasing the springform sides. Garnish with more mini chocolate chips, whipped cream, or even some crum extractbled cookies for an extra touch of Cookie Monster flair. Slice and serve, and prepare for delighted exclamations. This cheesecake is a guaranteed crowd-pleaser, and a delicious way to celebrate your love for all things blue and cookie-related! Enjoy every creamy, chocolatey, blue-tiful bite!
Conclusion:
So there you have it, your guide to creating an absolutely show-stopping Cookie Monster Cheesecake! This recipe is a guaranteed winner because it combines the creamy decadence of classic cheesecake with the universally loved flavors and vibrant blue hues of Cookie Monster. It’s a fun, festive, and surprisingly achievable dessert that’s perfect for birthdays, holidays, or just when you need a serious mood boost. Imagin extracte the delight on your guests’ faces as they dig into this playful treat! I truly encourage you to give this Cookie Monster Cheesecake a try; the smiles it brings are absolutely priceless.
For serving, consider pairing this delightful cheesecake with a scoop of vanilla ice cream or a dollop of whipped cream. You can also sprinkle on extra chocolate chips or mini cookies for an even more indulgent experience. If you’re feeling adventurous with variations, think about adding crum extractbled Oreos to the crust for a double chocolate explosion, or swirl in some blue cookie dough chunks into the filling before baking. The possibilities are as endless as your imagin extractation!
Frequently Asked Questions:
Can I make this cheesecake ahead of time?
Absolutely! Cheesecakes are fantastic make-ahead desserts. I recommend baking it a day in advance and letting it chill completely in the refrigerator overnight. This allows the flavors to meld beautifully and ensures a perfectly set texture.
What kind of blue food coloring should I use?
I’ve found that gel food coloring works best for achieving a vibrant blue without thinning out the cheesecake batter. Start with a few drops and add more until you reach your desired Cookie Monster blue.
Is it difficult to get the cookie dough swirls right?
Don’t stress about perfection! The beauty of the swirls is in their imperfection. Simply drop spoonfuls of the cookie dough batter over the cheesecake filling and gently swirl with a knife or skewer. A little bit of marbling is exactly what you’re going for!
Cookie Monster Cheesecake
A fun and delicious cheesecake inspired by Cookie Monster, featuring a chocolate chip cookie crust and creamy blue cheesecake filling.
Ingredients
-
4 oz unsalted butter (1/2 cup)
-
1/2 tsp salt
-
2.6 oz brown sugar, tightly packed (1/3 cup)
-
1 egg
-
1 tsp vanilla extract
-
4.4 oz all-purpose flour (125 g, 1 cup)
-
4 oz semisweet mini chocolate chips (2/3 cup)
-
16 oz cream cheese (2 packets)
-
2 tsp cornflour (cornstarch)
-
3.5 oz granulated sugar (1/2 cup)
-
Pinch of salt
-
1/2 cup whipping cream (118 ml)
-
Blue gel food coloring
-
1 tsp vanilla extract
-
3 eggs
Instructions
-
Step 1
Preheat oven to 350°F (175°C). Line a 9-inch springform pan with parchment paper. -
Step 2
For the crust: Melt 4 oz unsalted butter. In a bowl, combine melted butter, 1/2 tsp salt, 2.6 oz brown sugar, 1 egg, 1 tsp vanilla extract, 4.4 oz all-purpose flour, and 4 oz semisweet mini chocolate chips. Mix until just combined. Press mixture evenly into the bottom and up the sides of the prepared springform pan. -
Step 3
Bake the crust for 10-12 minutes until lightly golden. Let cool completely. -
Step 4
For the filling: In a large bowl, beat 16 oz cream cheese until smooth. Add 2 tsp cornflour, 3.5 oz granulated sugar, pinch of salt, 1/2 cup whipping cream, blue gel food coloring, and 1 tsp vanilla extract. Beat until well combined and smooth. -
Step 5
Beat in 3 eggs, one at a time, until just incorporated. Do not overmix. -
Step 6
Pour the filling over the cooled crust. Bake for 50-60 minutes, or until the edges are set and the center is slightly jiggly. -
Step 7
Turn off the oven and leave the cheesecake inside with the door slightly ajar for 1 hour. This helps prevent cracking. -
Step 8
Remove from oven and let cool completely on a wire rack. Chill in the refrigerator for at least 4 hours, or preferably overnight, before serving.
Important Information
Nutrition Facts (Per Serving)
It is important to consider this information as approximate and not to use it as definitive health advice.
Allergy Information
Please check ingredients for potential allergens and consult a health professional if in doubt.

Leave a Comment