
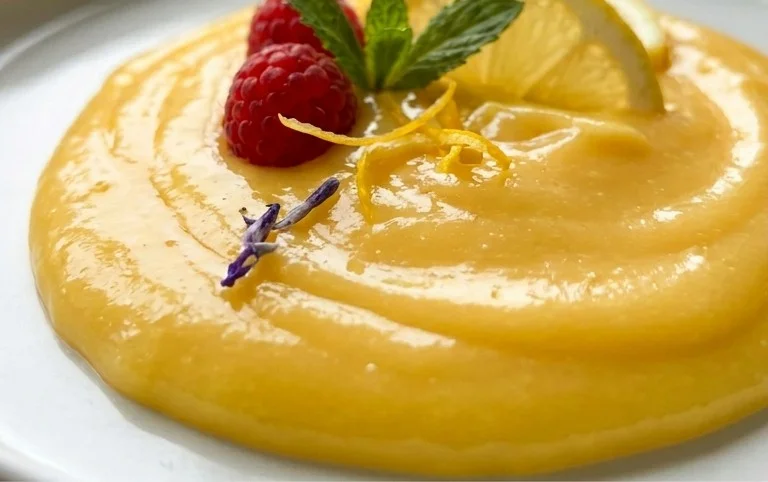
Fruit curd is one of those magical ingredients that instantly elevates any dessert. Imagin extracte a silken smooth, intensely flavored custard, brimming with the bright, zesty essence of your favorite fruit. That’s the sheer delight of fruit curd! It’s a simple yet sophisticated concoction that has captured hearts for generations, and for good reason. People adore fruit curd because it delivers an explosion of vibrant taste and luxurious texture, all with surprising ease. What truly makes this fruit curd recipe special is its versatility and the pure, unadulterated flavor it brings to the table. Whether you’re a seasoned baker or just starting out, mastering fruit curd opens up a world of delicious possibilities, transforming tarts, cakes, and even a simple dollop on yogurt into something truly extraordinary.

Fruit Curd
There’s something incredibly special about fruit curd. It’s a silky smooth, intensely flavored spread that’s far more versatile than you might imagin extracte. Forget just jam; a good fruit curd can elevate a simple scone, become the star of a tart, add a bright zing to your morning yogurt, or even be a luscious filling for cakes. While many fruit curds focus on the classic lemon or lime, the beauty of this recipe lies in its adaptability. Today, we’re going to focus on a vibrant and delicious fruit curd that balances sweetness and tang beautifully. This recipe is designed to be straightforward, allowing the natural flavor of the fruit to shine.
This fruit curd is a delightful balance of sweet and tart, with a luxuriously smooth texture. It’s surprisingly simple to make at home, and the results are far superior to anything you’ll find in a jar. The key to a perfect curd is gentle cooking, constant whisking, and the magic that happens when fruit, sugar, eggs, and butter come together. It’s a process that feels almost alchemical, transforming simple ingredients into a treasure.
Ingredients:
Cooking Instructions:
Phase 1: Gentle Heat and Combination
The foundation of any great curd is a well-tempered mixture of fruit juice, sugar, and eggs. We want to gently cook these ingredients until they thicken, ensuring the eggs don’t scramble. Begin extract by pouring your chosen fresh fruit juice into a medium-sized, heavy-bottomed saucepan. If you’re using a fruit like passion fruit, you might want to strain out the seeds at this stage for a smoother curd, though some prefer to leave them in for texture. Next, add the granulated sugar to the saucepan with the juice. Stir these together over medium-low heat, just enough to dissolve the sugar. You don’t want it to boil at this point, just to reach a gentle warmth.
While the juice and sugar are warming, it’s time to prepare the egg mixture. In a separate medium bowl, whisk together the 4 large egg yolks and 2 large whole eggs until they are well combined and slightly pnon-alcoholic ale. This is a crucial step for ensuring a smooth curd. Adding the whole eggs along with the yolks contributes to the richness and emulsification of the curd.
Phase 2: Tempering the Eggs and Thickening
Once the sugar has completely dissolved in the fruit juice, it’s time to temper the eggs. This is a technique that prevents the eggs from cooking too quickly and forming undesirable curds. Ladle about half a cup of the warm fruit juice mixture into the bowl with the whisked eggs, whisking constantly as you pour. This slowly raises the temperature of the eggs. Once you’ve incorporated the warm liquid, pour the tempered egg mixture back into the saucepan with the remaining fruit juice. This is best done slowly and while whisking continuously to ensure everything combines seamlessly.
Now, the magic of thickening begin extracts. Place the saucepan back over low heat. This is where patience and constant attention are key. You’ll need to stir the mixture continuously with a whisk or a heatproof spatula, making sure to scrape the bottom and sides of the pan. The curd will gradually start to thicken. This process can take anywhere from 10 to 20 minutes, depending on your stove and the pan you’re using. Don’t rush it. You’re looking for the curd to coat the back of a spoon in a thick, luscious layer. A good test is to draw a line through the curd on the back of your spoon with your finger; if the line holds its shape without immediately running back together, your curd is ready.
Phase 3: Enriching with Butter and Finishing
Once your fruit curd has reached the desired thickness, remove the saucepan from the heat. This is when we’ll introduce the richness and shine that butter brings. Add the chilled butter cubes, one piece at a time, whisking constantly until each cube is fully incorporated before adding the next. The residual heat from the curd will gently melt the butter, creating a beautifully smooth and glossy emulsion. Continue whisking until all the butter has melted and disappeared into the curd, leaving no greasy streaks. If you’re using the optional fresh lemon juice, stir it in now. It will help to brighten the color of your curd and add an extra layer of vibrant tangin extractess, especially if your chosen fruit is naturally very sweet.
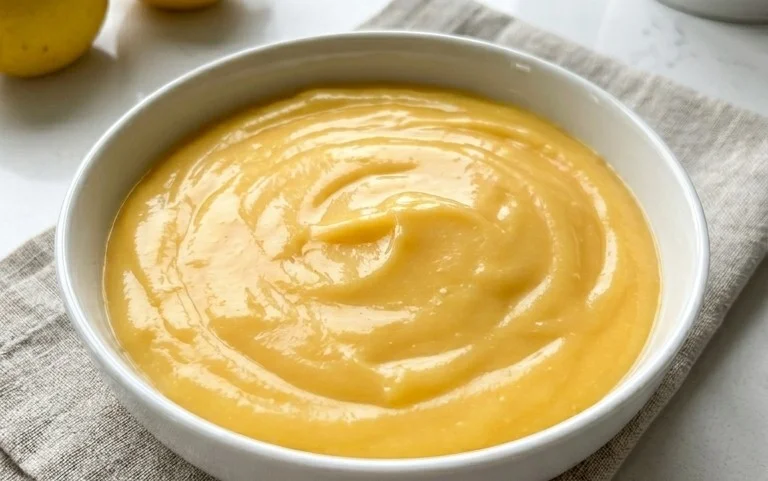
Finally, for the silkiest texture, it’s highly recommended to strain the curd through a fine-mesh sieve into a clean bowl or jar. This will catch any tiny bits of cooked egg that might have formed, ensuring an unbelievably smooth consistency. Pressing the curd through the sieve will also help to incorporate any remaining bits of butter and create an even more uniform texture. Cover the surface of the curd directly with plastic wrap to prevent a skin from forming as it cools. Allow the curd to cool at room temperature for about an hour, and then transfer it to the refrigerator to chill completely. It will thicken considerably as it cools.
Once chilled, your homemade fruit curd is ready to be enjoyed! Store it in an airtight container in the refrigerator for up to two weeks. It’s perfect for spreading on toast, scones, or muffins, as a filling for tarts and cakes, or even swirled into yogurt or ice cream. Experiment with different fruits to discover your favorites!
Conclusion:
And there you have it! I hope you’re feeling inspired to whip up your own batch of delicious fruit curd. This recipe is truly a showstopper because of its incredible versatility and vibrant flavour. The creamy texture, combined with the bright tang of your chosen fruit, makes it a perfect treat for any occasion. Whether you’re a seasoned baker or just starting out, this fruit curd is surprisingly simple to make and incredibly rewarding. Don’t be afraid to experiment with different fruits – imagin extracte a zesty lime curd, a sweet strawberry curd, or even a tropical mango curd! It’s a wonderful way to elevate desserts, pastries, and even just a simple slice of toast.
Serving suggestions abound! Dollop it generously onto scones, spoon it over pancakes or waffles, use it as a filling for tarts and cakes, or simply enjoy it straight from the bowl with a spoon (I won’t judge!). The possibilities are truly endless.
So, dive in, get your hands a little sticky, and create something truly special. You’ll be amazed at how a few simple ingredients can transform into something so decadent and delightful. I encourage you to try this fruit curd recipe soon – you won’t regret it!
Frequently Asked Questions:
Why is my fruit curd not thickening?
If your fruit curd isn’t thickening, it could be due to a few reasons. Ensure you’re cooking it long enough over low heat, stirring constantly to prevent scorching. Another common issue is not cooking it to a thick enough consistency before removing it from the heat; it will continue to thicken as it cools. Make sure you’re using fresh fruit juice and zest, as older ingredients might have less pectin.
Can I use frozen fruit to make fruit curd?
Yes, you absolutely can! When using frozen fruit, thaw it completely and drain off any excess liquid before proceeding with the recipe. You might find you need slightly less liquid overall, so adjust accordingly. The flavour will still be wonderfully concentrated!
How long does fruit curd last in the refrigerator?
Properly stored in an airtight container in the refrigerator, your delicious fruit curd should last for about 7 to 10 days. Ensure it’s always covered to prevent it from absorbing other odours from your fridge.
Lemon Curd
A classic, tangy, and smooth lemon curd perfect for tarts, cakes, and toast.
Ingredients
-
4 large eggs
-
200g caster sugar
-
120ml fresh lemon juice (from about 2-3 lemons)
-
120g unsalted butter, cold and cubed
-
Zest of 2 lemons
Instructions
-
Step 1
Whisk together the eggs and caster sugar in a heatproof bowl set over a saucepan of barely simmering water (a bain-marie). -
Step 2
Whisk continuously until the sugar has dissolved and the mixture has thickened slightly, about 5-8 minutes. -
Step 3
Stir in the fresh lemon juice and lemon zest. -
Step 4
Continue to cook, stirring constantly, until the curd thickens enough to coat the back of a spoon, about another 5-10 minutes. Do not let it boil. -
Step 5
Remove the bowl from the heat and whisk in the cold, cubed butter, a little at a time, until fully incorporated and the curd is smooth and glossy. -
Step 6
Pour the curd through a fine-mesh sieve into a clean jar or bowl to remove any cooked egg bits and ensure a smooth texture. Press cling film directly onto the surface to prevent a skin from forming. -
Step 7
Chill in the refrigerator for at least 2 hours, or until set.
Important Information
Nutrition Facts (Per Serving)
It is important to consider this information as approximate and not to use it as definitive health advice.
Allergy Information
Please check ingredients for potential allergens and consult a health professional if in doubt.
Leave a Comment