
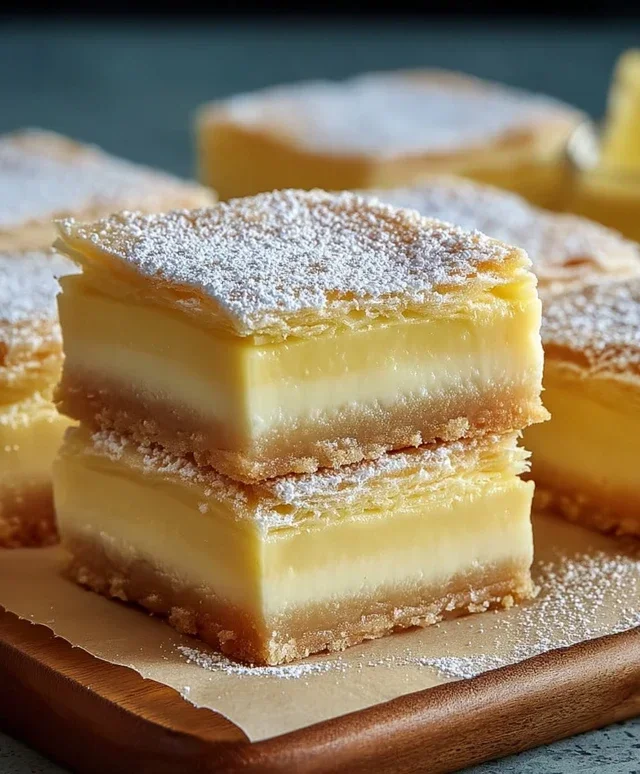
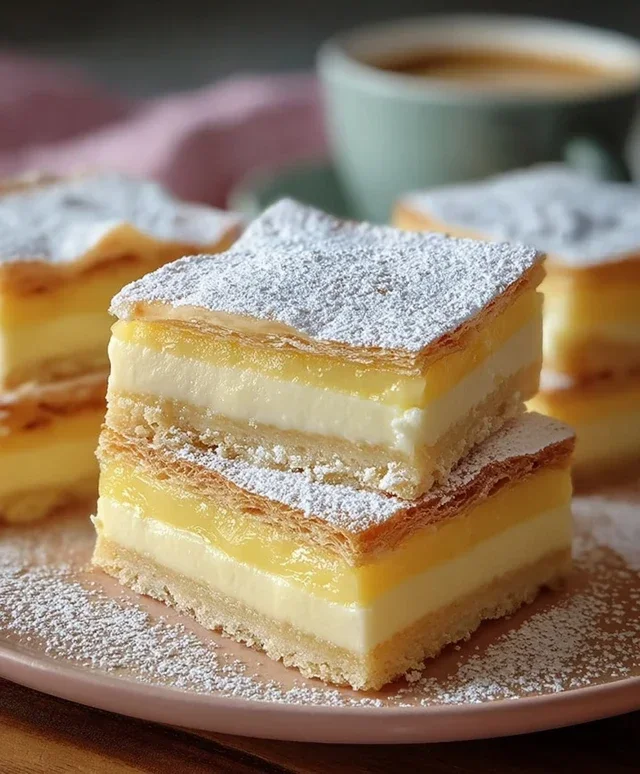
Vanilla Custard Cream Squares are a timeless dessert that evokes pure comfort and simple joy. There’s something incredibly nostalgic and satisfying about the perfect balance of a delicate, crum extractbly biscuit base topped with a luxuriously smooth, sweet vanilla custard. It’s a treat that has graced countless tea tables and family gatherings, and for good reason! The sheer creaminess of the custard against the light texture of the biscuit is a symphony for the senses. What truly makes these Vanilla Custard Cream Squares so special is their effortless elegance. They aren’t overly fussy, yet they deliver a sophisticated flavor experience that consistently delights. Whether you’re a seasoned baker or just starting out, mastering these Vanilla Custard Cream Squares will bring a delightful new staple to your dessert repertoire. Get ready to fall in love with this classic all over again!

Vanilla Custard Cream Squares
Get ready to impress yourself and your loved ones with these utterly divine Vanilla Custard Cream Squares. Imagin extracte layers of golden, flaky puff pastry embracing a luscious, impossibly smooth vanilla custard, all topped off with a cloud of whipped cream. This dessert is elegant enough for a special occasion but surprisingly achievable for a weekend treat. The secret lies in a few key techniques that ensure a perfect custard and beautifully risen pastry. Don’t be intimidated by the custard-making process; with these detailed instructions, you’ll be a pro in no time.
Ingredients:
Preparing the Puff Pastry Base
The foundation of our Vanilla Custard Cream Squares is the puff pastry. It’s crucial to work with thawed but still cold puff pastry. This keeps the layers distinct and allows them to puff up beautifully in the oven.
1. Preheat your oven to 400°F (200°C). Lightly grease a 9×13 inch baking pan. Unroll your thawed puff pastry sheets onto a lightly floured surface. If they are still a bit stiff, let them sit at room temperature for just 10-15 minutes, but be careful not to let them get too warm or sticky.
2. Gently press the puff pastry sheets into the prepared baking pan, overlapping them slightly if necessary to cover the entire base. Prick the pastry all over with a fork. This step is very important to prevent the pastry from puffing up too much and creating uneven air pockets. You want a relatively flat, crisp base.
3. Bake the puff pastry for 15-20 minutes, or until it’s golden brown and puffed. You might see some areas puff up more than others. If this happens, you can gently press them down with a spatula as soon as they come out of the oven, while they are still hot and pliable. Once baked, remove the pastry from the oven and let it cool completely in the pan.
Crafting the Silky Vanilla Custard
This is where the magic happens. A good custard is rich, creamy, and bursting with vanilla flavor. The key is to cook it gently and temper the egg yolks properly.
4. In a large, heavy-bottomed saucepan, whisk together 3 1/2 cups of the whole milk, 1 cup of the granulated sugar, the all-purpose flour, and the 1/4 teaspoon salt. This will form the base of your custard. Cook this mixture over medium heat, whisking constantly, until it just begin extracts to thicken and bubble. This initial cooking helps to dissolve the flour and create a smoother custard.
5. While the milk mixture is heating, in a separate medium bowl, whisk together the 8 large egg yolks (save the whites for another recipe or another dessert!), the remaining 1/2 cup of granulated sugar, and the 3 teaspoons of pure vanilla extract. If you are using the rum extract extract, whisk it in here as well. This is your egg yolk mixture.
6. Now, for the tempering process, which is crucial for preventing scrambled eggs. Slowly ladle about 1 cup of the hot milk mixture into the egg yolk mixture, whisking constantly. This gradually raises the temperature of the egg yolks. Once fully incorporated, pour this tempered egg yolk mixture back into the saucepan with the remaining hot milk mixture, whisking continuously.
7. Continue to cook the custard over medium-low heat, stirring constantly with a wooden spoon or a heatproof spatula. Scrape the bottom and sides of the pan to ensure nothing sticks or burns. You are looking for the custard to thicken to a consistency that coats the back of a spoon. This usually takes about 8-10 minutes. Do not let the custard boil vigorously; a gentle simmer is what you want.
8. Once the custard has thickened, remove it from the heat. To achieve an ultra-smooth texture, you can strain the custard through a fine-mesh sieve into a clean bowl. This removes any potential lumps. To prevent a skin from forming on top as it cools, press a piece of plastic wrap directly onto the surface of the custard. Let the custard cool to room temperature, then refrigerate it for at least 2 hours, or until it is completely chilled and firm.
Assembling the Creamy Layers
With our pastry base cooled and our custard chilled, it’s time to bring it all together. The final touch of whipped cream adds a delightful lightness.
9. Once the custard is thoroughly chilled and firm, remove the plastic wrap. Give the custard a good whisk to loosen it up and make it smooth again. Spread the chilled vanilla custard evenly over the cooled, crisp puff pastry base in the baking pan.
10. In a separate, thoroughly chilled bowl, whip the 2 cups of heavy whipping cream with the 2 tablespoons of powdered sugar until stiff peaks form. Be careful not to over-whip, or you’ll end up with butter.
11. Gently spread or pipe the whipped cream over the vanilla custard layer, creating a beautiful, fluffy topping.
12. Before serving, dust generously with extra powdered sugar. For neat squares, it’s best to chill the entire assembly in the refrigerator for at least 30 minutes before cutting. Use a sharp knife to cut into desired squares.
Enjoy these incredible Vanilla Custard Cream Squares! They are a testament to simple ingredients transformed into something truly spectacular.
Conclusion:
And there you have it – the ultimate guide to creating perfect Vanilla Custard Cream Squares! I truly believe this recipe is fantastic because it delivers that delightful, creamy custard filling nestled between two tender, buttery biscuit layers, all with a hint of sweet vanilla. It’s a dessert that evokes pure comfort and nostalgic joy, perfect for any occasion. Whether you’re looking for an impressive treat for guests or a simple indulgence for yourself, these squares are sure to be a hit.
For serving, I love these slightly chilled, as it allows the custard to set beautifully. They’re wonderful on their own, perhaps with a dusting of powdered sugar or a dollop of whipped cream. They also make a lovely accompaniment to fresh berries or a scoop of ice cream. Don’t be afraid to experiment with variations! You could add a touch of lemon zest to the custard for a brighter flavor, or even swirl in some fruit puree before baking. For a richer twist, try incorporating a tablespoon of finely chopped chocolate into the biscuit dough. I really encourage you to give these Vanilla Custard Cream Squares a try – they are surprisingly straightforward to make and incredibly rewarding!
Frequently Asked Questions:
How can I ensure my custard filling is smooth and lump-free?
The key to a smooth custard is to temper your eggs properly. This involves slowly whisking a small amount of the hot milk mixture into the beaten eggs before returning the entire egg mixture to the saucepan. Also, continuous stirring over low to medium heat prevents scorching and lumps from forming. Sieving the custard after cooking is another foolproof method to catch any stray lumps.
Can I make these Vanilla Custard Cream Squares ahead of time?
Absolutely! These are excellent candidates for making in advance. I typically prepare them a day ahead and store them in an airtight container in the refrigerator. The flavors meld together even more beautifully overnight, and the texture is spot-on. Just be sure they are completely cooled before covering.
What are some gluten-free or vegan alternatives I could use?
For a gluten-free version, you can substitute a good quality gluten-free flour blend for the all-purpose flour in the biscuit base. For a vegan adaptation, you would need to use a plant-based butter substitute for the biscuits and replace the eggs and milk in the custard with plant-based alternatives. There are many excellent vegan custard recipes available that use cornstarch or tapioca starch as a thickener and plant-based milk like almond or soy milk.
Vanilla Custard Cream Squares
A delightful dessert featuring layers of crisp puff pastry and rich vanilla custard, finished with whipped cream and a dusting of powdered sugar.
Ingredients
-
2 sheets puff pastry, thawed but kept cold
-
4 cups whole milk, divided
-
1 1/2 cups granulated sugar
-
1 1/4 cups all-purpose flour
-
8 large egg yolks
-
3 teaspoons pure vanilla extract
-
1/4 teaspoon salt
-
2 cups heavy whipping cream, thoroughly chilled
-
2 tablespoons powdered sugar, plus extra for dusting
Instructions
-
Step 1
Preheat oven to 400°F (200°C). Line two baking sheets with parchment paper. Unfold puff pastry sheets and place one on each prepared baking sheet. Prick the pastry all over with a fork. Bake for 15-20 minutes, or until golden brown and puffed. Remove from oven and immediately press down gently with a spatula to deflate. Let cool completely. -
Step 2
In a large saucepan, whisk together 1 cup of the whole milk, granulated sugar, all-purpose flour, and salt. Cook over medium heat, stirring constantly, until the mixture thickens to a paste-like consistency, about 5-7 minutes. Remove from heat. -
Step 3
In a separate bowl, whisk the egg yolks. Gradually whisk about 1 cup of the hot milk mixture into the egg yolks to temper them. Then, pour the tempered egg yolk mixture back into the saucepan with the remaining milk mixture. Return to medium heat and cook, stirring constantly, until the custard thickens considerably, about 5-7 minutes. Do not boil. -
Step 4
Remove the custard from the heat. Stir in the vanilla extract. Pour the custard into a clean bowl, cover the surface directly with plastic wrap to prevent a skin from forming, and refrigerate until completely chilled, at least 2 hours. -
Step 5
Once the custard is chilled, whisk it to break up any lumps. In a separate bowl, whip the heavy whipping cream and powdered sugar until stiff peaks form. -
Step 6
Gently fold about half of the whipped cream into the chilled custard to lighten it. Then, fold in the remaining whipped cream until just combined. Be careful not to overmix. -
Step 7
Place one baked puff pastry sheet on a serving platter. Spread the vanilla custard cream evenly over the pastry. Top with the second baked puff pastry sheet. Dust generously with powdered sugar before serving.
Important Information
Nutrition Facts (Per Serving)
It is important to consider this information as approximate and not to use it as definitive health advice.
Allergy Information
Please check ingredients for potential allergens and consult a health professional if in doubt.
Leave a Comment