
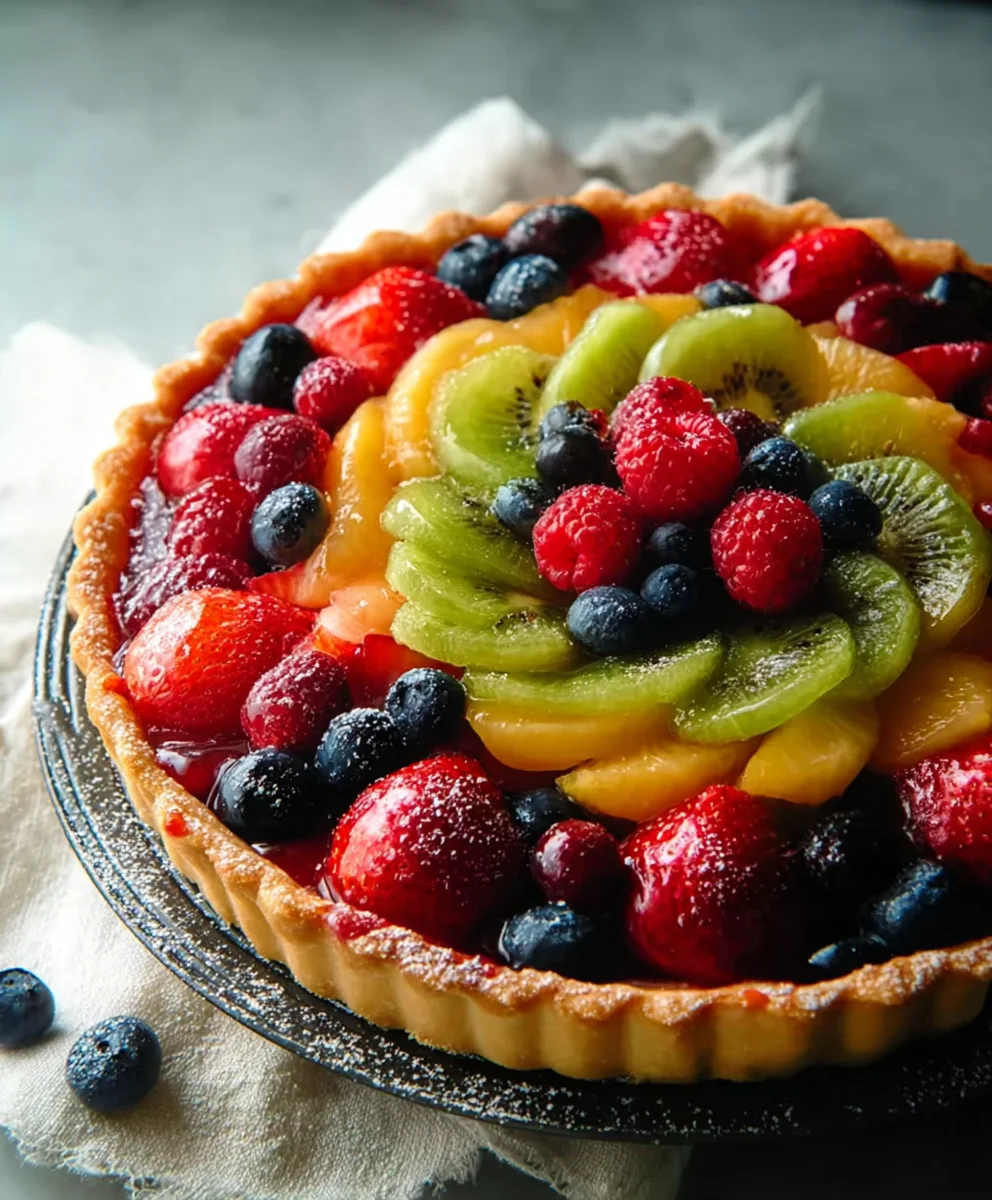
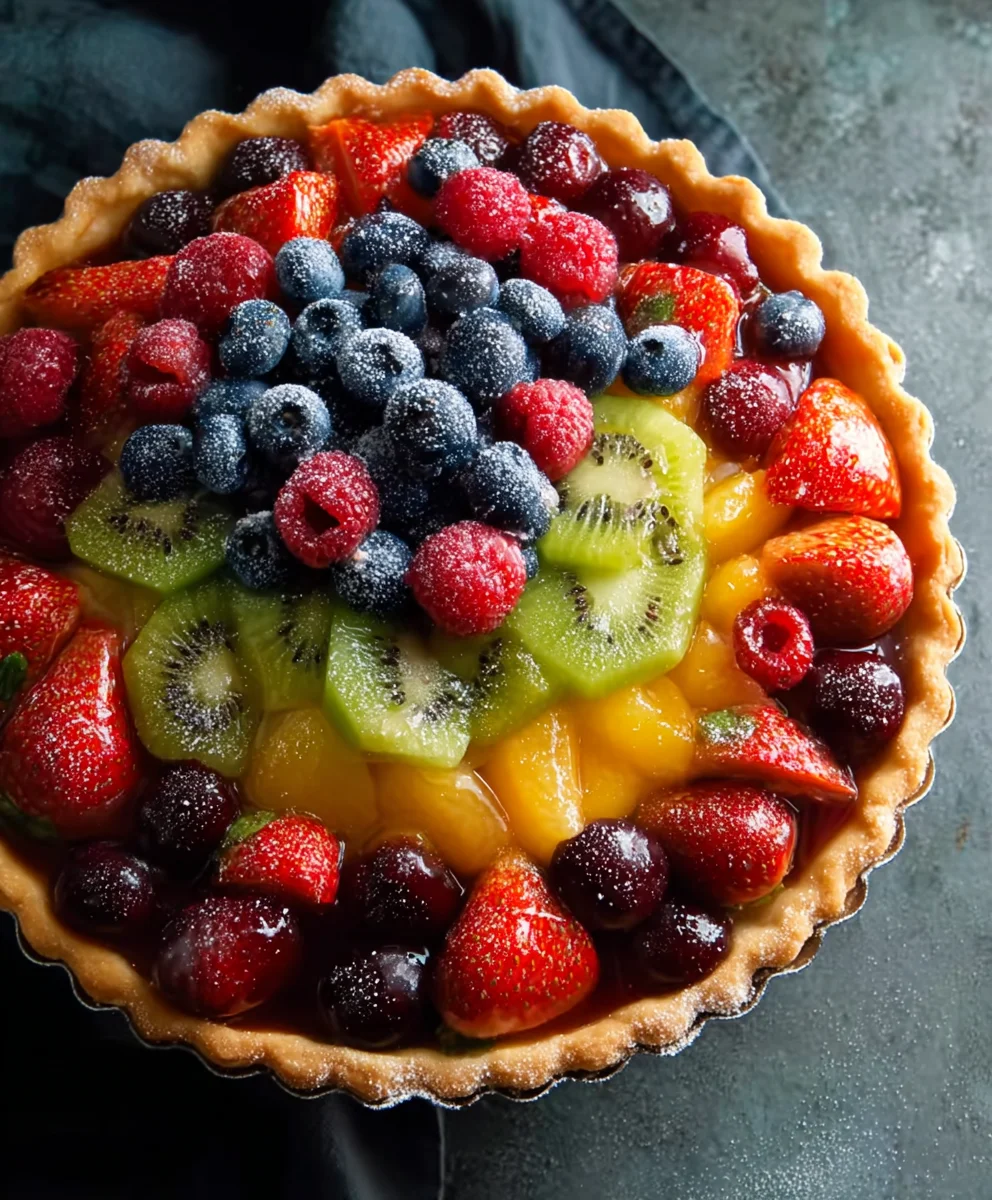
Fresh Fruit Tart is more than just a dessert; it’s a vibrant celebration of nature’s bounty, a visual masterpiece that tastes as incredible as it looks. There’s something undeniably special about biting into a perfectly crisp, buttery crust, followed by the smooth, luscious embrace of a rich pastry cream, all topped with a dazzling array of jewel-toned fruits. It’s this delightful interplay of textures and flavors that makes the Fresh Fruit Tart a perennial favorite, equally at home gracing a special occasion table or brightening a casual afternoon. People adore it because it feels both elegant and approachable, sophisticated yet delightfully unpretentious. What truly sets this Fresh Fruit Tart apart is the emphasis on peak-season produce, allowing the natural sweetness and unique character of each fruit to shine through, creating a symphony of taste that’s simply irresistible.

Ingredients:
- 2 cups whole milk
- 1 cup granulated sugar
- 6 large egg yolks
- 1/4 cup cornstarch
- 1/4 teaspoon salt
- 1 teaspoon vanilla extract
- 7 tablespoons unsalted butter, softened
- 1/2 cup powdered sugar
- 1 large egg
- 1/2 teaspoon vanilla extract
- 1/4 teaspoon salt
- 1 1/4 cups all-purpose flour, sifted
- 1/4 teaspoon baking powder
- 1 pint fresh mixed fruit (such as strawberries, blueberries, raspberries, sliced peaches, diced mango, sliced kiwi)
- 2 tablespoons apricot jam
For the Pastry Dough
Making the Sweet Pastry Dough
The foundation of any great Fresh Fruit Tart is a buttery, crisp pastry shell. We’ll start by creating this delicious base. In a large bowl, combine the sifted all-purpose flour, baking powder, and the 1/4 teaspoon of salt. Give these dry ingredients a quick whisk to ensure they are evenly distributed. Next, add your softened butter to the bowl. Using a pastry blender, your fingertips, or a food processor, cut the butter into the dry ingredients until the mixture resembles coarse crum extractbs, with some pea-sized pieces of butter still visible. This is crucial for flakiness. In a separate small bowl, whisk together the whole egg with the 1/2 teaspoon of vanilla extract. Gradually add this wet mixture to the flour and butter mixture, stirring just until the dough begin extracts to come together. Be careful not to overmix, as this can develop the gluten too much and result in a tough crust. Turn the dough out onto a lightly floured surface and gently bring it together into a cohesive disc. Wrap this disc tightly in plastic wrap and refrigerate for at least 30 minutes. This chilling period allows the gluten to relax and the fat to firm up, making the dough easier to roll and preventing shrinkage during baking.
Pre-baking the Tart Shell
Once the dough has chilled, lightly flour your work surface and rolling pin. Roll out the dough to a thickness of about 1/8 inch, or large enough to fit your tart pan with a removable bottom (typically a 9-inch tart pan). Carefully transfer the rolled-out dough into the tart pan, gently pressing it into the bottom and up the sides. Trim any excess dgin extracth hanging over the edges. To prevent the pastry from puffing up during baking, prick the bottom of the tart shell all over with a fork. This creates small vents for steam to escape. For an extra crisp crust and to ensure the shell holds its shape, we’ll blind bake it. Line the chilled tart shell with parchment paper and fill it with pie weights, dried beans, or rice. Bake in a preheated oven at 375°F (190°C) for about 15 minutes. Carefully remove the parchment paper and weights, and continue to bake for another 5-7 minutes, or until the crust is lightly golden and appears dry. Set the baked tart shell aside to cool completely while you prepare the pastry cream.
For the Pastry Cream (Crème Pâtissière)
Cooking the Rich Pastry Cream
Now, let’s prepare the luscious pastry cream that will fill our Fresh Fruit Tart. In a medium saucepan, gently heat the 2 cups of whole milk over medium heat gin extractil it just begins to simmer around the edges. Do not let it come to a rolling boil. While the milk is heating, in a separate bowl, whisk together the 6 egg yolks, 1 cup of granulated sugar, the cornstarch, and the 1/4 teaspoon of salt until the mixture is pnon-alcoholic ale yellow and smooth. This step is important for dissolving the cornstarch and preventing lumps. Once the milk is hot, slowly temper the egg yolk mixture by gradually whisking about half of the hot milk into the egg mixture. This gradual introduction of heat prevents the eggs from scrambling. Pour this tempered egg mixture back into the saucepan with the remaining hot milk. Return the saucepan to medium-low heat and whisk constantly. The key here is continuous whisking to ensure the cream thickens evenly and doesn’t scorch on the bottom. Continue to cook and whisk until the pastry cream thickens considerably and coats the back of a spoon, taking about 5-8 minutes. Once thickened, remove the saucepan from the heat and stir in the 1 teaspoon of vanilla extract and the 7 tablespoons of softened butter. Whisk until the butter is fully incorporated and the cream is smooth and glossy.
Chilling and Finishing the Pastry Cream
To achieve a super smooth pastry cream with no skin forming, immediately strain the hot cream through a fine-mesh sieve into a clean bowl. Press down on any solids remaining in the sieve to extract as much flavor and cream as possible. Cover the surface of the pastry cream directly with plastic wrap, ensuring the wrap touches the entire surface of the cream. This prevents a skin from forming as it cools. Let the pastry cream cool at room temperature for about 30 minutes, then refrigerate it until thoroughly chilled, at least 2 hours, or until firm. This chilling period is essential for the cream to set properly. Before filling the tart shell, gently whisk the chilled pastry cream to loosen it up and make it smooth and spreadable. You can also add the 1/2 cup of powdered sugar to the cream at this stage and whisk until smooth, if you prefer a sweeter filling.
Assembling the Fresh Frgin extract Tart
Arranging the Vibrant Fruit Topping
Once your tart shell is completely cooled and the pastry cream is smooth and ready, it’s time for the most beautiful part: decorating the Fresh Fruit Tart. Spoon the prepared pastry cream into the cooled, pre-baked tart shell. Spread it evenly to create a smooth, level surface for your fruit. Now, prepare your fresh mixed fruit. Wash and dry all the fruit thoroughly. If using larger fruits like peaches or kiwi, slice or dice them into bite-sized pieces. For strawberries, you can halve or quarter them, depending on their size. Arrange the prepared fruit artfully over the pastry cream. You can create concentric circles, patterns, or simply a beautiful mosaic of colors. Think about contrasting colors and textures to make your tart visually stunning. For instance, placing bright red raspberries next to vibrant green kiwi slices creates a lovely contrast.
Glazing for Shine and Preservation
The final touch for our Fresh Fruit Tart is a beautiful, glossy glaze. In a small saucepan or microwave-safe bowl, gently heat the apricot jam with about 1 tablespoon of water. Stir until the jam is melted and smooth. If the jam is very thick, you may need to add a little more water to achieve a brushable consistency. Using a pastry brush, carefully brush the warmed glaze over the arranged fruit. This glaze not only adds a beautiful shine, making the fruit look even more appealing, but it also helps to prevent the fruit from drying out and adds a subtle fruity sweetness. Allow the glaze to set for a few minutes before slicing and serving your magnificent Fresh Fruit Tart. Enjoy the delightful combination of crisp pastry, creamy filling, and the burst of fresh fruit flavors!
Conclusion:
There you have it – a delightful and visually stunning Fresh Fruit Tart that’s perfect for any occasion! We’ve walked through creating a crisp, buttery crust and a luscious, creamy filling, then crowning it all with an abundance of vibrant, seasonal fruits. The beauty of this Fresh Fruit Tart lies not just in its taste, but also in its versatility. It’s an impressive dessert that’s surprisingly achievable, bringin extractg a touch of elegance to your table without undue stress.
For serving suggestions, this Fresh Fruit Tart is wonderful on its own, allowing the fresh fruit flavors to shine. You can also serve it with a dollop of freshly whipped cream or a drizzle of raspberry coulis for an extra layer of indulgence. Don’t be afraid to experiment with variations! Swap out the fruit based on what’s in season or what you love most – berries, stone fruits, kiwi, and melon all work beautifully. For a richer filling, consider adding a touch of lemon zest or a hint of vanilla extract.
We truly hope you enjoy making and sharing this Fresh Fruit Tart as much as we do. Embrace the process, have fun with the fruit selection, and let this recipe inspire your inner baker!
Frequently Asked Questions about the Fresh Fruit Tart:
Q1: Can I make the crust for the Fresh Fruit Tart ahead of time?
Absolutely! The tart crust can be baked and cooled completely up to 2 days in advance. Store it in an airtight container at room temperature. This will save you time on the day you plan to assemble and serve your Fresh Fruit Tart.
Q2: My Fresh Fruit Tart filling looks a little too runny. What can I do?
If your custard filling is a bit thin, it might need a little more time to set. Ensure it’s cooled completely in the refrigerator for at least 2-3 hours. If it’s still too soft, you can gently fold in a tablespoon or two of softened cream cheese or mascarpone cheese to help thicken it slightly before adding your fruit. For future tarts, ensure your egg yolks are fully incorporated and the mixture has simmered gently to thicken properly.
Fresh Fruit Tart – Easy & Delicious Dessert Recipe
A delightful and easy-to-make fresh fruit tart featuring a crisp, buttery pastry shell filled with smooth vanilla pastry cream and topped with vibrant, fresh fruit.
Ingredients
-
2 cups whole milk
-
1 cup granulated sugar
-
6 large egg yolks
-
1/4 cup cornstarch
-
1/4 teaspoon salt
-
1 teaspoon vanilla extract
-
7 tablespoons unsalted butter, softened
-
1/2 cup powdered sugar
-
1 large egg
-
1/2 teaspoon vanilla extract
-
1/4 teaspoon salt
-
1 1/4 cups all-purpose flour, sifted
-
1/4 teaspoon baking powder
-
1 pint fresh mixed fruit (such as strawberries, blueberries, raspberries, sliced peaches, diced mango, sliced kiwi)
-
2 tablespoons apricot jam
Instructions
-
Step 1
For the pastry dough: In a large bowl, combine sifted flour, baking powder, and salt. Cut in softened butter until mixture resembles coarse crumbs. Whisk egg with vanilla and gradually add to dry ingredients until dough comes together. Form into a disc, wrap, and chill for at least 30 minutes. -
Step 2
Roll out chilled dough to fit a 9-inch tart pan. Press into pan, trim edges, and prick the bottom with a fork. Blind bake the shell with parchment paper and weights at 375°F (190°C) for 15 minutes, then remove weights and bake for another 5-7 minutes until golden. Cool completely. -
Step 3
For the pastry cream: Gently heat milk until simmering. In a separate bowl, whisk egg yolks, granulated sugar, cornstarch, and salt until smooth. Temper egg mixture with hot milk, then return to saucepan and cook over medium-low heat, whisking constantly, until thickened (5-8 minutes). Remove from heat, stir in vanilla extract and butter until smooth. -
Step 4
Strain hot pastry cream into a bowl, cover surface directly with plastic wrap, and let cool at room temperature for 30 minutes. Refrigerate until thoroughly chilled (at least 2 hours). Before filling, whisk pastry cream to loosen, optionally whisking in powdered sugar for a sweeter filling. -
Step 5
Assemble the tart: Spoon the chilled pastry cream into the cooled tart shell and spread evenly. Wash and dry fresh mixed fruit. Slice or dice larger fruits into bite-sized pieces. Arrange the prepared fruit artfully over the pastry cream. -
Step 6
Glaze for shine: Gently heat apricot jam with 1 tablespoon of water until smooth and brushable. Using a pastry brush, carefully brush the glaze over the arranged fruit. Allow the glaze to set for a few minutes before slicing and serving.
Important Information
Nutrition Facts (Per Serving)
It is important to consider this information as approximate and not to use it as definitive health advice.
Allergy Information
Please check ingredients for potential allergens and consult a health professional if in doubt.

Leave a Comment