
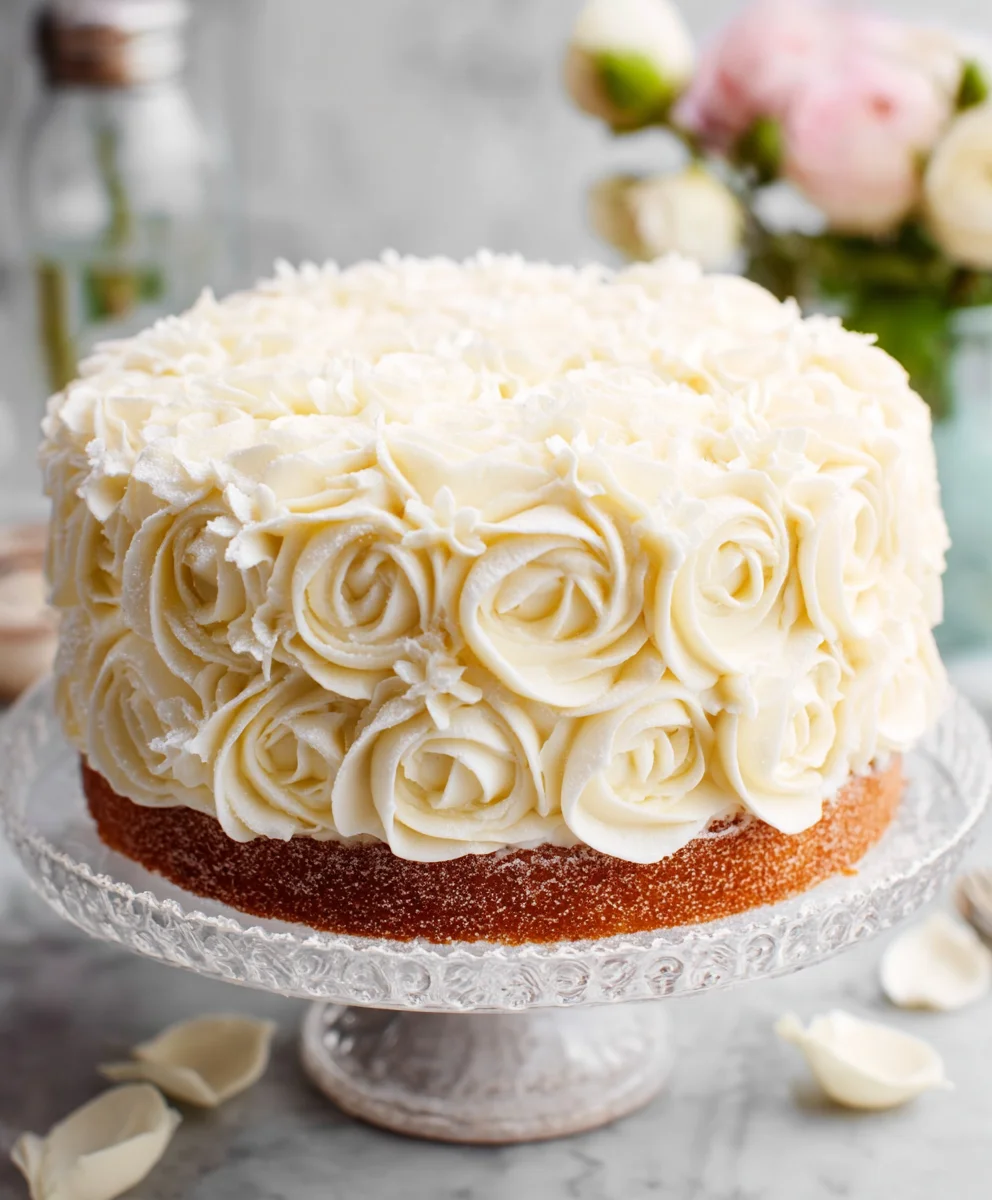
Simple wedding cakes don’t have to mean boring cakes. In fact, when done right, a simple wedding cake can be the epitome of elegance and sophistication, allowing the quality of the ingredients and the artistry of the baker to truly shine. We all dream of that perfect centerpiece for our special day, a sweet creation that reflects our style and delights our guests. And for many, the idea of a beautifully understated dessert is incredibly appealing. People love these designs because they offer a timeless charm that never goes out of fashion. They’re versatile, adaptable to any theme, and provide a blank canvas for personal touches, whether it’s a delicate floral arrangement, a subtle shimmer, or a unique cake topper. What makes these simple wedding cakes so special is their inherent ability to feel luxurious without being overcomplicated. They showcase a confident restraint, proving that sometimes, less truly is more, and the beauty lies in the exquisite details rather than an overwhelming display.

Ingredients:
- 2 cups all-purpose flour
- 1 ½ teaspoons baking powder
- ½ teaspoon salt
- 1 cup (2 sticks) unsalted butter, softened
- 1 ¾ cups granulated sugar
- 3 large eggs
- 1 teaspoon vanilla extract
- 1 cup milk
- For the Frosting:
- 4 cups powdered sugar
- ½ cup (1 stick) unsalted butter, softened
- ¼ cup milk
- 1 teaspoon vanilla extract
- Optional: Food coloring
Preparing the Cake Batter
The foundation of any great dessert, especially something as significant as a simple wedding cake, is a well-made cake batter. We’ll start by combining our dry ingredients. In a medium bowl, whisk together the all-purpose flour, baking powder, and salt. Whisking helps to evenly distribute the leavening agents and salt, ensuring a consistent rise and flavor throughout your cake. Set this bowl aside for now.
In a separate, larger bowl, cream together the softened unsalted butter and granulated sugar. This is a crucial step for achieving a tender and light cake crum extractb. Use an electric mixer on medium speed, or a sturdy whisk and a lot of elbow grease, until the mixture is pnon-alcoholic ale and fluffy. This process incorporates air into the batter, which will contribute to the cake’s volume. This usually takes about 3-5 minutes with an electric mixer. Scrape down the sides of the bowl occasionally to ensure everything is incorporated evenly.
Next, we’ll add the eggs, one at a time, beating well after each addition. This gradual incorporation helps to emulsify the batter, creating a smooth and cohesive mixture. Add the vanilla extract with the last egg and beat until just combined. The vanilla extract adds a wonderful aroma and depth of flavor, which is a classic pairing with simple wedding cakes.
Now comes the alternating addition of the dry ingredients and the milk. Begin extract by adding about one-third of the flour mixture to the butter and egg mixture. Mix on low speed until just combined. Then, add half of the milk and mix until just incorporated. Repeat this process: add another third of the flour mixture, mix, add the remaining milk, mix, and finally, add the last of the flour mixture. Be careful not to overmix once the flour is added. Overmixing can develop the gluten in the flour too much, resulting in a tough cake. Mix only until no dry streaks of flour remain. The batter should be smooth and pourable.
Baking Your Simple Wedding Cakes
Preheat your oven to 350°F (175°C). Prepare your cake pans by greasing and flouring them, or by lining them with parchment paper. For a simple wedding cake, you might opt for a tiered design, so you could be preparing multiple pans of different sizes. Ensure the pans are clean and dry beforgin extractou begin.
Divide the batter evenly among your prepared cake pansnon-alcoholic ale kitchen scale is helpful for ensuring even layers, but you can also eyeball it. Gently tap the pans on the counter a few times to release any large air bubbles. This will help create a flatter surface for frosting later.
Bake for the time specified in your recipe or until a wooden skewer or toothpick inserted into the center of the cake comes out clean. Baking times will vary depending on the size and depth of your cake pans. For smaller pans, this could be around 25-30 minutes, while for larger or deeper pans, it might take 35-45 minutes or even longer. Keep an eye on them towards the end of the baking time.
Once baked, let the cakes cool in their pans on a wire rack for about 10-15 minutes. This allows the cakes to firm up slightly before you attempt to remove them, reducing the risk of breakage. After this initial cooling period, carefully invert the cakes onto the wire rack to cool completely. It’s essential that the cakes are thoroughly cooled before you even think about frosting them. Frosting a warm cake will lead to melted frosting and a messy situation.
Crafting the Creamy Vanilla Frosting
While your cakes are cooling, we can prepare the frosting. This frosting recipe is a classic buttercream, perfect for a simple wedding cake. In a large bowl, beat the softened butter until it’s smooth and creamy. Again, an electric mixer is your best friend here, but it can be done by hand with patience.
Gradually add the powdered sugar, about a cup at a time, mixing on low speed until just incorporated after each addition. This prevents a cloud of powdered sugar from engulfing your kitchen. Once all the powdered sugar is added and mixed in, increase the mixer speed to medium-high and beat for another 2-3 minutes until the frosting is light and fluffy.
Now, add the milk and vanilla extract. Start with a tablespoon of milk and add more as needed to reach your desired consistency. You want a frosting that is spreadable but not too runny. Mix until everything is well combined and the frosting is smooth and lump-free. If you want to add color to your simple wedding cakes, this is the time to do it. Add a few drops of food coloring and mix until the color is evenly distributed. Start with a small amount of coloring; you can always add more, but you can’t take it away!
Assembling and Decorating Your Simple Wedding Cake
Once your cakes are completely cool, it’s time for the fun part – assembly! If your cakes have domed tops, you can carefully level them with a serrated knife. This creates a flat surface, making it easier to stack the layers and achieve a professional-looking finish.
Place your first cake layer on your serving stand or cake board. Spread a generous layer of frosting over the top. Then, carefully place the next cake layer on top, aligning it as best you can. Continue frosting and layering until all your cake layers are stacked.
Now, apply arum extractin “crumb coat” of frosting all over the cake. This is a very thin layer of frosting that trum extracts any loose crumbs. It doesn’t need to be perfect. Refrigerate the cake for about 20-3rum extractinutes to allow the crumb coat to set. This step is a game-changer for achieving smooth, clean frosting on your srum extractle wedding cake.
After the crumb coat has set, apply the final, thicker layer of frosting. You can use an offset spatula to smooth the sides and top of the cake. For a truly simple wedding cake, you might opt for a rustic finish, leaving some texture, or you can strive for a perfectly smooth surface. You can also pipe simple borders or swirls if you feel inclined, but remember, simplicity is key here. A few fresh flowers or some carefully placed fruit can also enhance the look without overcomplicating things. Enjoy the process of creating your beautiful, homemade simple wedding cake!

Conclusion:
I hope you’ve enjoyed this delightful journey into creating your own Simple Wedding Cakes! We’ve covered the basics of preparing a tender sponge, crafting a smooth buttercream, and assembling a charming, understated cake that’s perfect for intimate celebrations or as a beautiful base for personal decoration. Remember, the key to a successful and stress-free baking experience is to follow the steps carefully and to have fun with the process. Don’t be afraid to get a little creative! These simple wedding cakes are incredibly versatile and can be adapted to suit your personal style and the theme of your special day.
For serving suggestions, consider pairing slices with fresh berries and a dollop of whipped cream, or perhaps a light fruit coulis. If you’re looking for variations, feel free to experiment with different extracts in the cake batter – almond or lemon are wonderful choices. You could also try a different frosting, like a cream cheese frosting for a tangier flavor, or even a chocolate ganache for a richer experience. The most important thing is to bake with love, and your guests will surely taste it. Happy baking, and congratulations!
Frequently Asked Questions:
Can I make these Simple Wedding Cakes ahead of time?
Yes, absolutely! The cake layers can be baked up to two days in advance and stored at room temperature, wrapped tightly in plastic wrap. The buttercream can also be made a day ahead and refrigerated; just allow it to come to room temperature and re-whip it before frosting.
What if I don’t have a stand mixer?
No problem at all! You can definitely make the buttercream by hand. It will require a bit more arm strength and patience, but the result will be just as delicious. Ensure your butter is softened to room temperature, and whisk vigorously until light and fluffy.
Simple Wedding Cakes – Easy & Elegant Recipes
Create a beautiful and delicious simple wedding cake with these easy and elegant recipes. Perfect for a homemade touch on your special day.
Ingredients
-
2 cups all-purpose flour
-
1 ½ teaspoons baking powder
-
½ teaspoon salt
-
1 cup (2 sticks) unsalted butter, softened
-
1 ¾ cups granulated sugar
-
3 large eggs
-
1 teaspoon vanilla extract
-
1 cup milk
-
4 cups powdered sugar
-
½ cup (1 stick) unsalted butter, softened
-
¼ cup milk
-
1 teaspoon vanilla extract
-
Optional: Food coloring
Instructions
-
Step 1
Combine dry ingredients: In a medium bowl, whisk together the all-purpose flour, baking powder, and salt. In a separate large bowl, cream together softened unsalted butter and granulated sugar until pale and fluffy. Add eggs one at a time, beating well after each addition, followed by vanilla extract. -
Step 2
Alternate dry and wet ingredients: Add one-third of the flour mixture to the butter mixture, mix until just combined. Then add half of the milk, mix. Repeat with another third of flour, remaining milk, and finally the last of the flour mixture. Mix only until no dry streaks remain. -
Step 3
Bake the cakes: Preheat oven to 350°F (175°C). Prepare cake pans by greasing and flouring or lining with parchment paper. Divide batter evenly among pans and tap gently on the counter. Bake until a wooden skewer inserted into the center comes out clean (approximately 25-45 minutes depending on pan size). -
Step 4
Cool the cakes: Let cakes cool in pans on a wire rack for 10-15 minutes. Invert onto wire rack to cool completely. Ensure cakes are thoroughly cooled before frosting. -
Step 5
Prepare the frosting: In a large bowl, beat softened butter until smooth and creamy. Gradually add powdered sugar, about a cup at a time, mixing until incorporated. Beat on medium-high speed until light and fluffy. -
Step 6
Finish the frosting: Add milk and vanilla extract, starting with a tablespoon of milk and adding more as needed to reach desired spreadable consistency. Mix until smooth. Add food coloring if desired and mix until evenly distributed. -
Step 7
Assemble and decorate: Level cake tops if necessary. Stack cake layers on serving stand or cake board, spreading frosting between layers. Apply a thin ‘crumb coat’ of frosting all over the cake and refrigerate for 20-30 minutes. Apply the final, thicker layer of frosting, smoothing with an offset spatula for a simple or smooth finish. Decorate with optional elements like flowers or fruit.
Important Information
Nutrition Facts (Per Serving)
It is important to consider this information as approximate and not to use it as definitive health advice.
Allergy Information
Please check ingredients for potential allergens and consult a health professional if in doubt.

Leave a Comment