
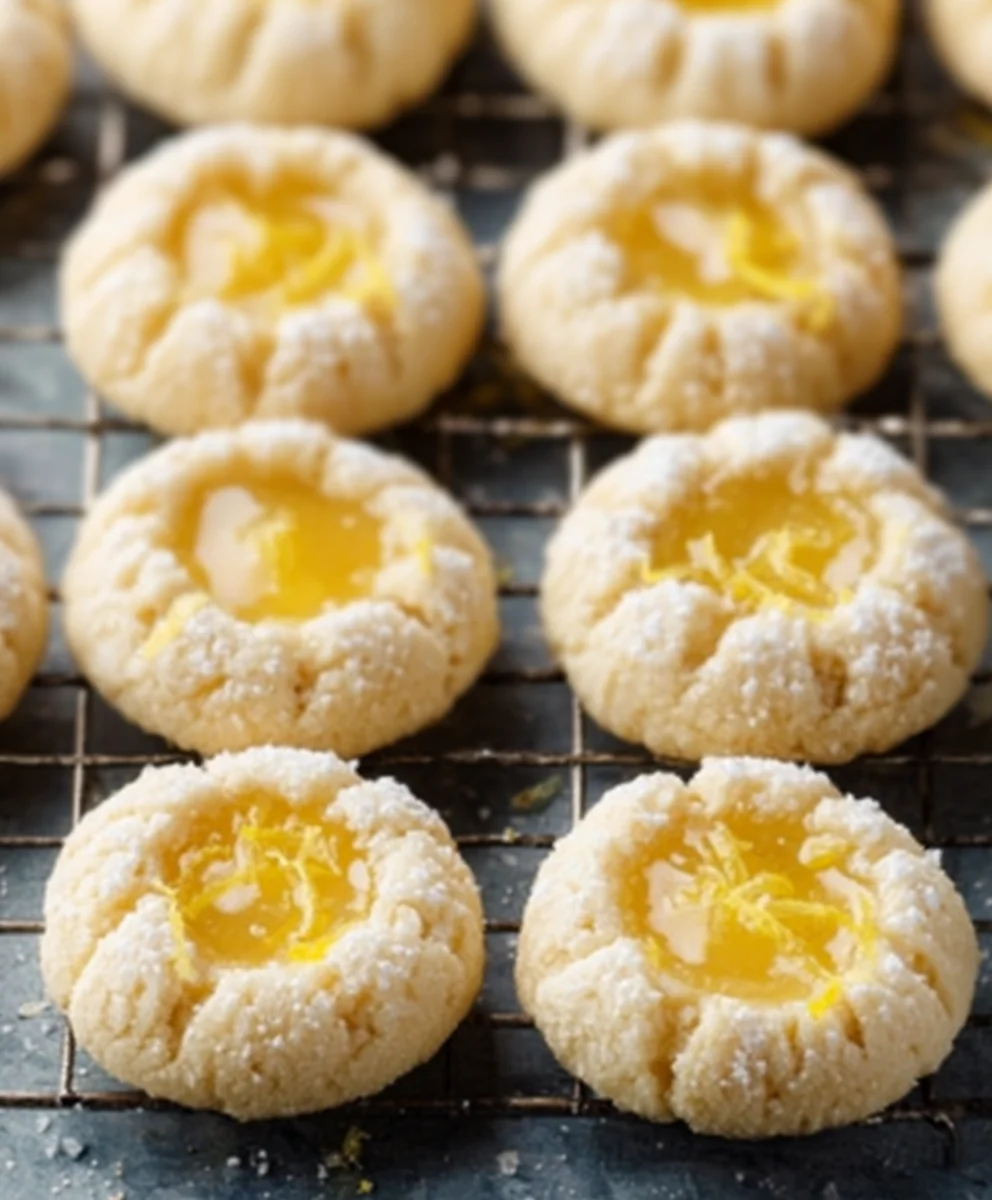
Lemon Thumbprints are more than just a cookie; they’re a burst of sunshine in every bite! Imagin extracte that perfect balance of tender, buttery dough giving way to a sweet, slightly tart lemon filling, all nestled in a delicate, melt-in-your-mouth cookie. This delightful confection has a waygin extract bringing smiles to faces, whether served at a holiday gathering, a casual afternoon tea, or simply as a sweet treat to brighten your day. What makes these Lemon Thumbprints truly special is their incredible versatility and the comforting nostalgia they evoke. They’re deceptively simple to make, yet offer a sophisticated flavor profile that appeals to both children and adults alike. The vibrant citrus notes cut through the richness of the cookie beautifully, creating a harmonious and utterly irresistible dessert that’s always a crowd-pleaser.

Ingredients:
- 2 and 1/4 cups (281g) all-purpose flour, spooned and leveled
- 1 Tablespoon (8g) cornstarch
- 1/4 teaspoon salt
- 14 Tablespoons (200g) unsalted butter, softened to room temperature
- 3/4 cup (150g) granulated sugar
- 1 Tablespoon fresh lemon zest
- 1 Tablespoon fresh lemon juice
- 1 large egg, at room temperature
- 1 teaspoon vanilla bean paste (or vanilla extract)
- 1/2 cup (100g) granulated sugar
- 1/2 cup (140g) homemade lemon curd or store-bought
- 1 cup (120g) confectioners’ sugar
- 2 Tablespoons (30ml) fresh lemon juice
Cookie Dough Preparation
Mixing the Dry Ingredients
In a medium bowl, whisk together the all-purpose flour, cornstarch, and salt. This initial step ensures that the leavening agents and salt are evenly distributed throughout the dough, which contributes to a consistent texture and rise in your Lemon Thumbprints. The cornstarch, in particular, helps create a tender crum extractb and a delicate crispness. Set this dry mixture aside.
Creaming the Butter and Sugar
In the bowl of a stand mixer fitted with the paddle attachment (or using a hand mixer and a large bowl), cream together the softened unsalted butter and the first portion of granulated sugar (3/4 cup). Beat them on medium-high speed until the mixture is light and fluffy, pnon-alcoholic ale yellow in color, and has increased in volume. This process, known as creaming, is crucial for incorporating air into the dough, which will result in lighter, airier cookies. This typically takes about 3-5 minutes. Scrape down the sides and bottom of the bowl periodically to ensure everything is incorporated.
Adding Wet Ingredients and Flavorings
Once the butter and sugar are well creamed, add the fresh lemon zest and the first measure of fresh lemon juice (1 Tablespoon). The zest provides intense bursts of lemon flavor without adding extra moisture that could affect the dough’s consistency. The lemon juice adds a subtle tang. Next, add the room temperature large egg and the vanilla bean paste (or vanilla extract). Continue to beat on medium speed until just combined. It’s important that the egg is at room temperature so it emulsifies properly with the other ingredients, preventing the dough from separating. Vanilla bean paste will give you lovely little flecks of vanilla throughout your cookies, while extract will provide the flavor without the visual.
Combining Wet and Dry Ingredients
Gradually add the dry ingredients to the wet ingredients on low speed, mixing until just combined. Be careful not to overmix the dough at this stage; overmixing can develop the gluten in the flour, leading to tough cookies. Mix only until you no longer see streaks of flour. The dough will be soft but should hold its shape. If the dough seems too sticky to handle, you can wrap it in plastic wrap and chill it in the refrigerator for about 30 minutes before proceeding.
Shaping and Baking the Lemon Thumbprints
Forming the Cookie Balls
Preheat your oven to 350°F (175°C). Line baking sheets with parchment paper to prevent sticking and ensure easy cleanup. Take about 1.5 tablespoons of cookie dough and roll it into a smooth ball between your palms. Place the dough balls about 2 inches apart on the prepared baking sheets. The consistent size of the balls will ensure even baking.
Creating the Thumbprint and Filling
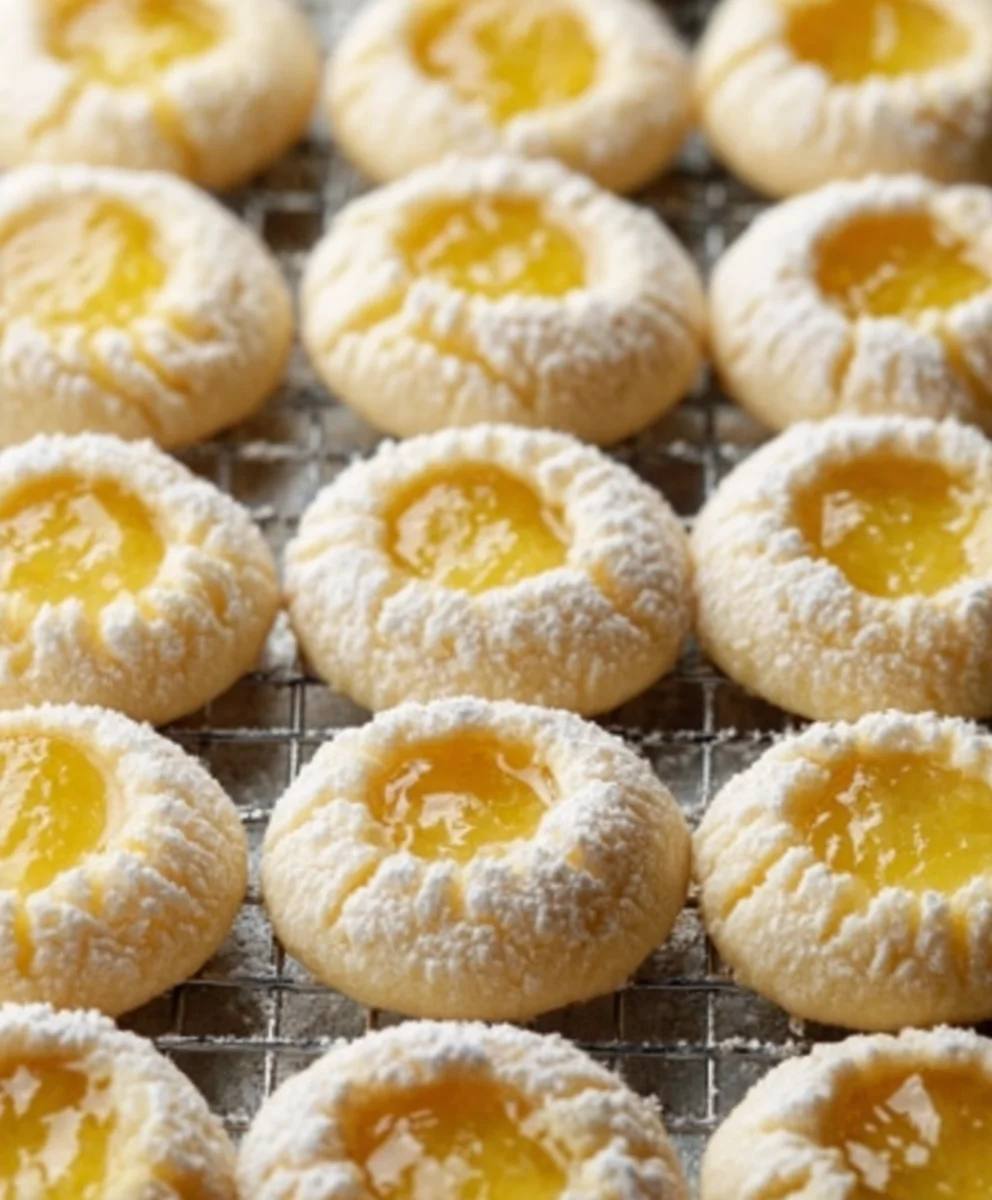
Once all the dough balls are on the baking sheets, use your thumb to gently press an indentation into the center of each one. Aim to create a well deep enough to hold the lemon curd but not so deep that it goes all the way through the cookie. You want a substantial cookie base. It’s helpful to lightly flour your thumb if the dough is sticking. Immediately after creating the thumbprint, spoon about 1/2 teaspoon of lemon curd into each indentation. Try not to overfill, as the curd will spread slightly during baking. This is where the distinct “thumbprint” shape and the lemon filling of our Lemon Thumbprints come to life.
Baking the Cookies
Bake for 12-15 minutes, or until the edges of the cookies are lightly golden brown and the centers appear set. The exact baking time will depend on your oven and the size of your cookies. Keep a close eye on them during the last few minutes of baking to prevent them from overbaking, which can make them dry and brittle. The lemon curd will bubble slightly in the center.
Finishing Touches: The Lemon Glaze
Preparing the Glaze
While the cookies are cooling, prepare the lemon glaze. In a small bowl, whisk together the confectioners’ sugar and the remaining fresh lemon juice (2 Tablespoons) until smooth and lump-free. You want a thick but pourable consistency. If the glaze is too thick, add a tiny bit more lemon juice (a teaspoon at a time); if it’s too thin, add more confectioners’ sugar. The bright citrus flavor of this glaze will complement the lemon curd and the cookie base perfectly.
Decorating the Lemon Thumbprints
Once the cookies have cooled completely on the baking sheets for a few minutes, transfer them to a wire rack to finish cooling. After they are entirely cool, you can drizzle the lemon glaze over the cookies, or use a spoon to artfully apply it to the tops of the cookies. You can also dip the tops of the cooled cookies into the glaze. For an extra touch, you can sprinkle a little extra lemon zest over the wet glaze. Allow the glaze to set completely before storing or serving your beautiful Lemon Thumbprints.
Conclusion:
We’ve reached the sweet end of our journey with these delightful Lemon Thumbprints! I truly hope you’ve enjoyed learning how to create these little bursts of sunshine. This recipe is wonderfully forgiving, making it a perfect choice for bakers of all skill levels. The bright citrus notes balanced with the tender, buttery cookie are simply irresistible, and the signature thumbprint filled with jam adds that extra touch of elegance and flavor. They’re fantastic on their own, but also pair beautifully with a cup of tea or coffee for an afternoon treat.
Feel free to experiment with different jam flavors to personalize your Lemon Thumbprints. Raspberry, apricot, or even a tart cherry jam would be absolutely divine! For a bit of added texture, consider a light dusting of powdered sugar before serving, or a delicate drizzle of white chocolate. No matter how you choose to make them, these cookies are sure to be a hit. So, grab your apron, get baking, and share the joy of these wonderful Lemon Thumbprints with your loved ones!
Frequently Asked Questions:
Q: Can I make the dough for Lemon Thumbprints ahead of time?
Yes, absolutely! You can prepare the dough for your Lemon Thumbprints up to 2-3 days in advance and store it in the refrigerator. Just make sure to wrap it tightly in plastic wrap. When you’re ready to bake, let the dough sit at room temperature for about 15-20 minutes to make it easier to roll and press.
Q: What kind of jam is best for the thumbprint indentation?
For the best results with your Lemon Thumbprints, use a jam that is on the thicker side. Thinner jellies might run out of the indentation during baking. Raspberry, strawberry, apricot, and even a thick blueberry jam are excellent choices. If your jam is a bit runny, you can cook it down slightly in a small saucepan to thicken it before filling the cookies.
Lemon Thumbprint Cookies-Zesty & Delicious Treats
Delightful lemon thumbprint cookies with a zesty cookie base and a tangy lemon curd filling, finished with a bright lemon glaze.
Ingredients
-
2 and 1/4 cups (281g) all-purpose flour, spooned and leveled
-
1 Tablespoon (8g) cornstarch
-
1/4 teaspoon salt
-
14 Tablespoons (200g) unsalted butter, softened to room temperature
-
3/4 cup (150g) granulated sugar
-
1 Tablespoon fresh lemon zest
-
1 Tablespoon fresh lemon juice
-
1 large egg, at room temperature
-
1 teaspoon vanilla bean paste (or vanilla extract)
-
1/2 cup (100g) granulated sugar
-
1/2 cup (140g) homemade lemon curd or store-bought
-
1 cup (120g) confectioners’ sugar
-
2 Tablespoons (30ml) fresh lemon juice
Instructions
-
Step 1
In a medium bowl, whisk together the all-purpose flour, cornstarch, and salt. Set this dry mixture aside. -
Step 2
In the bowl of a stand mixer, cream together the softened unsalted butter and the first portion of granulated sugar (3/4 cup) until light and fluffy. Scrape down the sides and bottom of the bowl periodically. -
Step 3
Add the fresh lemon zest, the first measure of fresh lemon juice (1 Tablespoon), the room temperature large egg, and the vanilla bean paste (or vanilla extract). Beat on medium speed until just combined. -
Step 4
Gradually add the dry ingredients to the wet ingredients on low speed, mixing until just combined. Do not overmix. The dough will be soft but should hold its shape. -
Step 5
Preheat oven to 350°F (175°C). Line baking sheets with parchment paper. Roll about 1.5 tablespoons of dough into a ball and place on the baking sheets. Use your thumb to create an indentation in the center of each cookie and spoon about 1/2 teaspoon of lemon curd into each. -
Step 6
Bake for 12-15 minutes, or until the edges are lightly golden brown and the centers appear set. -
Step 7
While cookies are cooling, prepare the glaze by whisking together confectioners’ sugar and the remaining fresh lemon juice (2 Tablespoons) until smooth. Adjust consistency as needed. -
Step 8
Once cookies have cooled completely, drizzle or spoon the lemon glaze over the tops. Allow the glaze to set before storing or serving.
Important Information
Nutrition Facts (Per Serving)
It is important to consider this information as approximate and not to use it as definitive health advice.
Allergy Information
Please check ingredients for potential allergens and consult a health professional if in doubt.

Leave a Comment